
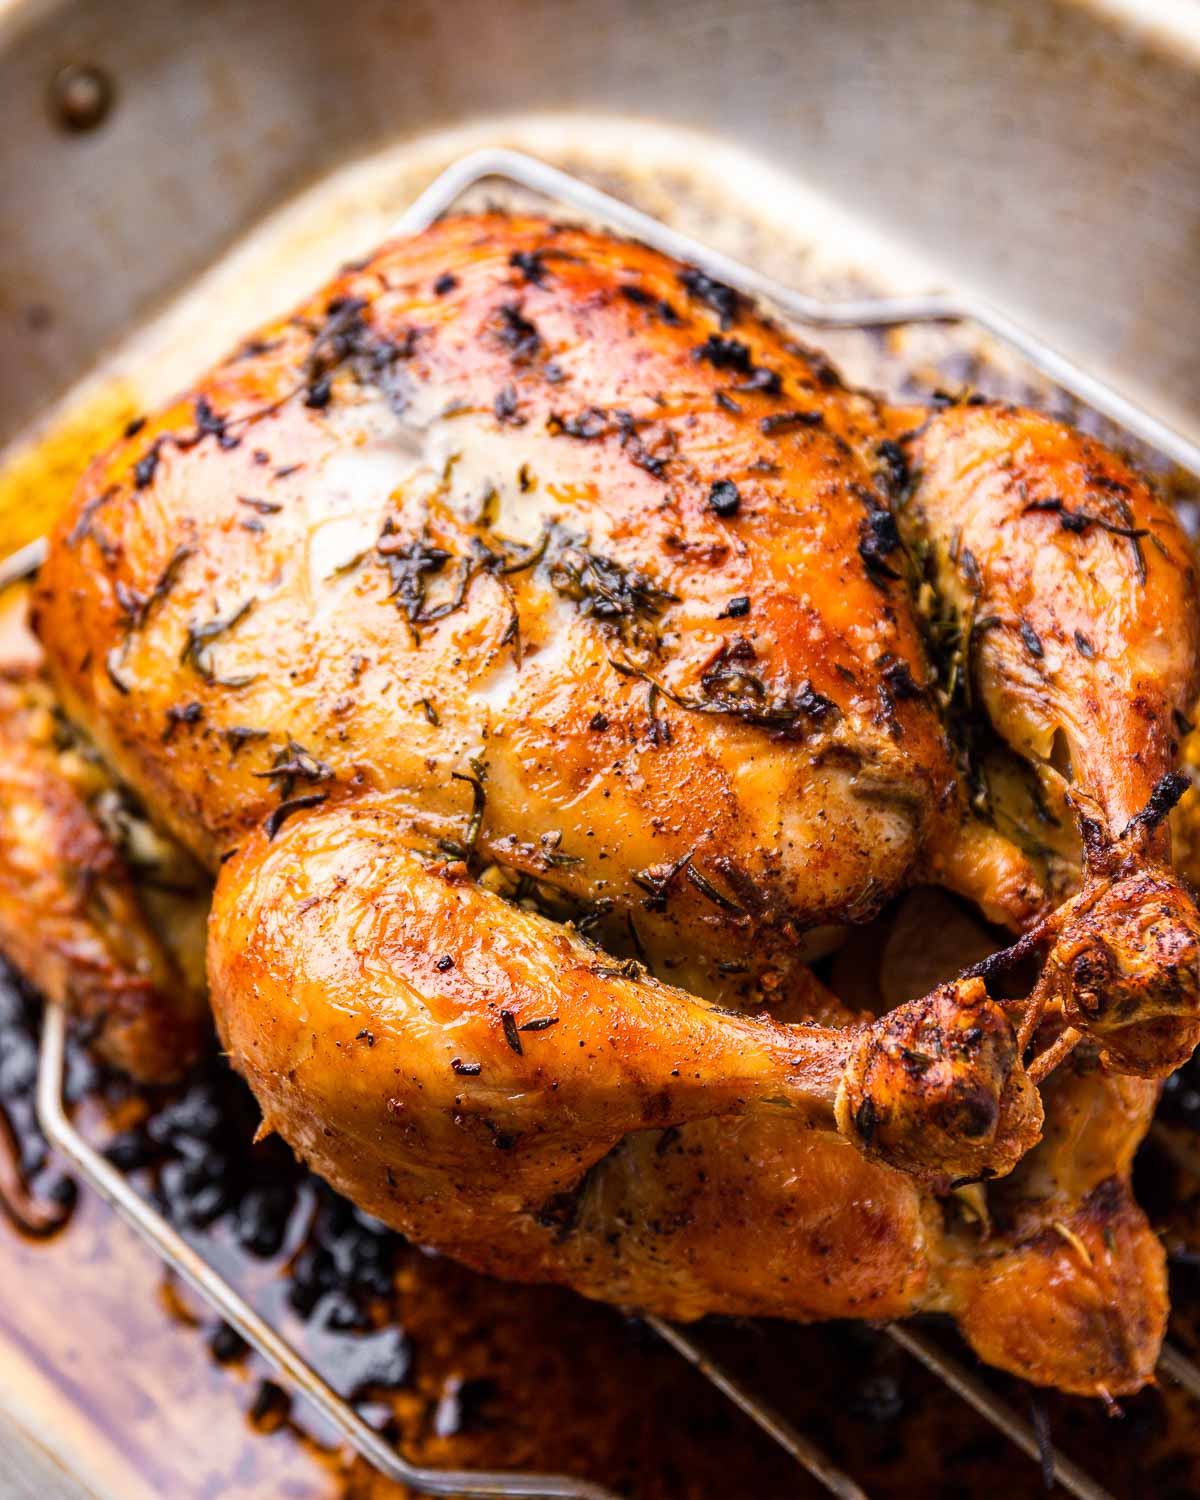
My garlic butter roast chicken recipe shows you exactly how to make this simple but beautiful dish that yields tender and juicy meat beneath a crispy golden skin that’s flavored with garlic, rosemary, and thyme.
This post may contain affiliate links. Our disclosure policy.
There are some nights when all I want is roast chicken and this garlic butter roasted chicken recipe is the one I return to again and again.
And since I usually have a whole chicken on hand for recipes like Peruvian chicken, chicken cacciatore or Italian baked chicken and potatoes, it means I don’t have to run out to the grocery store.
It’s easy to make with minimal ingredients and is especially great alongside scalloped potatoes or Greek potatoes with lemon and oregano, and Italian green beans.
My wife and kids devour this roasted chicken and ask me to make it frequently!
Want To Save This Recipe?

How to make it
Each number corresponds to the numbered written steps below.
- Preheat your oven to 450f and set the rack to the middle level. Also, mince 3 cloves of garlic, 2 tablespoons fresh thyme, 3 tablespoons fresh rosemary, and slice one head of garlic in half.
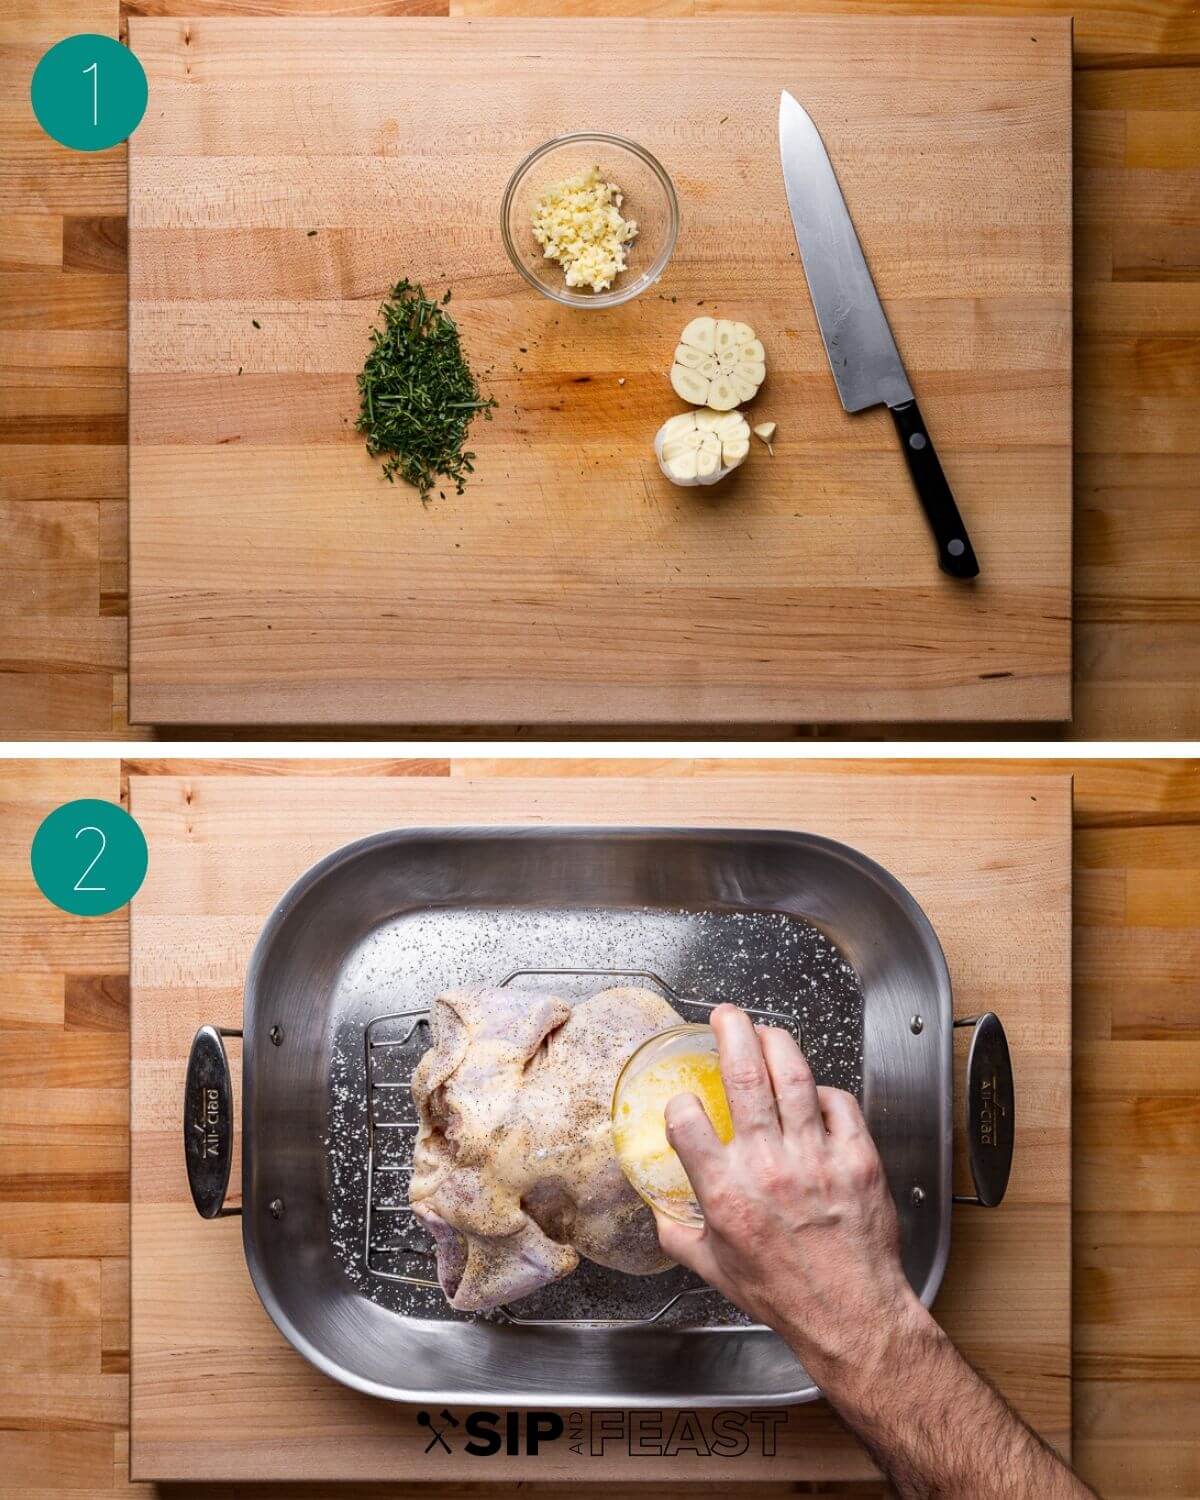
- Drizzle the 3 tablespoons of melted butter and 2 tablespoons of olive oil all over the chicken. Use your hands and get it all over.
- Season the inside of the chicken with 1 teaspoon of kosher salt and the outside with another 1 1/2 teaspoons. Season all over with 1 teaspoon of cracked black pepper and rub in the herbs and the garlic as well. Try to get the seasonings under the skin as well as on top. Place the cut head of garlic inside the chicken’s cavity. Note: Use garlic powder instead of garlic if you intend to make a pan sauce or gravy. The fallen garlic pieces will burn in the bottom of the pan.
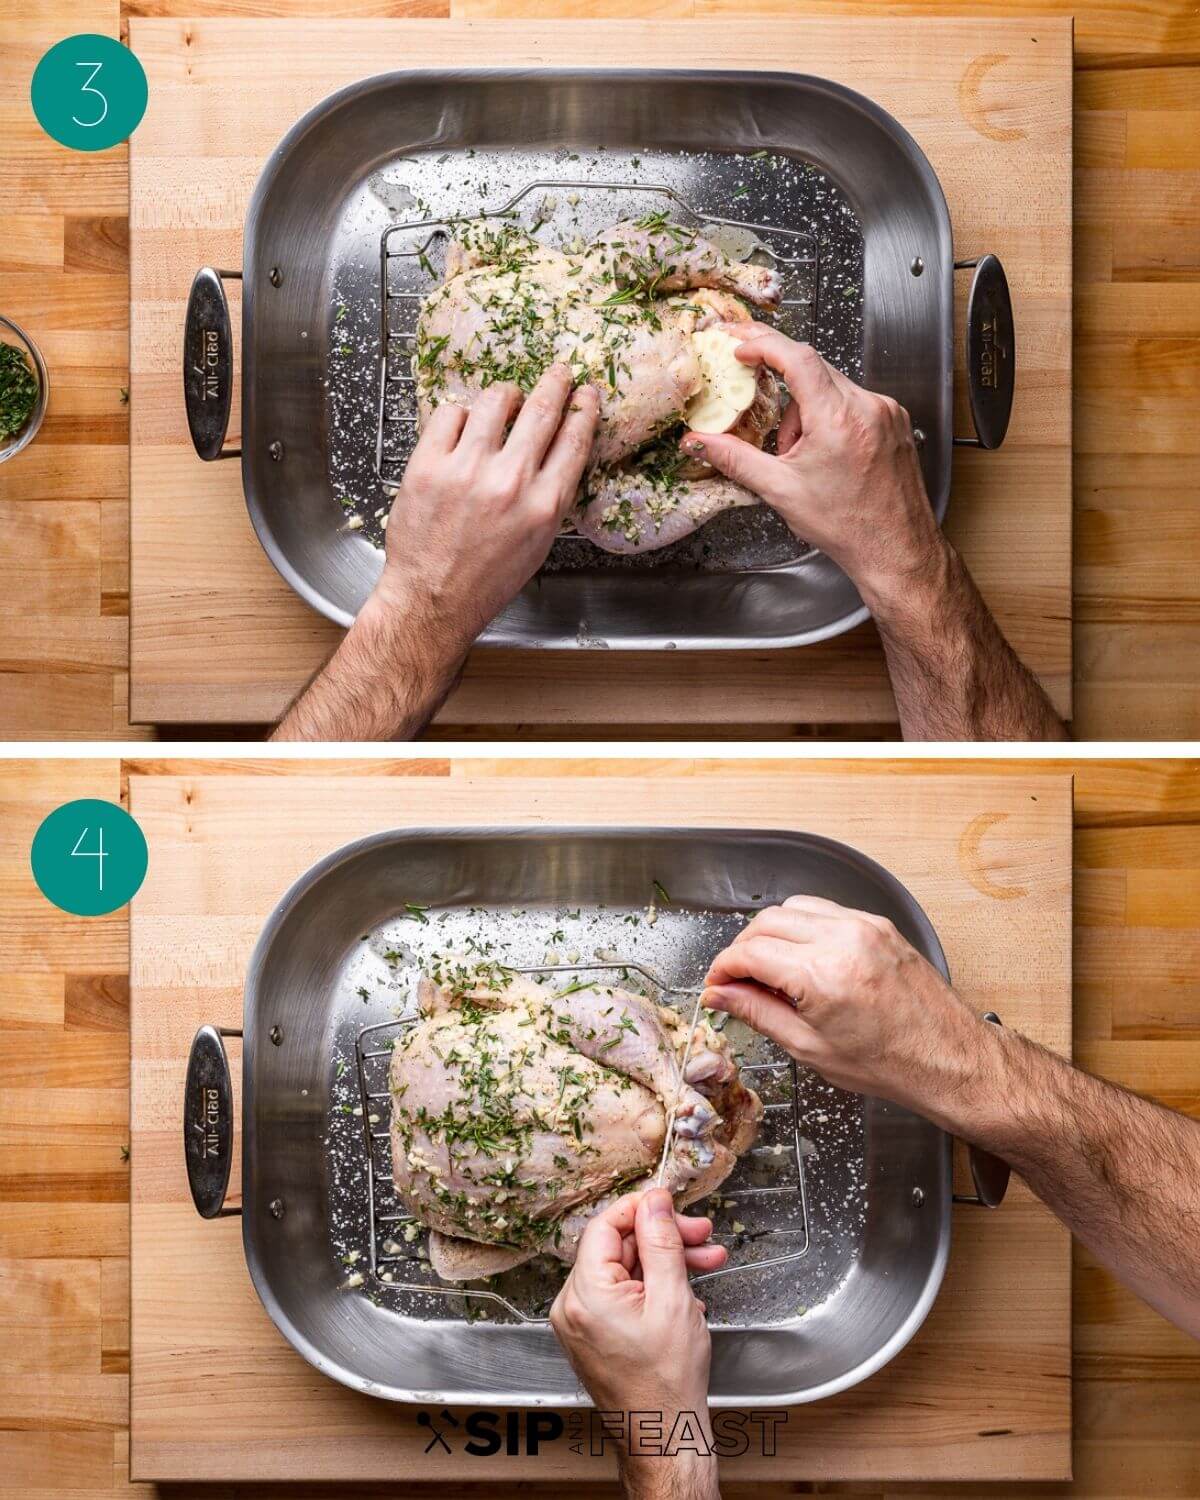
- Tie the legs together with kitchen twine and tuck the wing tips under the chicken.
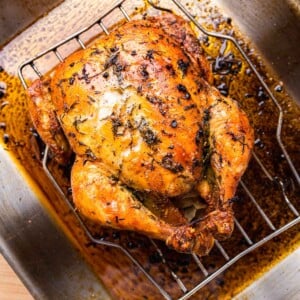
- Roast the chicken “breast” side down for 30 minutes.

- Flip the chicken over to “breast” side up.
- Baste with the pan juices. Return chicken to the oven and continue cooking until the temperature reaches ~160f in the deepest part of the breast (about 30 more minutes).
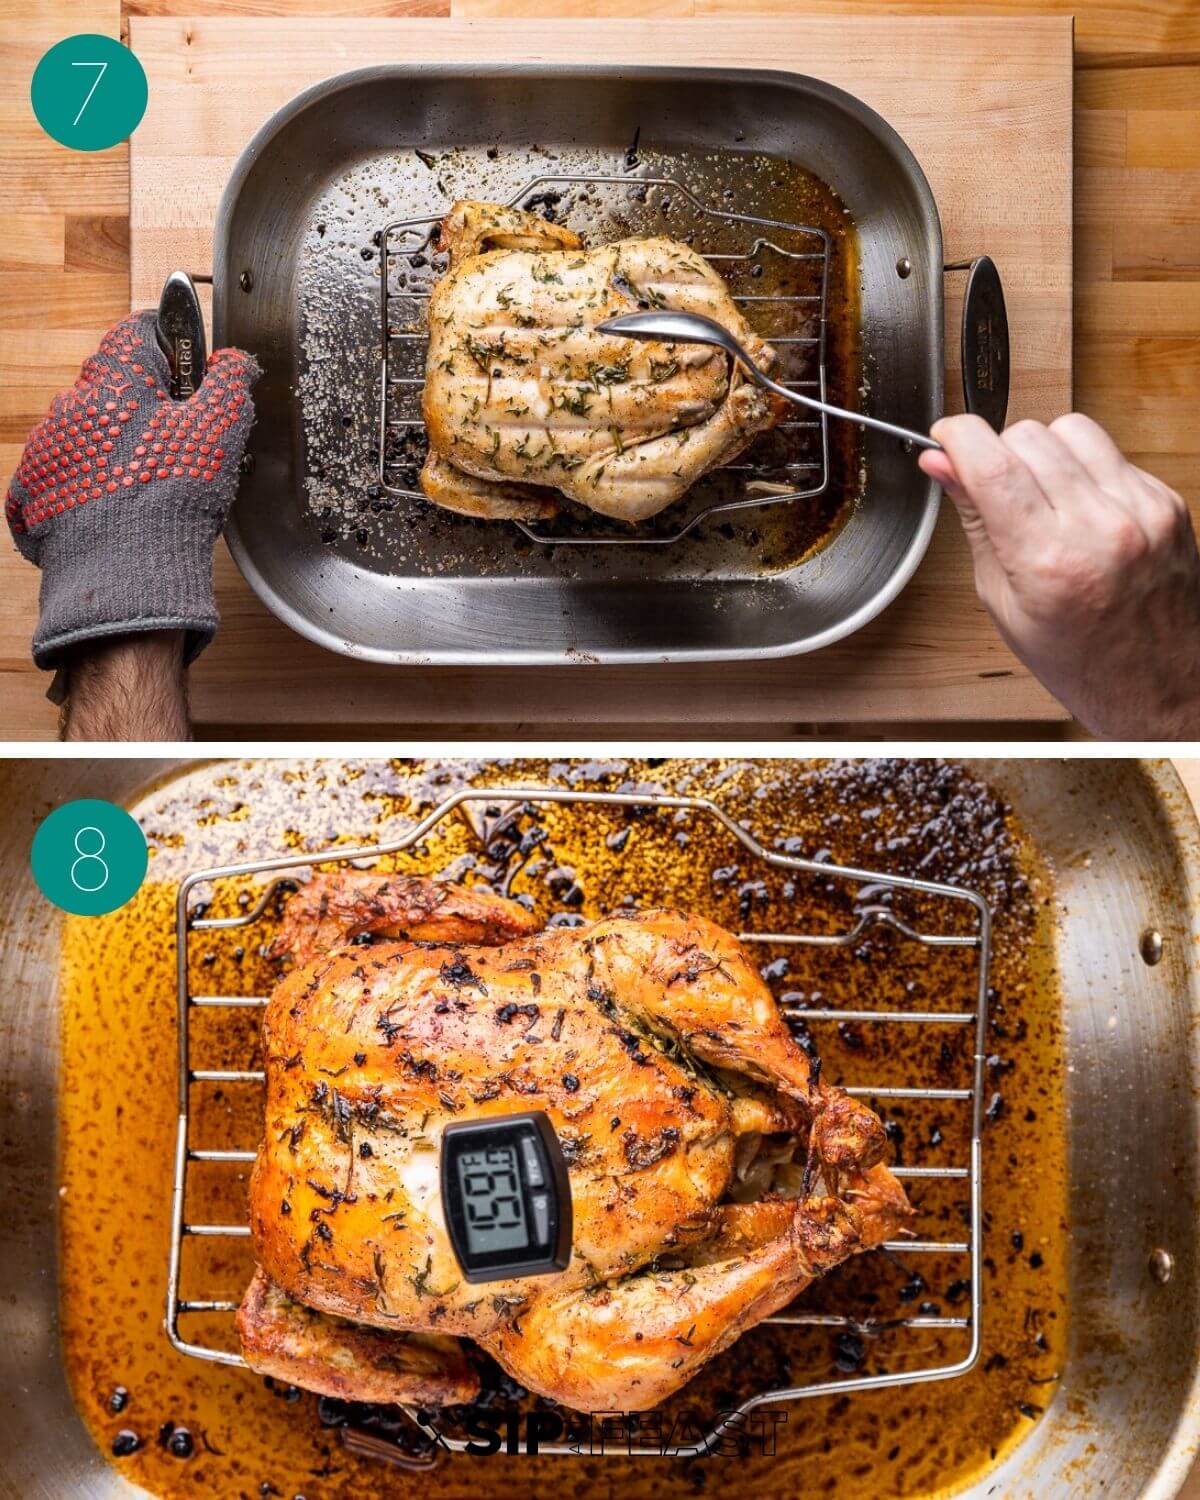
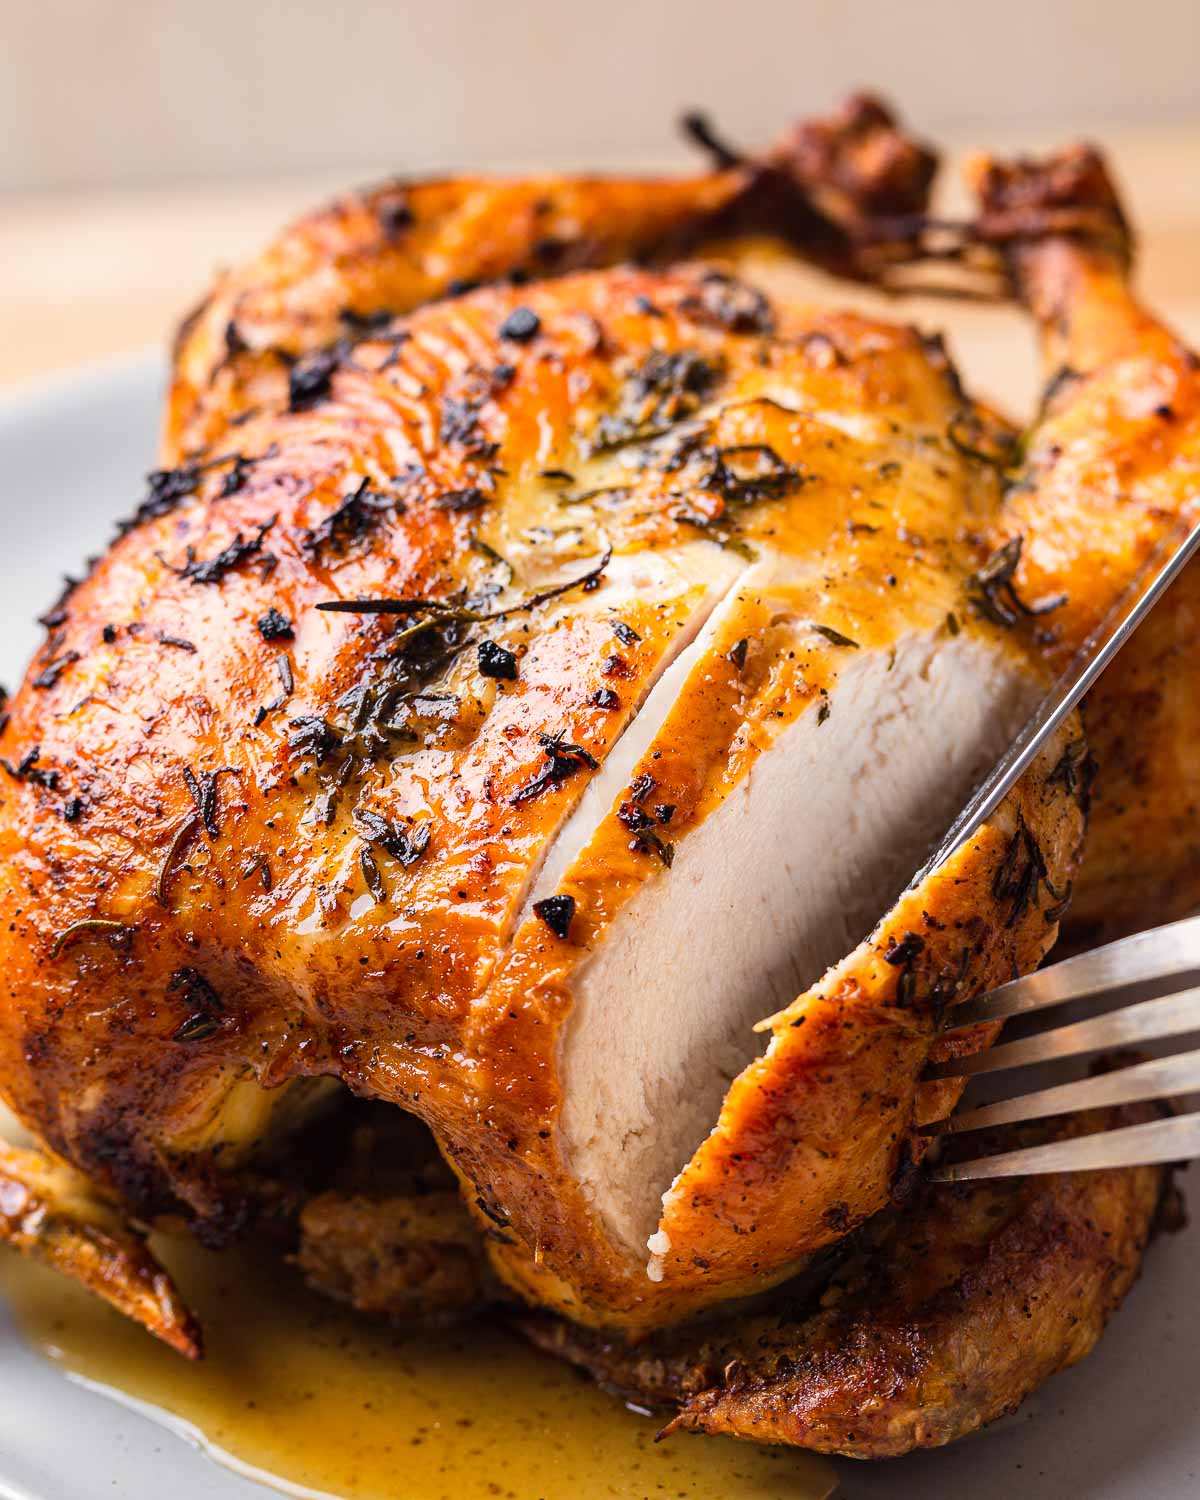
- For more color broil the top for the last 1-2 minutes if desired. Here in pic 8 above, the chicken is perfectly cooked with the breast reading 159°F. Set the chicken onto a carving board and tent with foil for 10-15 minutes before carving and eating. The juices will settle and the internal temp will continue to rise to about 165°F which is considered the proper temperature for safe to eat chicken breast.
Top tips
- Really dry your chicken. I can’t stress enough how important it is to make sure your chicken is dry. Drying the chicken helps to ensure that it roasts instead of steams. This helps prevent rubbery chicken. Simply dry the chicken with paper towels on both the outside and the inside.
- Double down on the garlic. This recipe is for GARLIC butter roast chicken with a strong emphasis on garlic. That’s because I use it on top of the chicken (along with the herbs) and on the inside. Placing a whole head of garlic (with the top removed) into the cavity of the chicken ups the garlic factor immensely resulting in outstanding flavor. As noted in the process shots above, use garlic powder instead of minced garlic if you intend to make a pan sauce. The minced pieces will fall off and get too burnt in the pan to make a sauce.
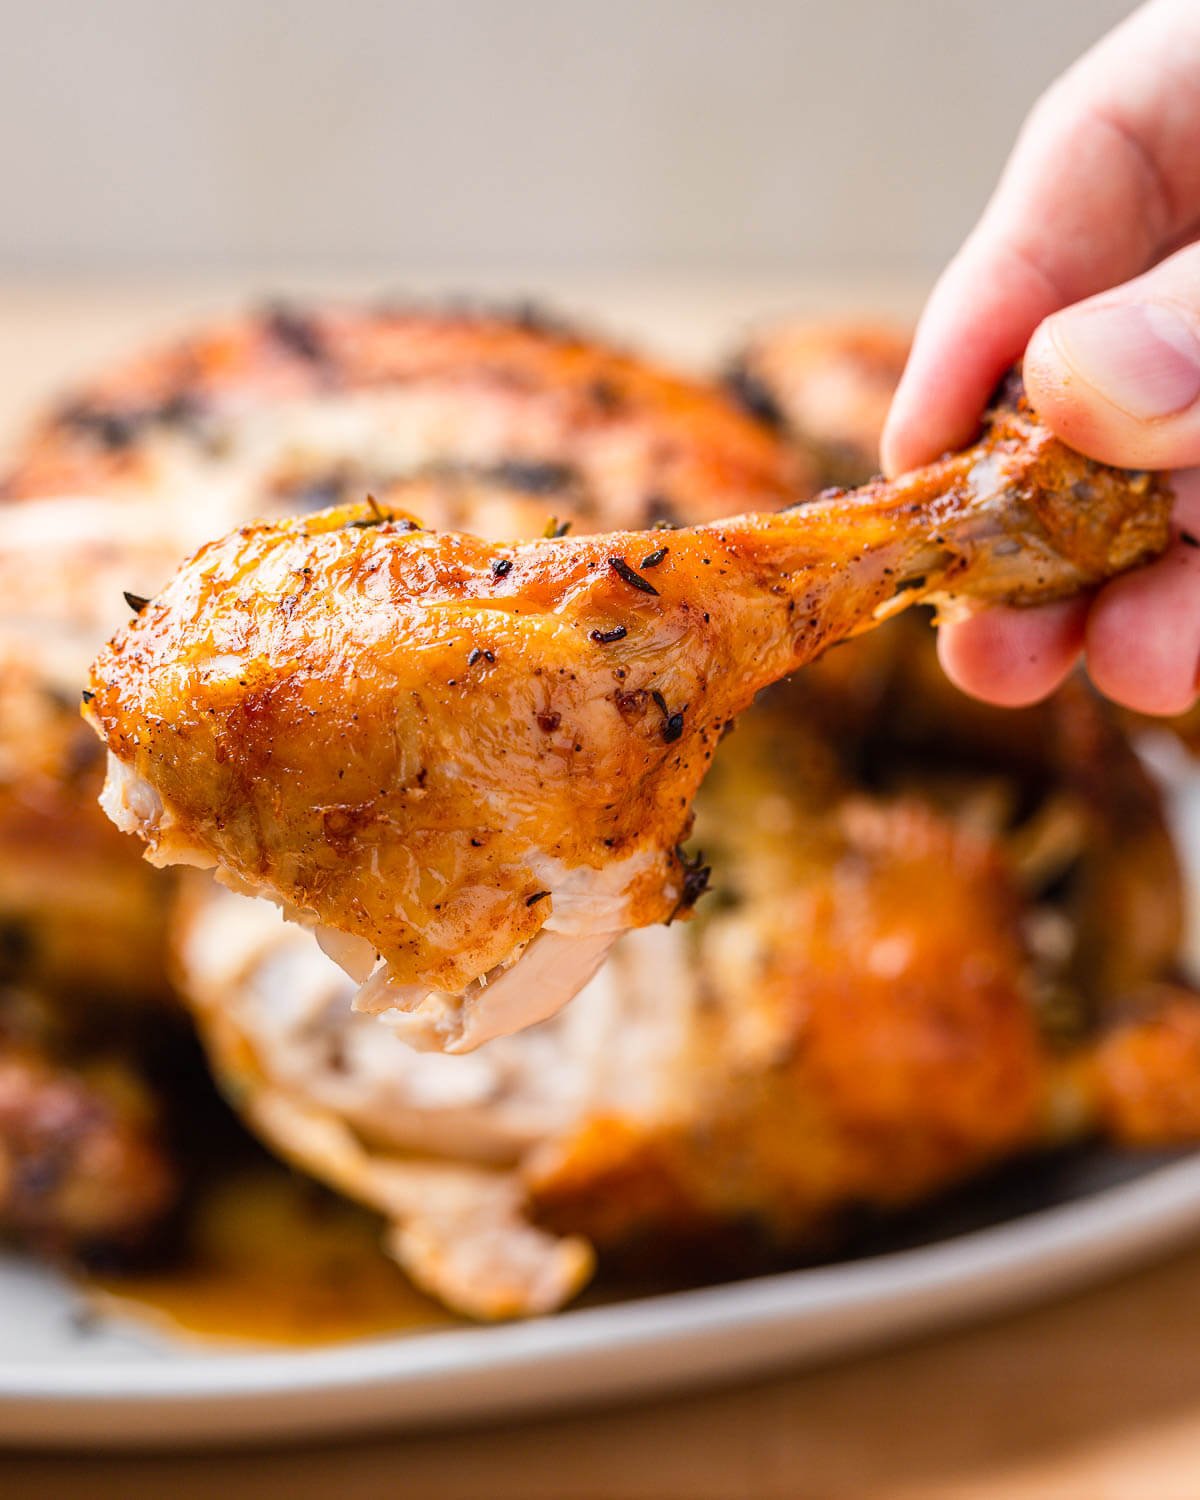
- Crispy golden skin. The best way to achieve a roast chicken with beautiful color is to broil the top for the last 1-2 minutes. This helps crisp up the skin and creates a beautiful golden color. Just watch carefully!
- Let it rest. To ensure the chicken is as juicy as can be, it’s important to let it rest after leaving the oven. Let the chicken rest for about 15 minutes and tent it with foil to keep it warm. At this point, your kitchen will smell so incredible and you may be tempted to dive right in, but patience is key here.
Our favorite chicken recipes
Chicken is such a versatile ingredient and can be used in so many dishes. Here are a few of our favorite ways to enjoy this incredible bird.
If you’ve enjoyed this Garlic Butter Roast Chicken recipe, give it a 5-star rating.
Watch us on YouTube, follow along on our Facebook Page, and become a Patreon member to receive access to exclusive full-meal videos and content.
Garlic Butter Roast Chicken
Ingredients
- 1 4-5 pound whole chicken neck and giblets removed
- 3 cloves garlic minced, see notes below
- 1 head garlic cut in half
- 3 tablespoons butter melted
- 2 tablespoons olive oil
- 2 1/2 tesapoons kosher salt
- 1 teaspoon pepper
- 2 tablespoons thyme chopped
- 3 tablespoons rosemary chopped
Want To Save This Recipe?
Instructions
- Preheat oven to 450f and set rack to middle level.
- Dry off the chicken very well with paper towels both on both the outside and inside of the bird. Place the chicken into a roasting pan with a wire rack insert. Drizzle the melted butter and olive oil all over the chicken. Use your hands and get it all over.
- Season the inside of the chicken with 1 teaspoon of kosher salt and the outside with the remaining salt. Season all over with pepper and rub in the herbs and the garlic as well. Try to get the seasonings under the skin as well as on top. Place the cut head of garlic inside the chicken's cavity.
- Tie the legs together with kitchen twine and tuck the wing tips under the chicken.
- Roast the chicken "breast" side down for 30 minutes then flip over to breast side up and baste with the pan juices. Return chicken to the oven and continue cooking until the temperature reaches 160f in the deepest part of the breast (about 30 more minutes). For more color broil the top for the last 1-2 minutes if desired.
- Tent the chicken with foil and allow it to rest for 15 minutes prior to slicing to lock in the juices.
Notes
- The exact cooking time will vary based on the size of the chicken. An internal temperature of 160f into the deepest part of the breast is fully cooked.
- If you want to use the pan juices for gravy or a pan-sauce, use garlic powder instead of fresh garlic. Fresh garlic will burn after an hour of cooking.
- Leftovers can be saved in the fridge for up to 3 days and can be reheated in the oven or microwave.
Nutrition
Nutrition information is automatically calculated, so should only be used as an approximation.
Follow Me
The Sip and Feast Cookbook
- 100+ recipes
- Essential tools and ingredients
- Entertaining ides
- Stunning photography


Simple and Great!
Going to the store now to get the chicken, can’t wait any longer!
All the recipes that I have made are really good thus far. Thanks for posting these recipes.
Trying your way! I usually roast in a covered dutch oven. Smells great already! Thank you.
Always look forward to your recipes! Especially when you post yummy low carb ones!
Every single recipe I have made has been outstanding!! Can’t wait to try the roasted garlic chicken! I haven’t roasted a whole chicken in years.
Great recipe, can’t wait to try it!
Hi Jim , Enjoy all the recipes you and your beautiful family provide, Thank you for Sharing! My chicken is in the oven smells yummy 😋 !
Hi Anne, thanks for the comment and so happy you are enjoying the recipes!
This is my go to roast chicken now. It checks so many boxes. It is never dry, even when I’ve overshot the 160 degrees. The skin is so delicious. And the meat is flavorful; it doesn’t need a sauce. It’s an easy recipe too and pretty quick. What’s not to like?
Hi Drew, I’m so happy this is your go-to chicken! I really appreciate the comment, thank you!
Delicious and thank you
Hi Donna, thanks for the comment and so happy you liked it!
Yum!!!!! Perfect!!! Just like mom’s 💞
Thanks for the comment, Jeanne. So happy you enjoyed it!
Hubby and I are Making this for Sunday dinner after Mass today! Thank you Jim for all you do🥳
Hi Katy, I hope you both enjoy and really appreciate the comment!
Great recipe! Definitely gonna make this again!
Hi Shelly, I’m so happy you enjoyed the chicken! Thanks for the comment!
Looks great. And your recipes are always well defined and explained very well. Always nice to see another variation on roast chicken. The one thing I might do differently Is to start the roasting breast up, and the. go to breast down, resting it breast down also. This way you are forcing the juices into the breast for a longer time.
Hi Patrick, thank you for sharing! The reason I do this is to make sure the top is crispy at the end. I find that the chicken is still very juicy as long as it’s cooked to the proper temperature.
Exceeds expectations ! Fabulous Jim! Thanks!
Tracy De
Thanks, Tracy! So happy you enjoyed it!