
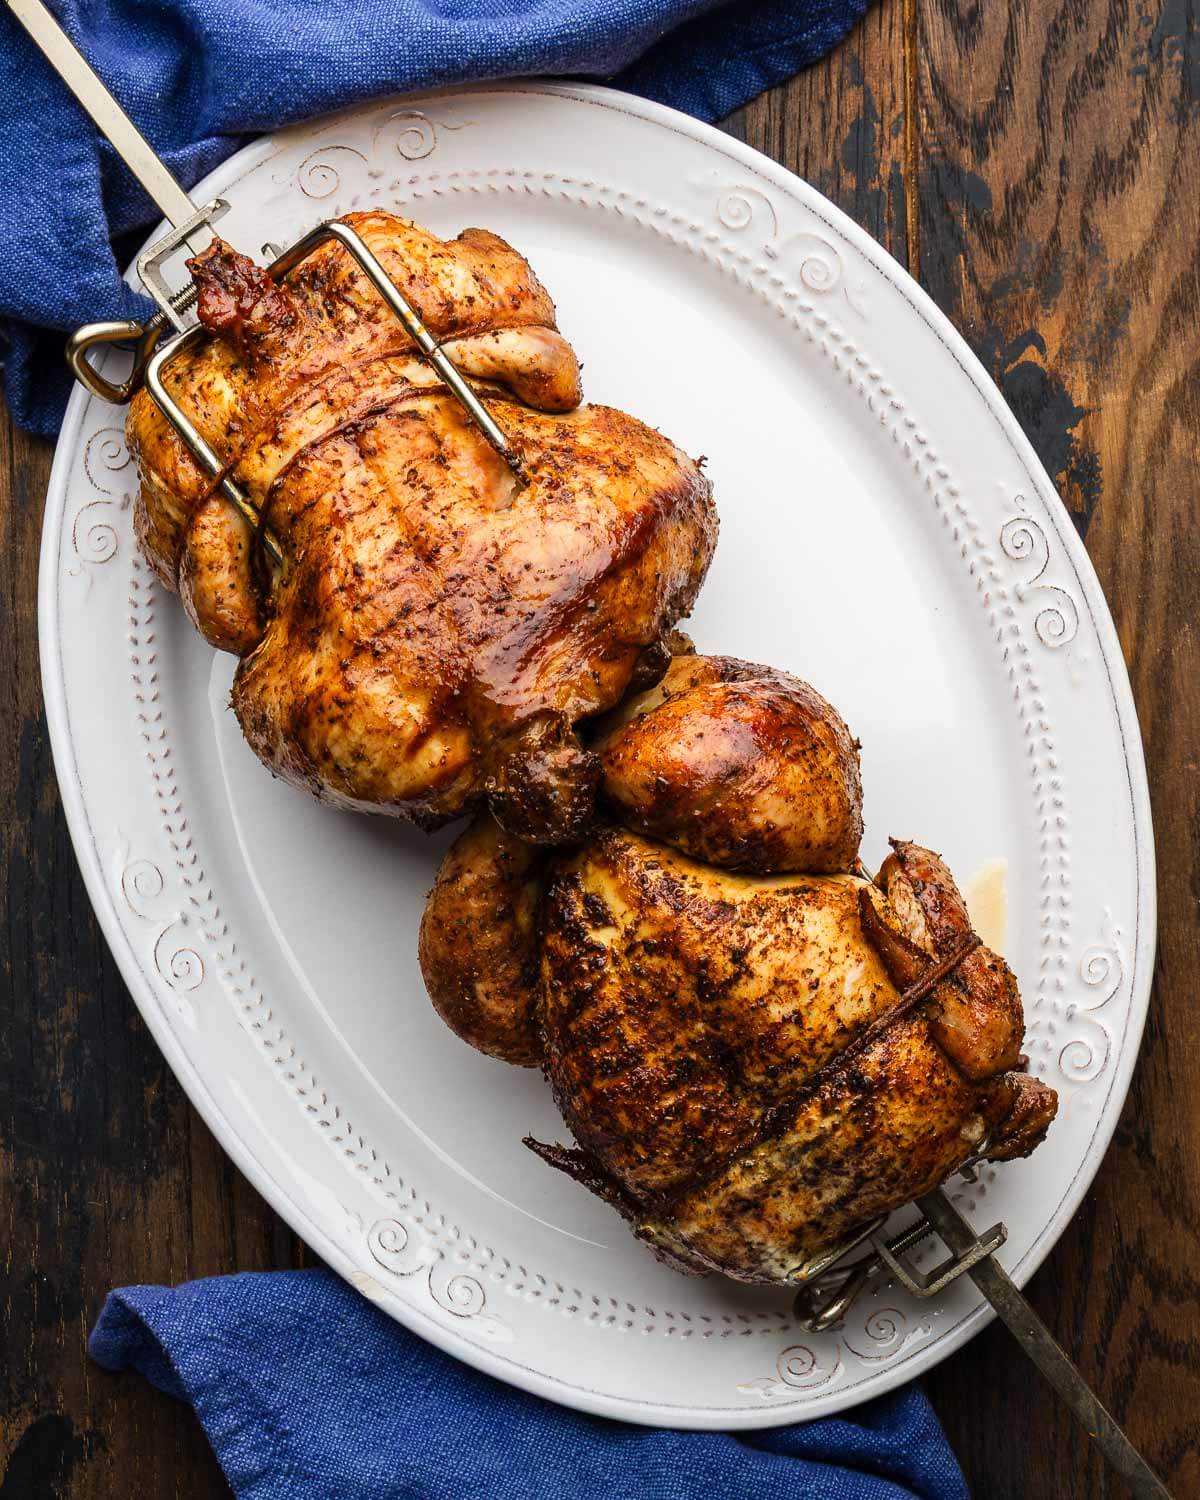
When it comes to flavor, it doesn’t get much better than Homemade Rotisserie Chicken. Not only is it better than store-bought, but it’s actually pretty easy to make, and with the right equipment, this juicy and delicious bird can be on your table in about an hour.
This post may contain affiliate links. Our disclosure policy.

Easier (and far better) than you’d ever imagine…
I know what you’re thinking – why deal with the hassle of making homemade rotisserie chicken when I can grab one at the store?
My answer – this homemade rotisserie chicken is the best you will ever have, and as long as you’ve got the rotisserie, it’s actually pretty easy and mostly hands-off cooking.
It takes about an hour for the chicken to roast on the rotisserie, which is essentially set it and forget it – and during that time, you can prepare some simple sides to enjoy with the chicken, like my tortellini pasta salad,rice pilaf, or crispy roasted potatoes. The green sauce I use for my Peruvian chicken is also fantastic with this rotisserie chicken or you could use that marinade for this recipe.
And since the rotisserie attachment holds 2 chickens, you can make one for dinner and save the other to break down into other dishes like chicken cheesesteaks, Waldorf chicken salad, or NY deli-style chicken salad.
But truly, the best thing about making homemade rotisserie chicken is the look of pure amazement you’ll get from your friends and family as they watch you present them with the ultimate, glistening, best-tasting rotisserie chicken they’ve ever had.
Recipe Ingredients
All ingredients for this recipe are shown in the pic below and special notes are made in this bulleted list to assist you.
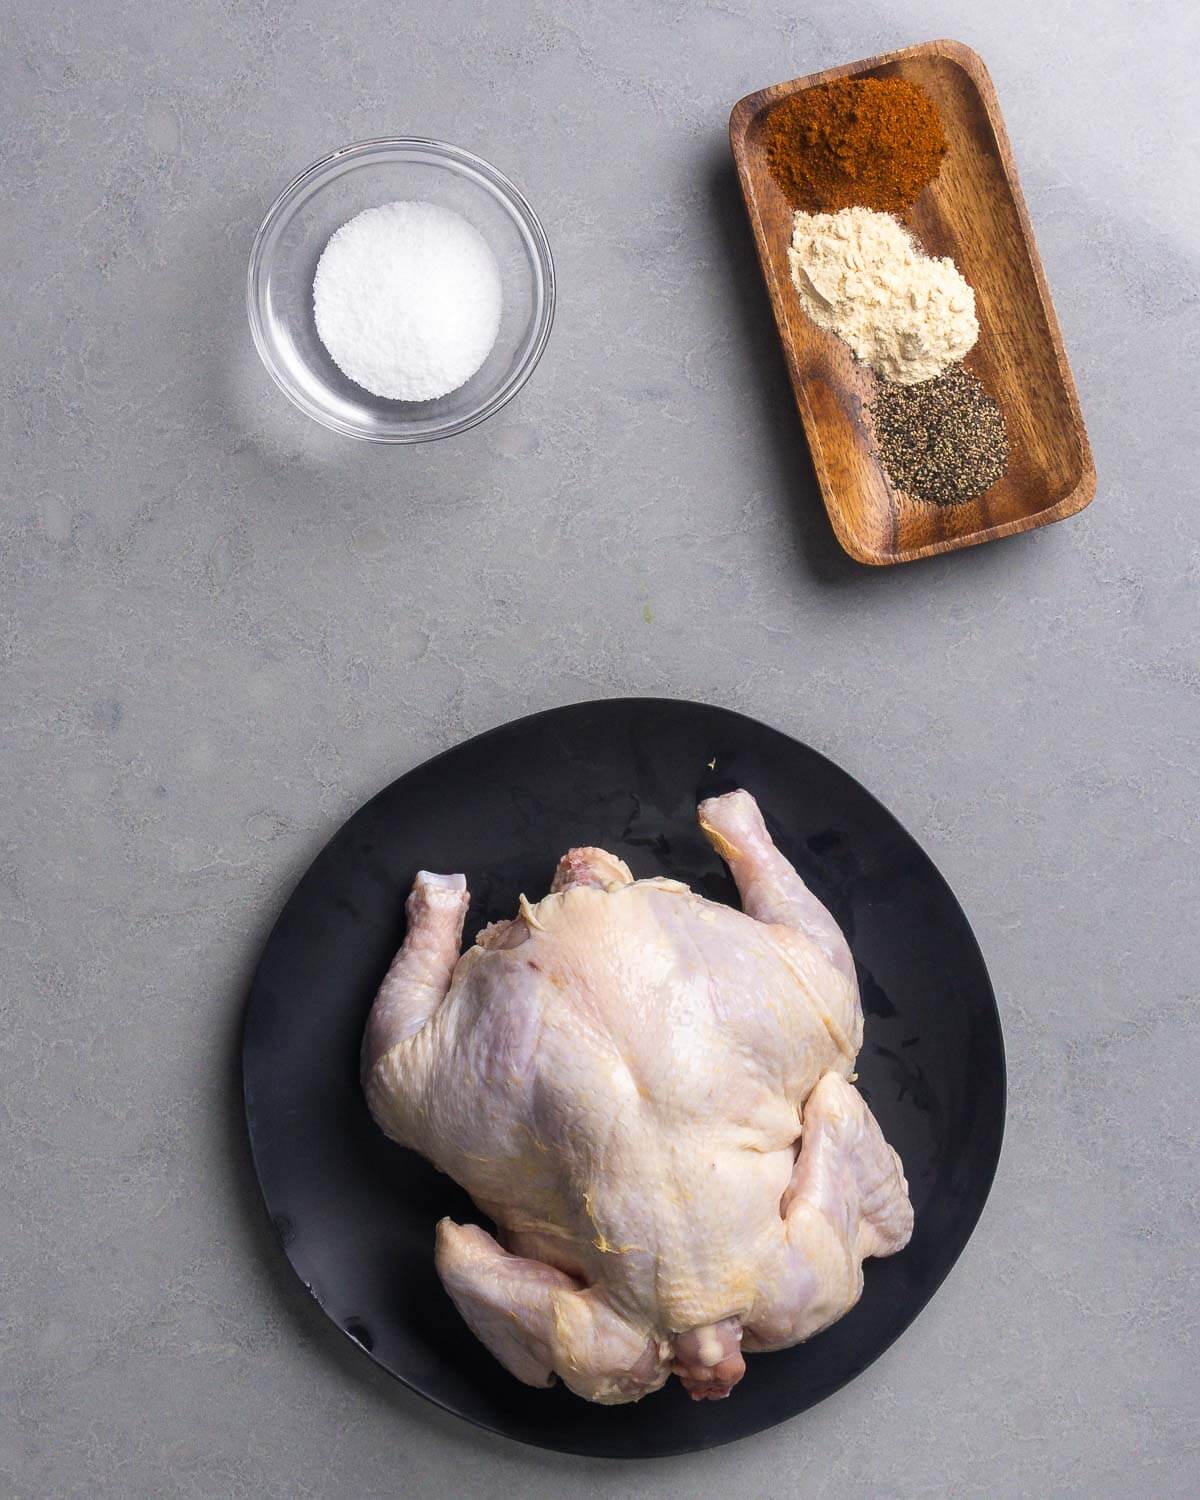
- Chicken. A whole young chicken is best for rotisserie chicken. They usually run about 4-5 pounds. While this recipe is for 1 chicken, you can definitely double it and make 2 chickens since the rotisserie holds 2. I try to buy chickens on the smaller side since the larger ones tend to be tough and sometimes woody.
- Seasoning. I’m using a mixture of Diamond Crystal kosher salt, paprika, onion powder, garlic powder, and black pepper.
See the recipe card for full information on ingredients and quantities.
Want To Save This Recipe?
How to make rotisserie chicken with the only fire weber attachment
Each number corresponds to the numbered written steps below.
Note: I am using the only fire weber rotisserie attachment for the most common Weber grill size of 22″ (often labeled 22.5″) but many makes have attachments for other size grills and gas grills.
- Mix the rub ingredients and spread evenly all over the chicken and into the cavity. If you can get some of the rub under the skin, that would be great too.
- Start by taking a 3-foot length of butcher’s twine under the chicken and crisscross it over the point of the breast.
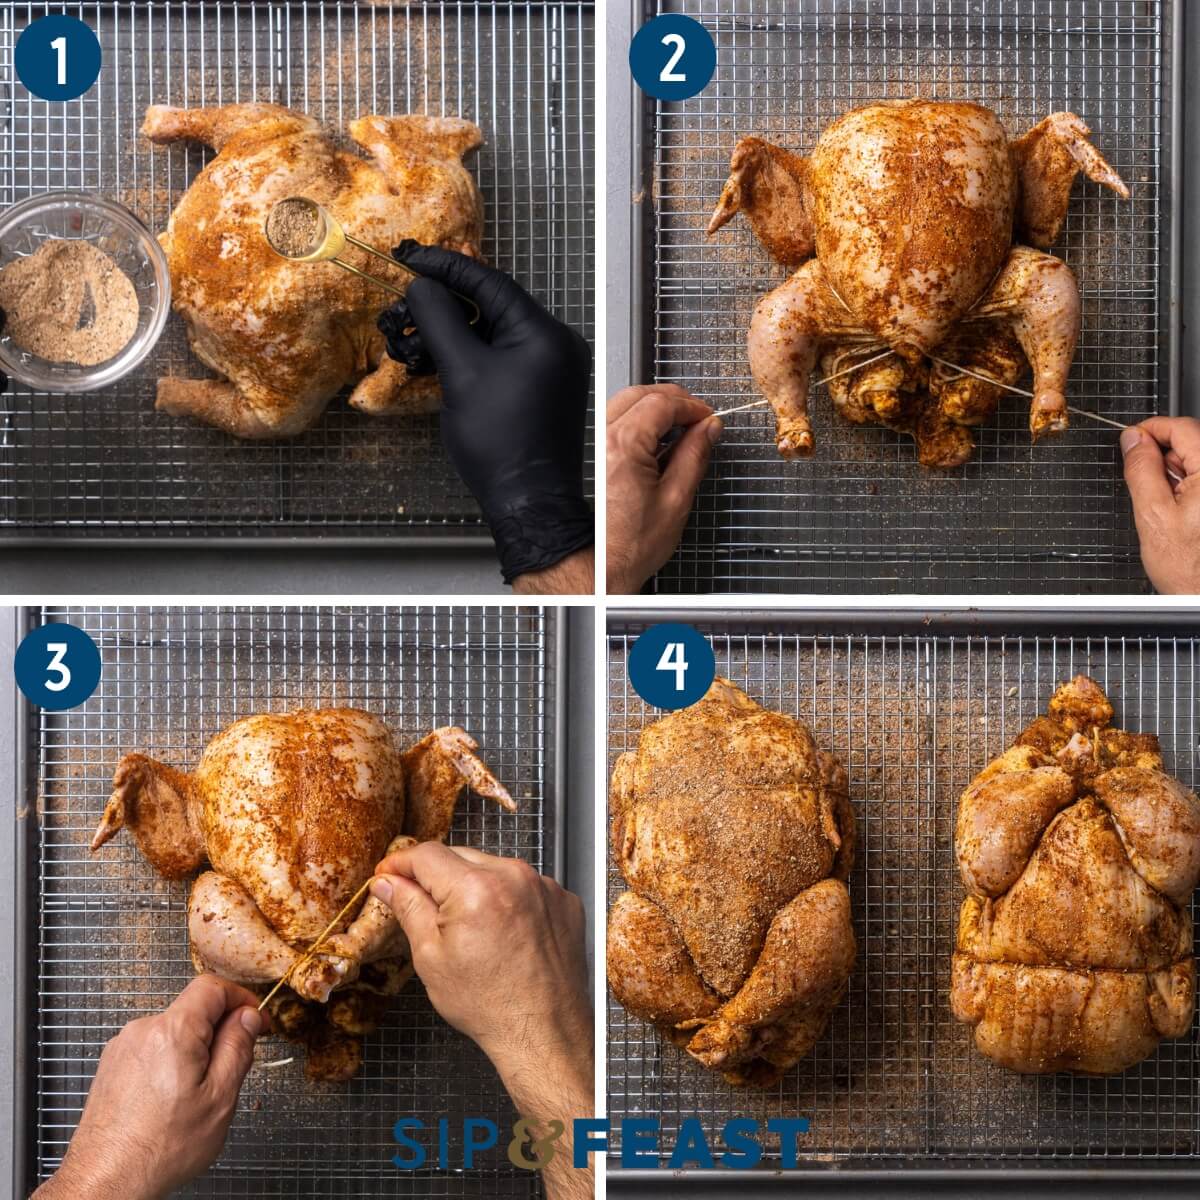
- Pull the string tight and wrap it back under the legs. Secure the legs together with a knot and cut off the excess. The wings can be secured with another piece of string. Once the chicken is secured, you can either place it on a wire rack lined baking sheet and set it in the fridge overnight, or allow it to sit with the spice at room temperature for 1 hour. Note: You can truss the chicken and hold the wings in one shot by starting with the string under the neck area, wrapping the wings, and moving on to this step.
- While this recipe is for 1 chicken, it’s easy to do 2 chickens at once, and I’ve done it several times. Though I haven’t tried it yet, I’m pretty sure 3 chickens would just fit.
- Pictured is the ring, which attaches to the top of the kettle and the rod and prong clamps.
- If you dry-brined the chicken overnight, remove it from the fridge 1 hour before cooking. Slide one clamp with prongs on the handle side of the rotisserie rod. Insert the non-clamp side of the rod through the chicken and then slide the other pronged clamp onto the rod. Center the chicken, then insert the prongs into the chicken to secure it and prevent it from moving during the cooking process. Make sure to tighten the clamps so that they don’t move. Since I’m using 2 chickens in these photos, I just press the chickens together, and they hold well during the cooking process.
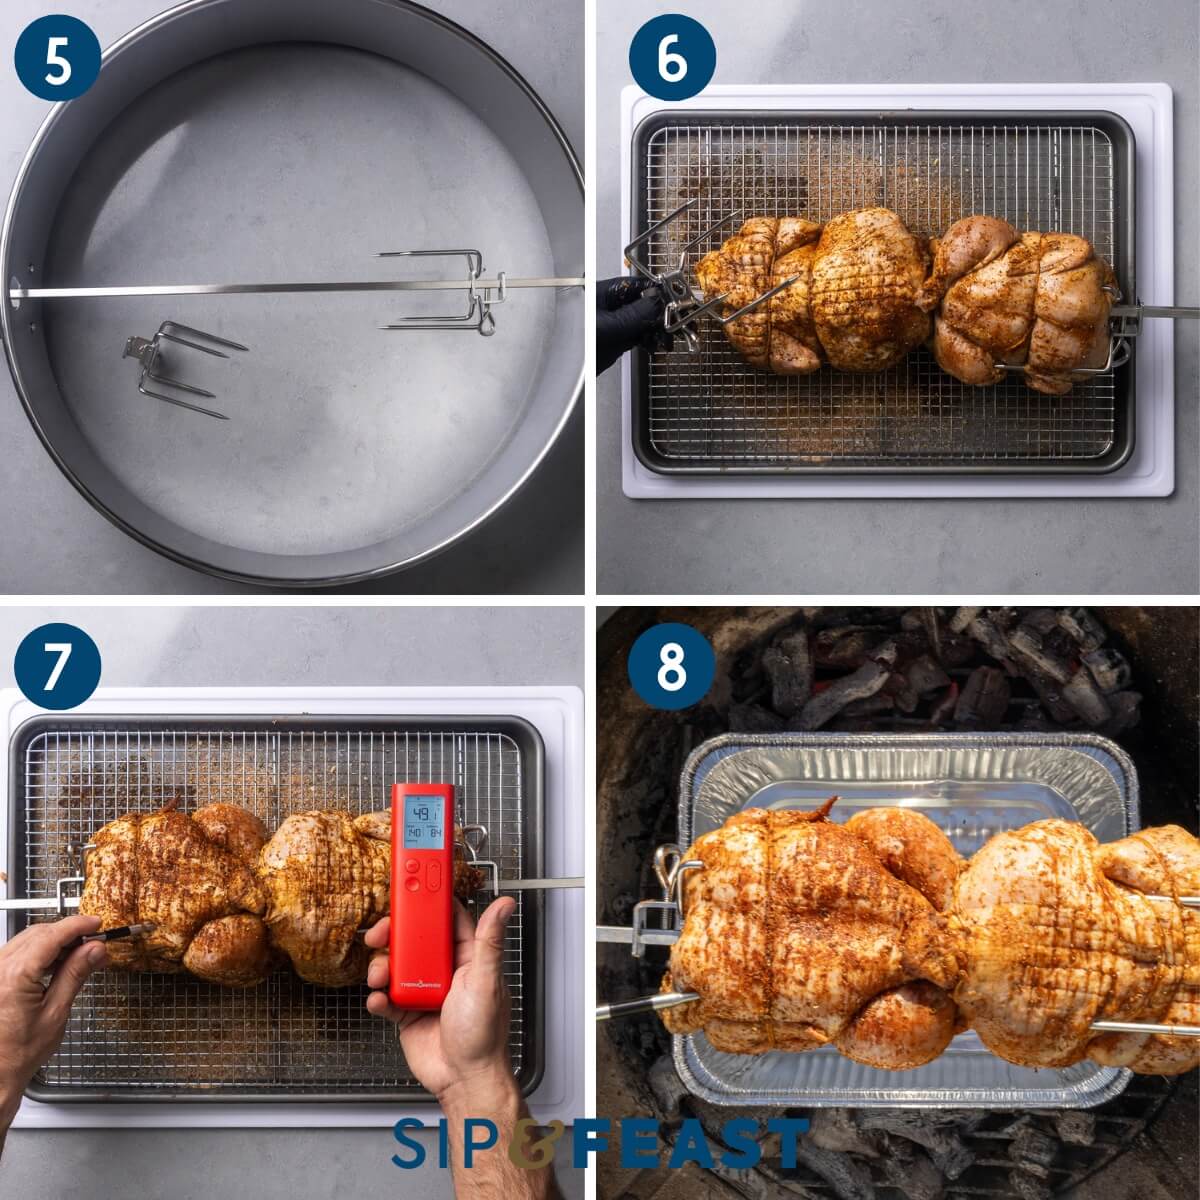
- If using a wireless thermometer, insert the probe into the thickest part of the breast. In the photo, it’s reading 49°F internal, which is about right for a chicken that has been out of the fridge for 1 hour.
- Prepare the charcoal grill by removing the grate and heating a large chimney of Kingsford briquette coal (about 4.5 pounds). Once the coal is almost grayed out toward the top of the chimney (about 15 minutes), dump the coal into the grill. Spread the coal into two sections, leaving room for a drip pan in the center. Pour 1 cup of water into the pan. Place another 7-10 unheated briquettes on each side of the two sections of coal, making sure the unheated briquettes are in contact with the hot coals. Place the rotisserie ring onto the grill.
- Slide on the wired turning attachment and plug it in. Place the secured rod with the chicken onto the ring and slide the end of the rod into the wired attachment box and turn it on.
- Immediately cover the grill.
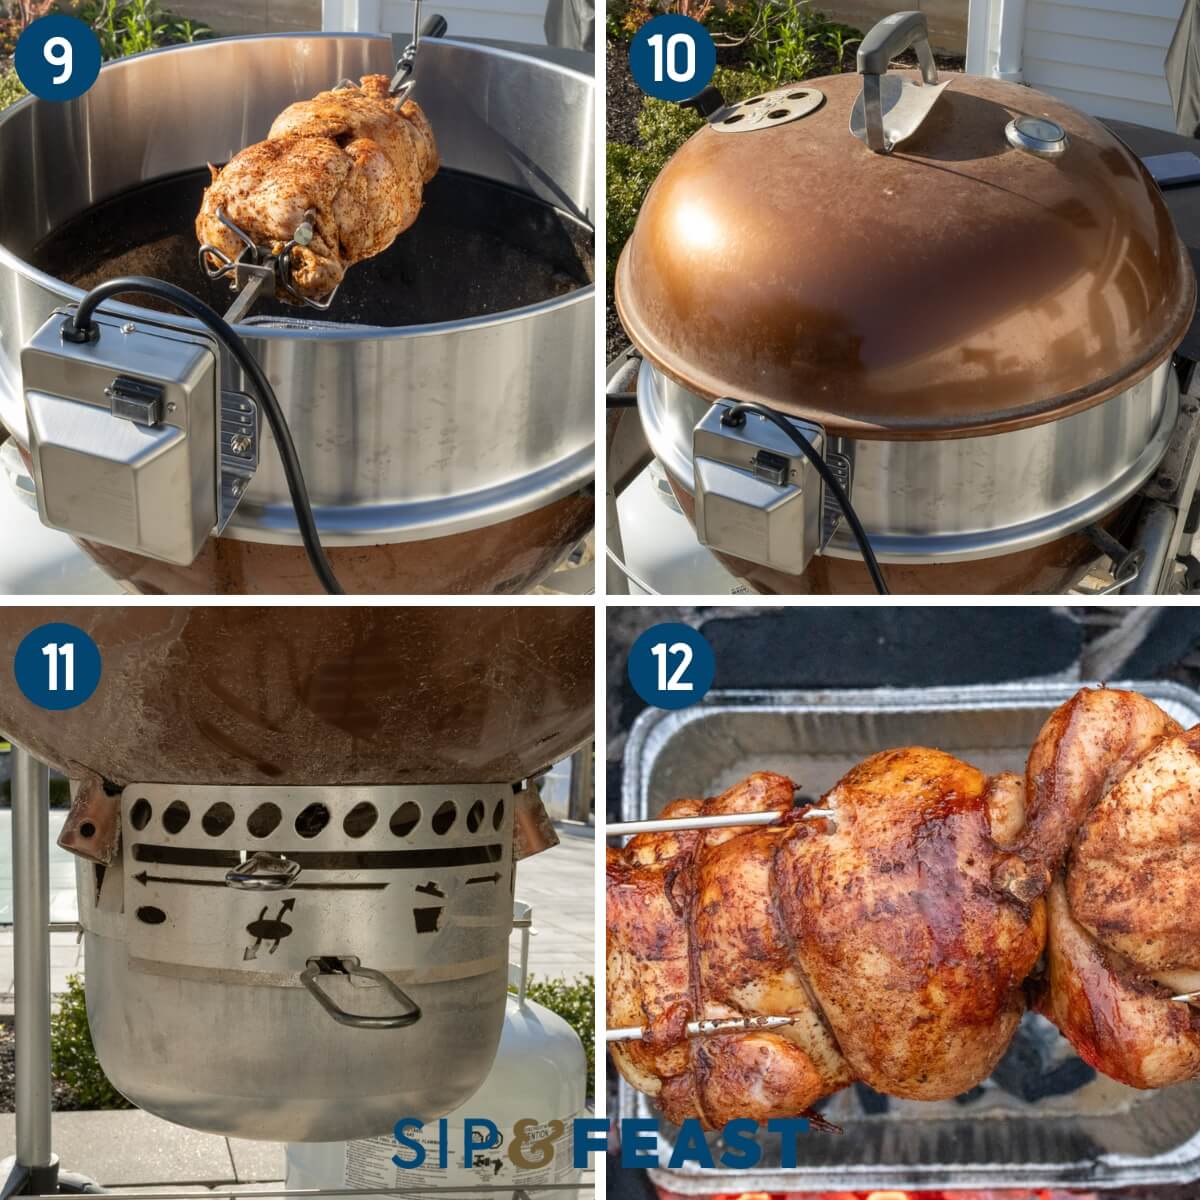
- The goal is to cook at 350-400°F covered. To do this, adjust dampers as required. If the temp is running too hot, decrease the amount of oxygen by turning the bottom damper to the left. If the temp is still running too hot after about 15 minutes, almost close the top damper.
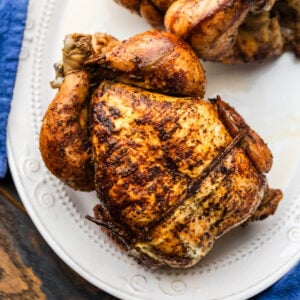
- Once the chicken reaches 160°F, turn off the rotisserie and, with heat-proof gloves, remove the chicken and transfer it to a cutting board. Let the chicken rest for 10 minutes before removing the clamps and sliding it off the rod. The chicken can be broken down for just meat or enjoyed whole.
Top tips
- The coal. I strongly recommend using Kingsford briquettes as they heat more evenly. I’ve used both lump coal (above pics) and briquettes and prefer the briquettes for sure. Lump is better for when you need higher heat, as it runs hotter but also dies out quicker than briquettes. Save the lump for when you make a grilled tomahawk ribeye.
- The tools. In addition to the grill and rotisserie attachment, a wireless thermometer is essential here if you want a true set it and forget it rotisserie chicken. Otherwise, you’ll need to keep checking the temp with an instant-read probe thermometer. You’ll also need a drip pan filled with a cup of water, which serves as a vessel to catch the drippings from the chicken, but also helps to keep the chicken moist as it acts as a heat sink to lower the coal temperature. Get even more use out of it by omittin the water and placing some chunks of potatoes tossed with olive oil, salt, pepper, and 1/2 cup of chicken stock in the pan to roast as the chicken spins on the rotisserie. The drippings will further flavor the potatoes.
- The heat. The bottom and top dampers of your grill serve to regulate the heat. Just be sure not to close them entirely, as the lack of oxygen will extinguish the coal. If you find the grill is running at a temp higher than 450°F, almost close both dampers to lower the heat, leaving them slightly cracked to still allow the flow of oxygen. The target temp for cooking the chicken is 350-400°F.
More chicken recipes
If you’ve enjoyed this Homemade Rotisserie Chicken, give it a 5-star rating.
Watch us on YouTube, follow along on our Facebook Page, and become a Patreon member to receive access to exclusive full-meal videos and content.
Homemade Rotisserie Chicken
Ingredients
- 1 whole young chicken about 4 pounds
- 2 tablespoons Diamond Crystal Kosher salt
- 1 tablespoon paprika
- 1 teaspoon onion powder
- 1 teaspoon garlic powder
- 1 teaspoon black pepper
Want To Save This Recipe?
Instructions
- Mix the salt, paprika, onion powder, garlic powder, and pepper together and with your hands evenly apply to the chicken. Add some of the spice mixture into the interior of the chicken and under the skin if possible.
- Secure the chicken legs and wings with kitchen twine. At this time it is recommended to place the chicken on a wire rack lined baking sheet an into the fridge uncovered, overnight. If you want to cook it the same day, let the chicken sit with the spice at room temperature for 1 hour before cooking.
- Remove the chicken from the fridge 1 hour before cooking. Slide one clamp with prongs on the handle side of the rotisserie rod. Insert the nonclamp side of the rod through the chicken and then slide the other pronged clamp onto the rod. Center the chicken then insert the prongs into the chicken to secure it and prevent it from moving during the cooking process. Make sure to tighten the clamps so that they don't move.
- If you have a wireless thermometer, insert the probe into the thickest part of the breast. If you don't have one, check every so often with an instant read thermometer during the cook.
- Prepare the charcoal grill by removing the grate and heating a large chimney of Kingsford briquette coal (about 4.5 pounds of coal). Once the coal is almost greyed out towards the top of the chimney (about 15 minutes), dump the coal into the grill. Spread the coal into two sections, leaving room for a drip pan in the center. Pour 1 cup of water into the pan. Place another 7-10 briquettes on each side of the two sections of coal, making sure to touch the hot coals.
- Place the rotisserie ring onto the grill then slide on the wired turning attachment and plug it in. Place the secured rod with the chicken onto the ring and slide the end of the rod into the wired attachment box and turn it on. Immediately cover the grill.
- The goal is to cook at 350-400°F covered. To do this adjust dampers as required. If the temp is running too hot, decrease the amount of oxygen by turning the bottom damper to the left. If the temp is still running too hot after about 15 minutes, almost close the top damper. A 4 pound chicken cooked on this rotisserie at 350-400°F will take about 60 minutes to reach an internal temperature of 160°F. If the grill temp was running on the hotter side, it might take 20 minutes less and if the temp was running on the cool side the chicken could take substantially longer. Just make sure to cook to the bird to at least 160°F internal temperature.
- Once the chicken reaches 160°F, turn off the rotisserie and with heat proof gloves remove the chicken to a cutting board. Let the chicken rest for 10 minutes before removing the clamps and sliding it off the rod. The chicken can be broked down for just meat or enjoyed whole.
Notes
- Type of coal. In the pics I used lump coal, which will work, but I highly recommend Kingsford briquettes since the heat will be more even and last longer. You don’t need the blazing heat of lump coal for this recipe. Though lump runs hotter, it tends to die out more quickly than briquettes.
- Grill heat. The bottom and top dampers can be adjusted to regulate the heat, just don’t completely close the dampers which will extinguish the oxygen and put out the coal. If too much coal was used and the grill is running at temps above 450°F almost close both dampers, but again, don’t completely close them.
- Thermometer. A wireless thermometer almost makes the process set and forget since you won’t have to turn off the rotisserie and check with an instant-read thermometer.
- Coal placement. I like to keep the coal away from the center and use a water pan in the center, but if you want a crispier chicken, spreading the coals evenly through the kettle will help. It’s easy to burn the chicken this way so keep an eye on it and adjust dampers accordingly to regulate heat.
- Drip pan. The pan helps keep the chicken moist and acts as a heat sink to lower the hot coal temperature. The pan can also be used for roast potatoes during the cooking process. Simply add chunks of potatoes tossed with olive oil, salt, pepper, and a 1/2 cup of chicken stock. The fat drippings from the chicken will flavor the potatoes during the roasting process.
- Leftovers. Rotisserie chicken can be saved in the fridge for up to 3 days or it can be broken down and frozen for up to 3 months.
Nutrition
Nutrition information is automatically calculated, so should only be used as an approximation.
Follow Me

The Sip and Feast Cookbook
- 100+ recipes
- Essential tools and ingredients
- Entertaining ides
- Stunning photography


I’m confused by this instruction. “Place another 7 unheated briquettes on each side of the two sections of coal” Is that 7 coals in total spread out around the two sections of coal or 28 coals with 7 on each side of two sections?
Hi Jim, good question. So you can place 7-10 unheated briquettes on each side – that’s a total of 14-20 unheated briquettes. The hot coals surround the two long sides of the pan so the unheated ones can be placed at the two ends. Watching the video may help explain better – see the video around the 10:30 minute mark to see exactly how Jim does it. I hope that helps.
I love your recipes, you give good advice. The food I prepare from them always turns out delicious and my family is amazed at what a great cook I have become. Thanks to you and your cooking skills I thank you and my family thanks you too.
Love your recipes and this one looks great. Any advice on using a gas grill?
Hi Louann, they do sell rotisserie kits for gas grills but we have not tested one so can’t give specific advice there, though a gas grill is likely easier to control, temperature-wise, so as long as you’re cooking at a similar temp and checking the temp of the chicken with a wireless thermometer, the steps should be similar.
Hi Louann,
I just did a chicken on my gas grill on Sunday. You have to remove the grates and I didn’t use the middle burner. Also, put a drip pan under the chicken as it cooks. Mine came out great.
Thank you!
I brine my chicken in buttermilk overnight and then use the rotisserie on my grill, per your recipe.
How about rotisserie chicken parts? As a single person. (With no grill) – can we get a recipe for oven roasting chicken quarters (or parts) that turn out moist and flavored like the rotisserie chicken?
Sure, you can try our Italian baked chicken and potatoes which uses chicken parts. https://www.sipandfeast.com/italian-baked-chicken-potatoes/