
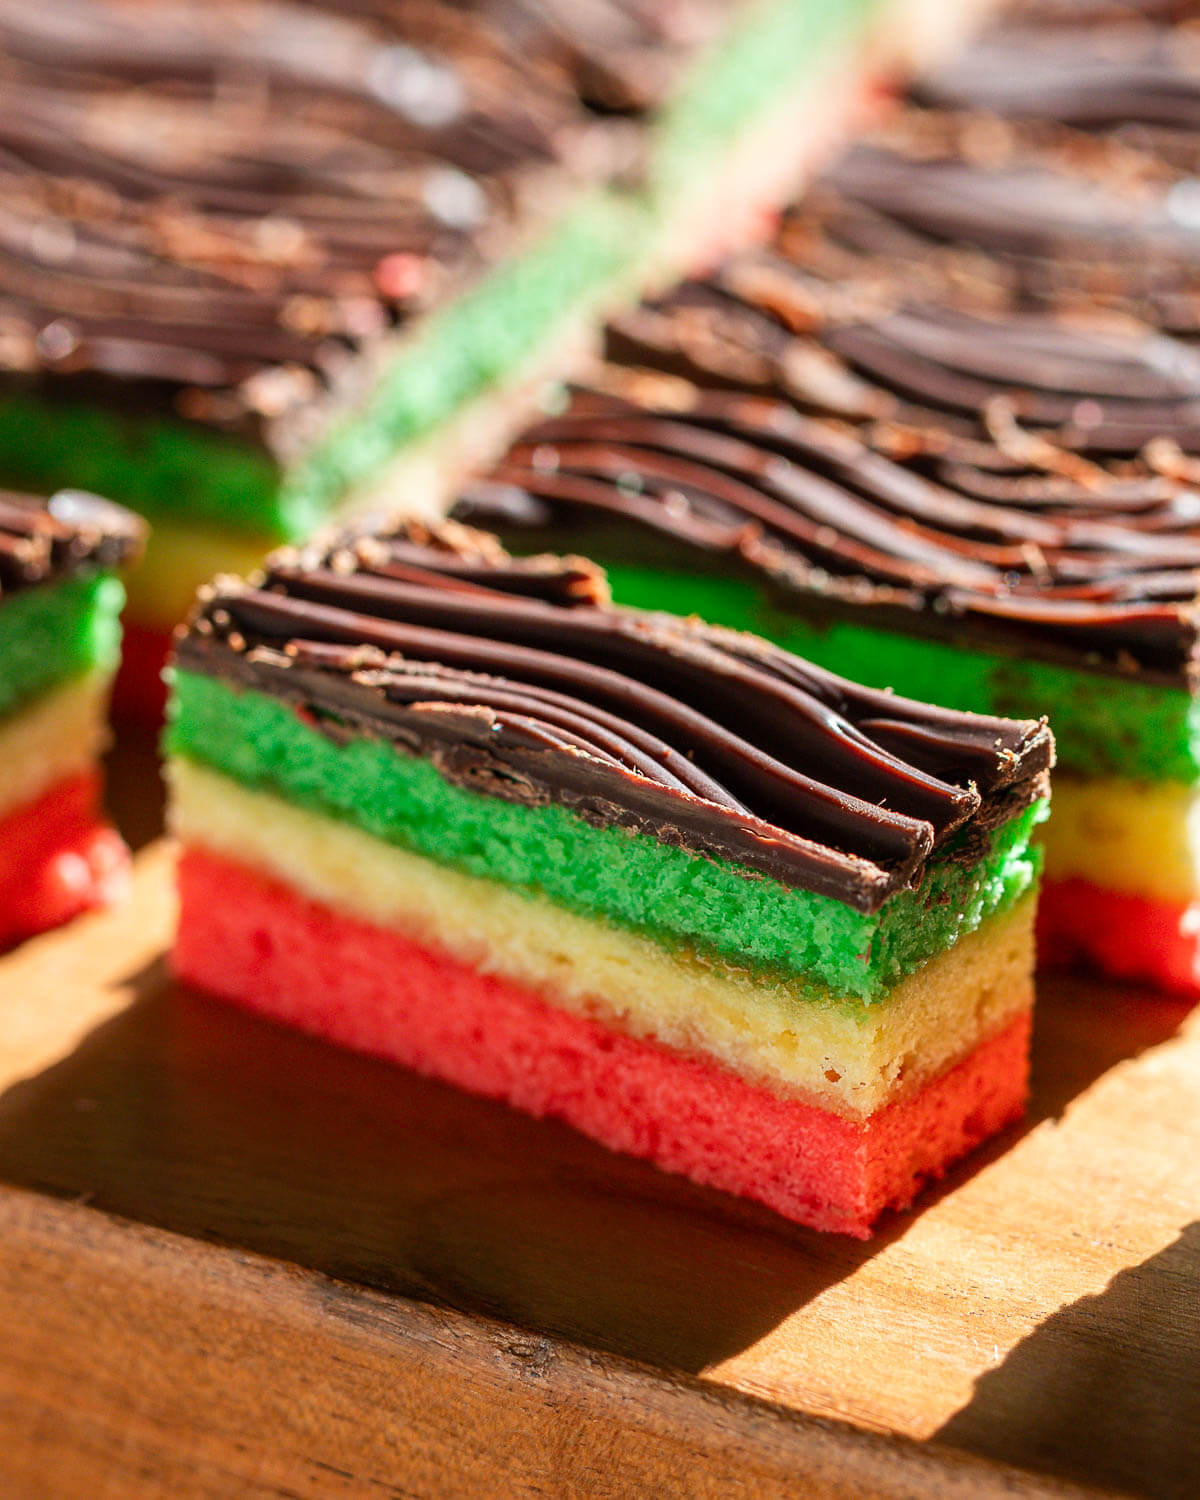
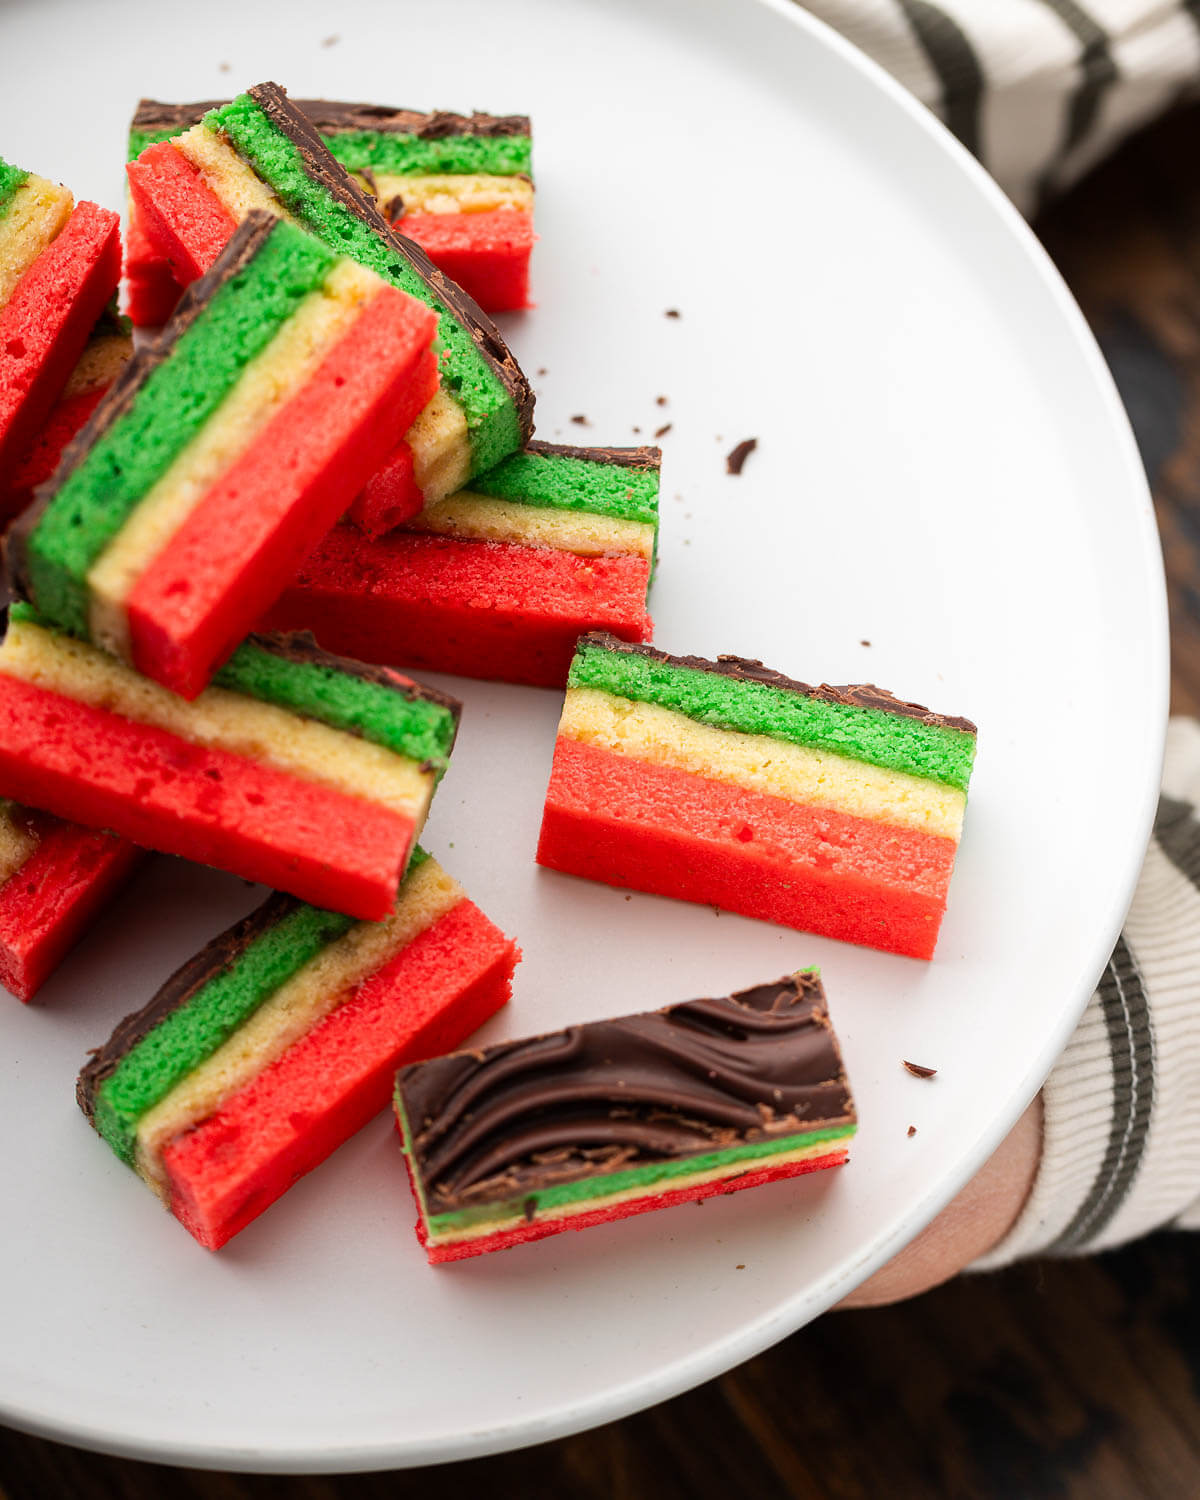
Italian Rainbow Cookies are the brightly colored festive cookie that can be found in nearly every Italian bakery. They’re easier to make than you’d think and so much fun to eat!
This post may contain affiliate links. Our disclosure policy.
Where we live on Long Island, Italian rainbow cookies, also known as tricolor or seven-layer cookies, are as ubiquitous as bagels, pizza, and cannoli.
They’re one of Sammy’s (my daughter) favorite cookies. She’s an avid home baker and is the one who created this recipe, and took the process photos you see below. All I did was the cutting and the eating!
These delicious cookies, which are actually more of a cake, are colored to match the Italian flag and since they’re made with almond paste, are inherently almond flavored, similar to pignoli cookies and Italian almond cookies.
While they can be enjoyed all year round, they’re even better for Christmas and Easter!
Recipe Ingredients
All ingredients for this recipe are shown in the pic below and special notes are made in this bulleted list to assist you.
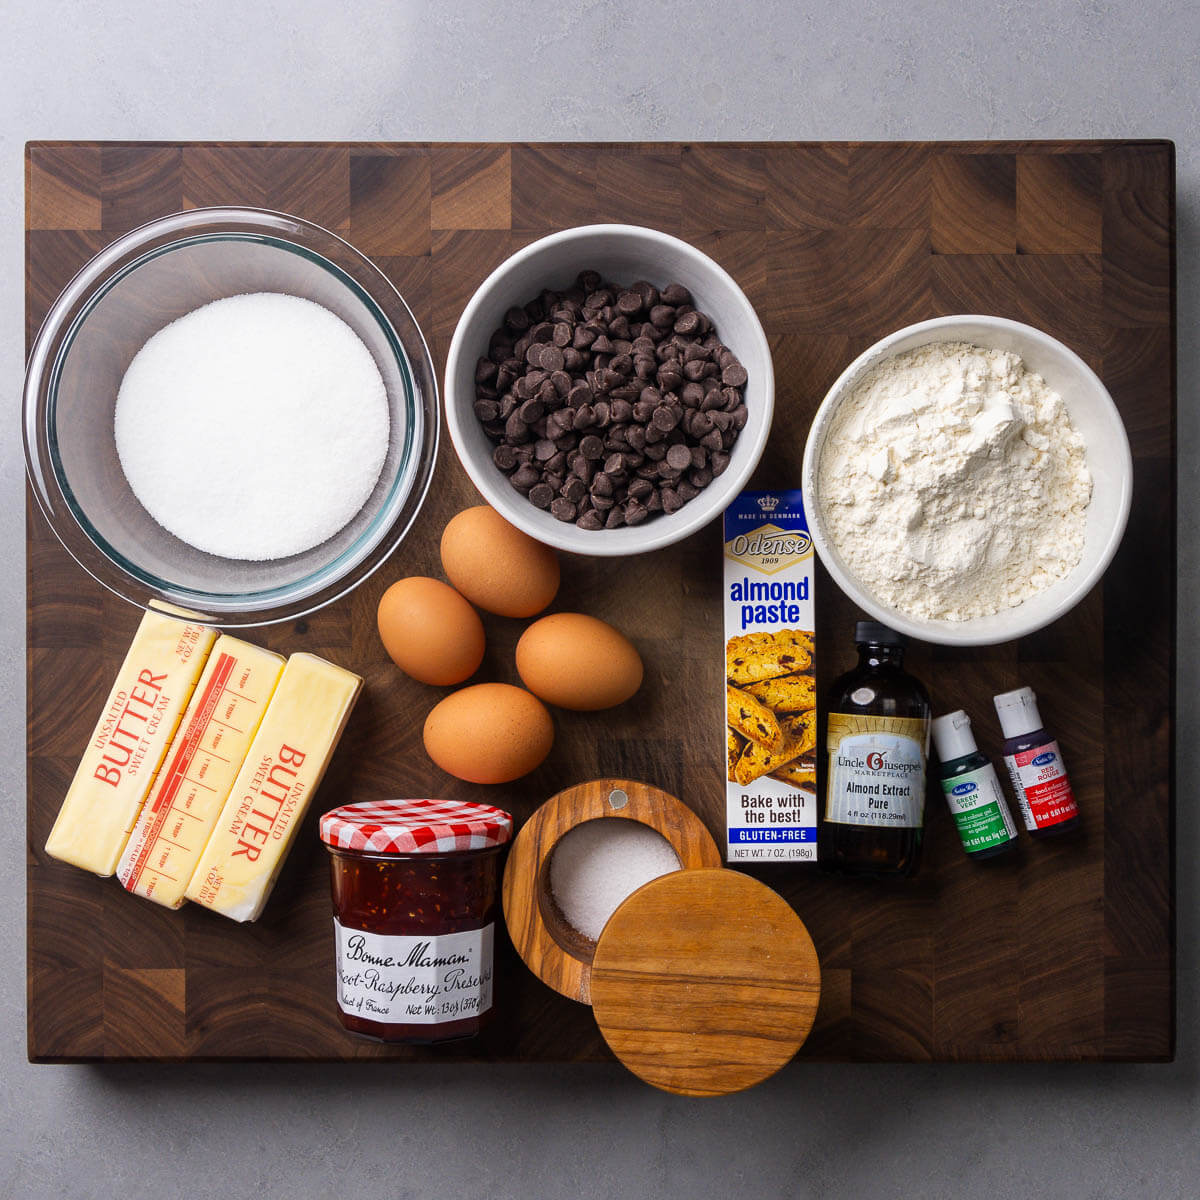
- Almond paste. Almond paste is an essential ingredient in rainbow cookies and helps contribute to the almond flavor of the cookie, in addition to almond extract.
- Food coloring. We recommend using gel food coloring as it yields superior results.
- Jam. The great rainbow cookie debate involves apricot vs. raspberry jam. Whichever jam you use, try to use seedless jam as it will be much easier to spread. We used seeded Apricot-Raspberry jam and had good results, but using seedless would have been a better idea. Also, be sure to warm the jam (about 10-20 seconds in the microwave) before spreading.
See the recipe card for full information on ingredients and quantities.
Want To Save This Recipe?
How to make it
Each number corresponds to the numbered written steps below.
- Preheat the oven to 350°F and line three 9×13″ baking sheets with parchment paper. In a large bowl, or the bowl of a stand mixer fitted with a whisk attachment, beat 4 egg whites at medium speed increasing to high speed until stiff peaks are formed. Add 1/4 cup of sugar, a little at a time, beating until the whites are glossy in appearance, about 3 minutes.
- In a medium-sized bowl, beat together 7 ounces of almond paste and the remaining 3/4 cup of sugar until combined, about 4 minutes, on low to medium speed. Add 1 1/4 cups of room-temperature butter and beat until pale and fluffy, about 3 minutes.
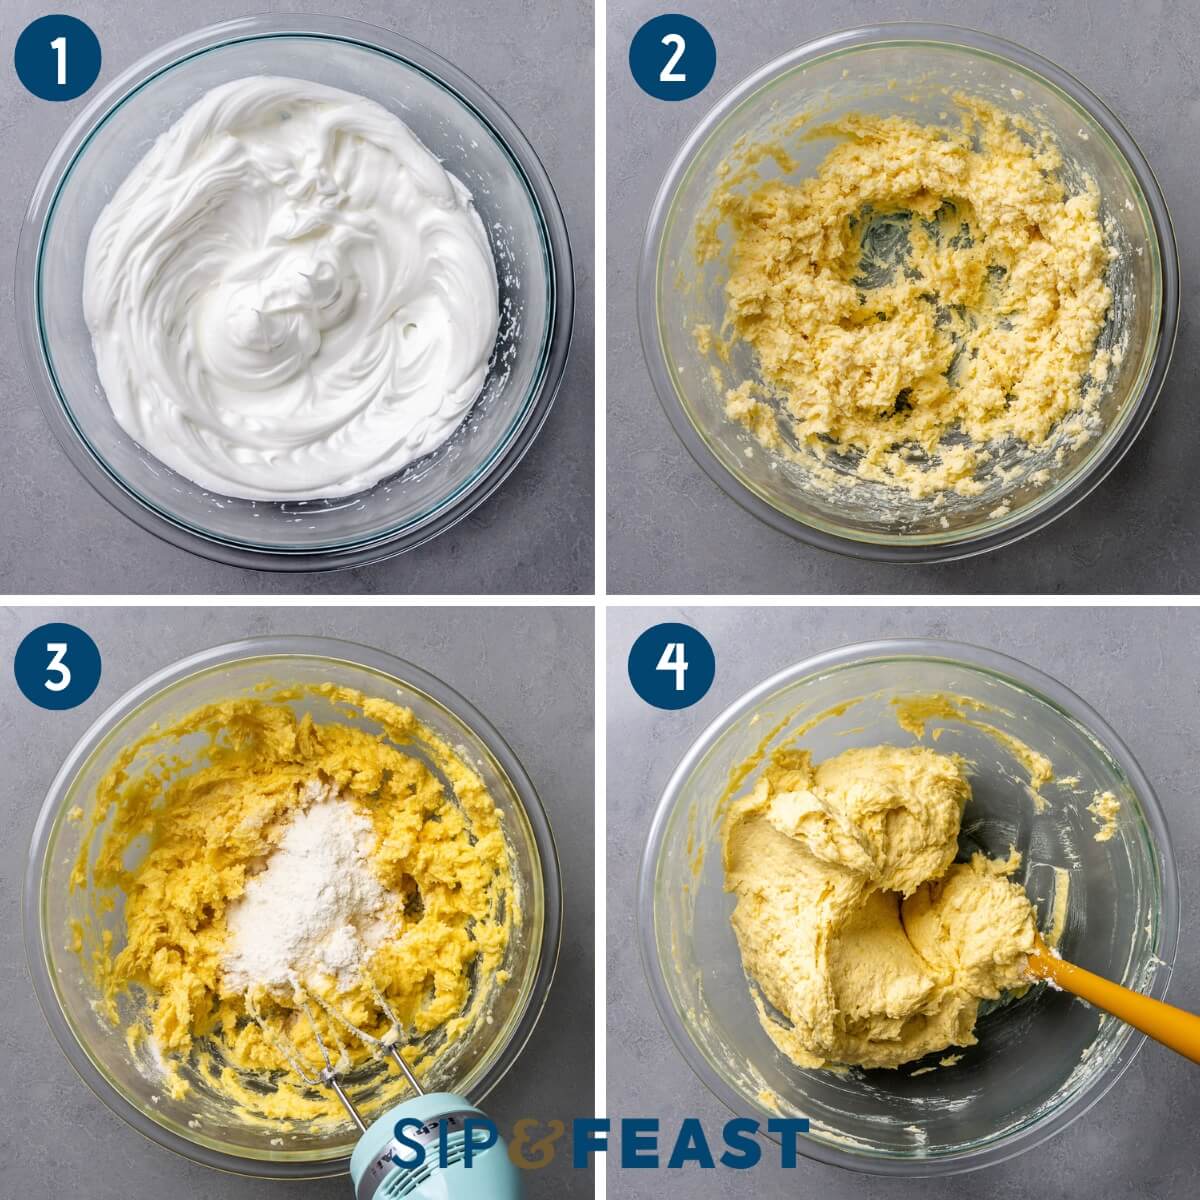
- Add 4 egg yolks and 1 teaspoon of almond extract and beat until combined, about 3 minutes, then add 2 cups of all-purpose flour, 1/2 teaspoon of salt, and mix until combined.
- Use a spatula to fold half the egg white mixture into the almond mixture, then gently fold the remaining egg whites until just combined.
- Divide the batter equally into 3 bowls. Use a kitchen scale to ensure accurate and equal weight in each bowl. Leave one bowl of batter plain, and add 1 drop at a time of green and red gel food coloring to the other two bowls until the desired color is achieved.
- Pour each bowl of batter into each baking sheet and spread the batter evenly throughout the pan to ensure even cake layers. Bake the layers for 8 to 10 minutes, rotating at the halfway point.

- Once cooled, lay out a new sheet of parchment paper and invert the green layer onto the paper. Warm 3/4 cup of raspberry or apricot jam for 10-20 seconds in the microwave and spread half of it evenly across the cake. Invert the white layer on top and spread the other half of the jam on top.
- Invert the red layer on top of the white and place the layered cake with the parchment paper onto the bottom of a quarter sheet pan.
- Place another sheet of parchment paper (or plastic wrap) on top, followed by another quarter sheet pan, and weights (we used cans, but books would be much better as the cans can create waves). Place in the refrigerator for a minimum of 6 hours, but preferably overnight.
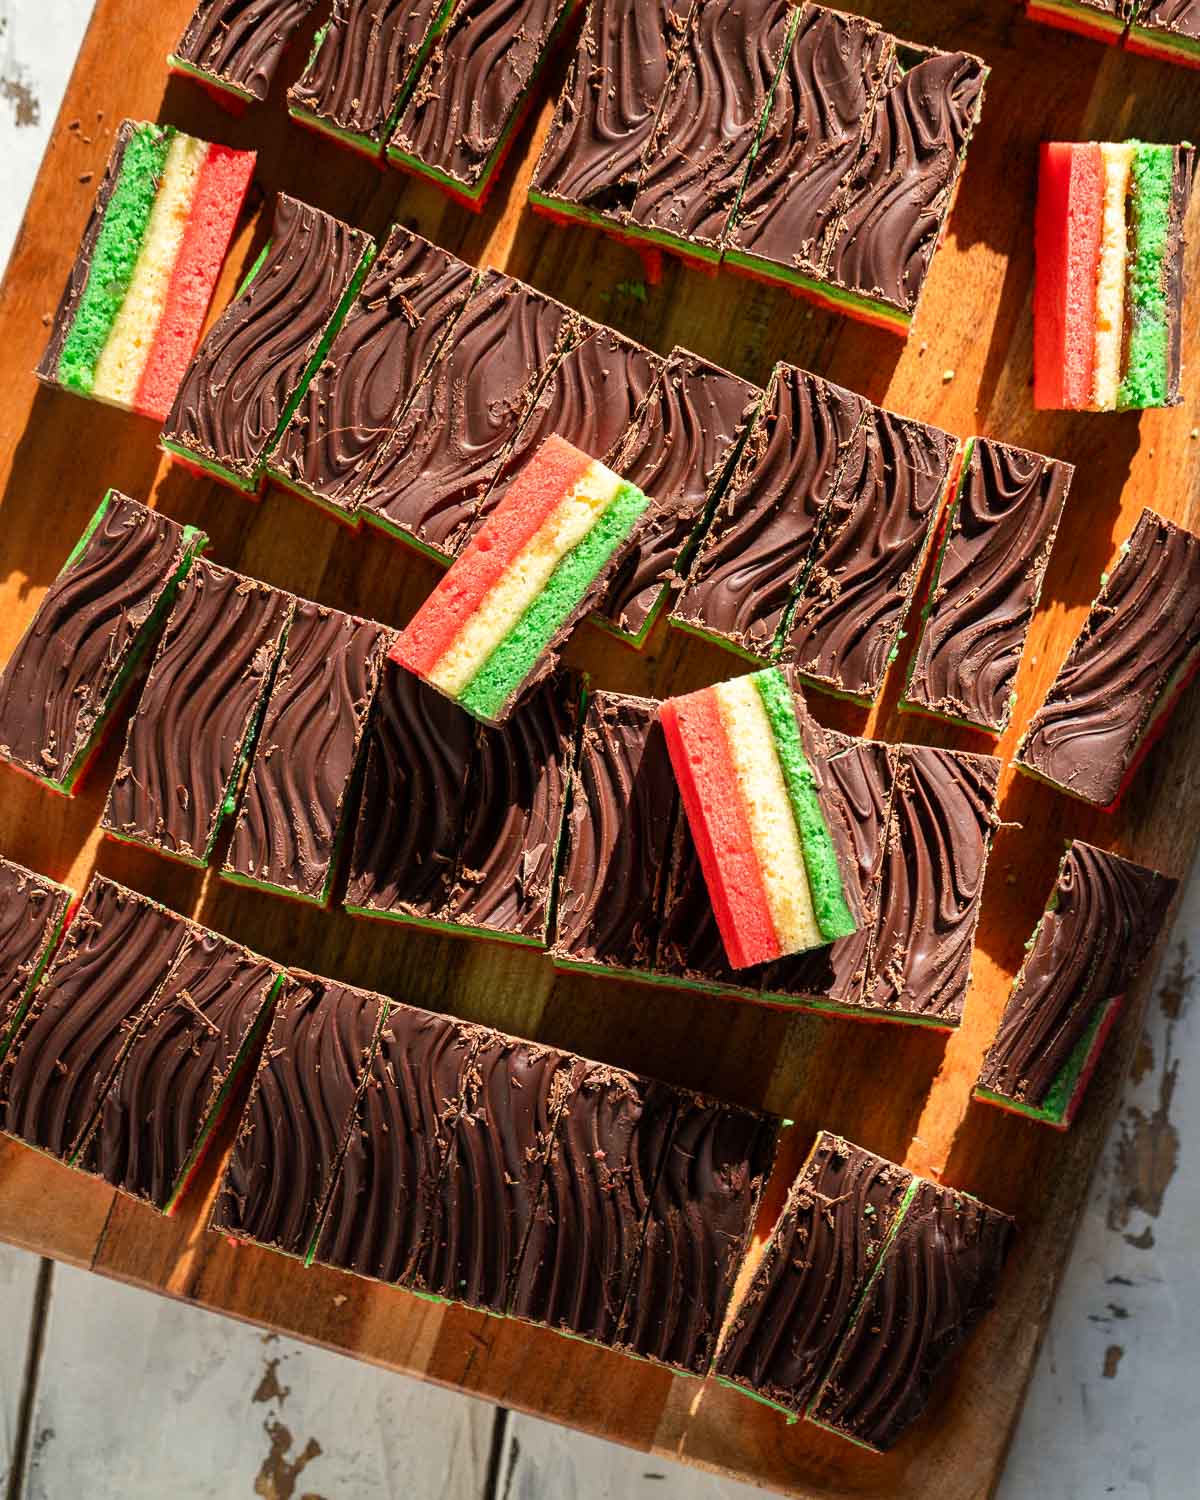
- Once chilled, remove the sheet with the weights along with the parchment paper or plastic wrap. Invert the cake carefully to ensure the cake doesn’t break. The green layer will now be on top. Use a sharp knife to gently trip each side of the cake to ensure even sides. Melt 1 1/2 cups of chocolate chips in the microwave in 10 second bursts, or over low heat in a pan on the stovetop. After it melts, allow the chocolate to set out until room temperature, about 12 minutes, then pour the chocolate on top of the cake using an offset spatula to spread it evenly. If desired, spread the chocolate on the sides of the cake, and/or use a fork to make lengthwise wave patterns in the chocolate. Note: you can also spread the chocolate onto the bottom red layer. To do this, you’ll need to allow the top layer of chocolate to completely chill, then repeat the process for the bottom. You can use parchment paper to help speed up the process, but I prefer to let it chill.
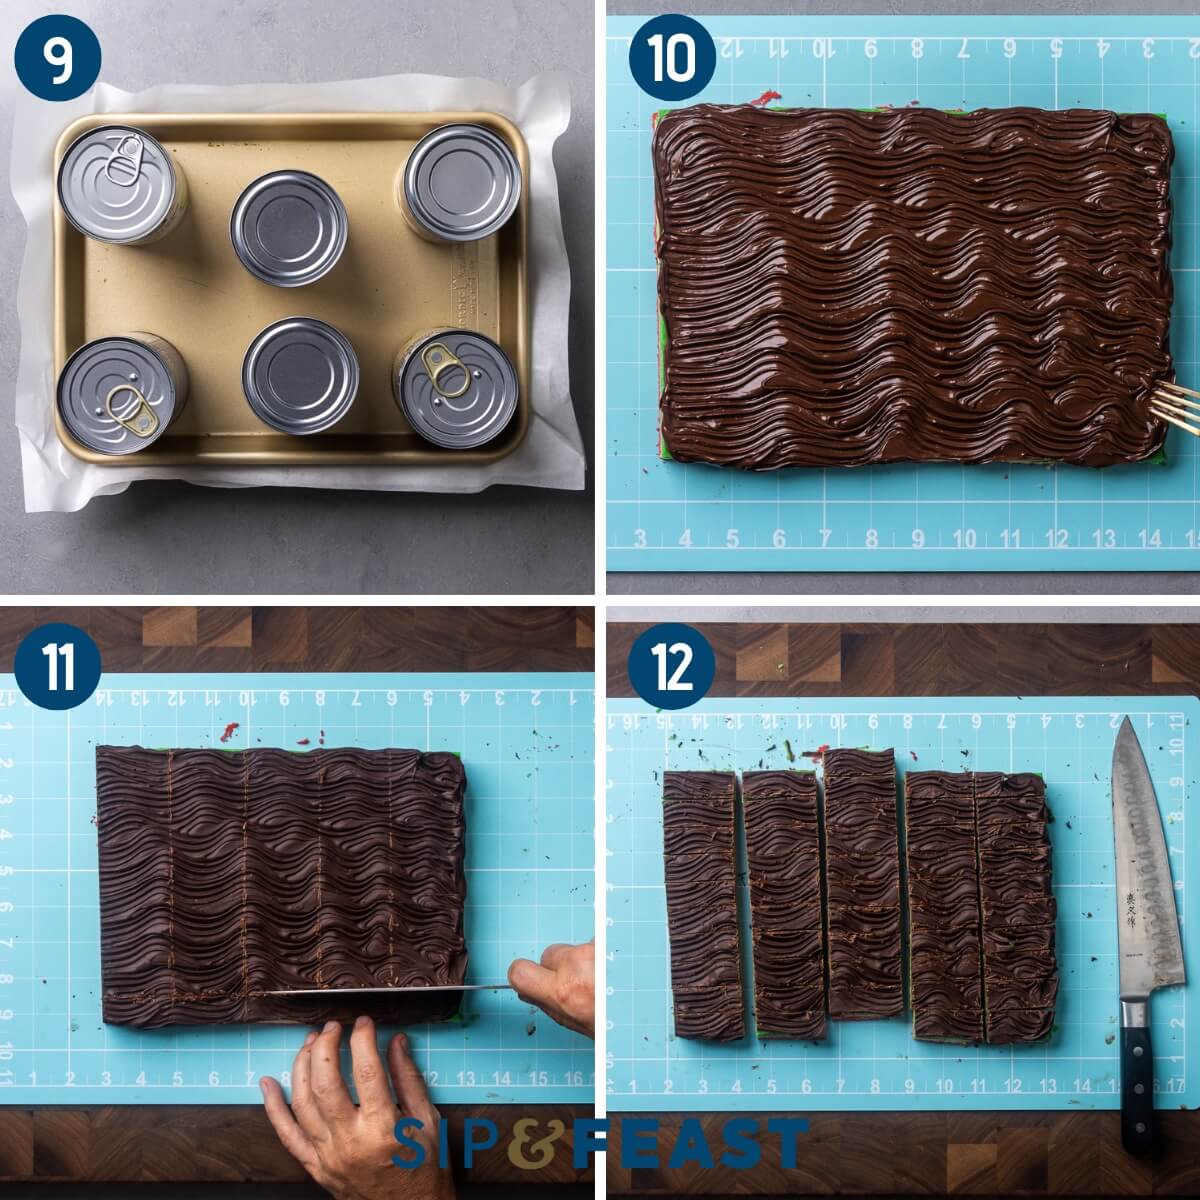
- Refrigerate for 1 hour or until the chocolate is fully set. Once set, place the cake on top of a cutting board. Using either a serrated knife or a chef’s knife, score the chocolate in the way in which you plan to slice the cookies, ensuring breakage doesn’t occur.
- Once scored, use a chef’s knife to cut the cake into 5-6 equal sections, width-wise, then cut each section into 10-12 sections, lengthwise, leaving you with 50-72 Italian rainbow cookies. Clean your knife between each slice to ensure neat cuts. The rainbow cookies can be stored in an airtight container in the refrigerator for 1-2 weeks.
Top tips
- Even layers. Don’t rely on your eyes to divide the batter. A simple kitchen scale will ensure equal weight for each layer and is a tool every home baker should have.
- Use seedless jam! Seedless jam is much easier to spread and will make the process even easier.
- Cutting the rainbow cookies. Score the chocolate first with a sharp knife. It helps to use a fondant cutting board with a grid to ensure equal cuts. Then use a sharp knife (I prefer a chef’s knife but a thin serrated will work well too) to cut each section, and then each cookie. Be sure to wipe the knife clean after each cut to ensure clean layers. Work quickly. If the chocolate starts to melt, it’s best to place it back in the fridge or freezer to let it harden before making further cuts.
More amazing cookies
If you’re a fan of Italian cookies, here are a few more recipes to try!
If you’ve enjoyed this Italian Rainbow Cookie Recipe or any recipe on this site, give it a 5-star rating and tell us about it in the comments below.
We strive to satisfy a number of learning styles. If you are someone who prefers to learn by watching, you can find most of our recipes on YouTube and our Facebook Page.
For more never-before-seen FULL MEAL RECIPE VIDEOS, become a Patreon member today!
Italian Rainbow Cookies

Ingredients
- 4 eggs separated
- 7 ounces almond paste
- 1 cup (200g) sugar divided
- 1 1/4 cups (282g) butter room temperature
- 1 teaspoon almond extract
- 1/2 teaspoon salt
- 2 cups (260g) all-purpose flour
- red and green food coloring
For Assembly
- 1 1/2 cups (226g) semi-sweet chocolate chips
- 3/4 cup (240g) apricot or raspberry jam warmed, see notes below
Want To Save This Recipe?
Instructions
- Preheat oven to 350°F and line three 9×13" baking sheets with parchment paper.
- In the bowl of a stand mixer fitted with a whisk attachment, beat the 4 egg whites at medium speed, increasing to high speed until stiff peaks are formed. Add a 1/4 cup of sugar, a little at a time, beating until the whites are glossy in appearance, about 3 minutes. You can also use an electric hand mixer and a large bowl.
- In a medium-sized bowl, beat together the almond paste and remaining 3/4 cup sugar until combined, about 4 minutes on low to medium speed.
- Add the butter and beat until pale and fluffy, about 3 minutes. Add the egg yolks and the almond extract and beat until combined, about 3 minutes. On low, add the flour and salt, mixing until just combined.
- Fold half of the egg white mixture into the almond mixture, then fold in the remaining whites gently, until just combined.
- Divide the batter into three different bowls. Use a kitchen scale to ensure equal measurements for each bowl. Leave one bowl of batter plain, add 1 drop at a time of red and green food coloring to the other bowls until the desired color is achieved.
- Pour each bowl of batter into each baking sheet lined with parchment paper. Spread the batter evenly throughout the pan to ensure even and level cake layers.
- Bake the layers for 8-10 minutes, rotating at the halfway point.
- Once cooled, lay out a new piece of parchment paper. Invert the green layer onto the parchment, then spread about half of the warmed jam evenly across the cake. Then, invert the white layer on top. Spread the remaining jam on top. Finally, invert the red layer on top of the white layer.
- Place the layered cake with the parchment paper on the bottom onto a quarter sheet pan. Place another piece of parchment or saran wrap on top. Finally, place another quarter sheet on top, with weights (ie. books). Refrigerate for a minimum of 6 hours, but preferably overnight.
- Once chilled, remove the sheet with the weights, along with the parchment or saran wrap. Invert the cake, in an extremely careful manner, ensuring that the cake doesn't break. The green layer will now be on top. Trim each side of the cake to ensure evenness.
- Melt the chocolate chips in the microwave in 10 second bursts. Alternatively, you can melt in a pan on the stovetop over low heat. Once melted, let it sit until room temperature, about 12 minutes.
- Pour the chocolate on top of the cake, spreading it out evenly with an offset spatula. If desired, you can spread the chocolate on the sides of the cake, and/or use a fork and create a lengthwise wave pattern in the chocolate. Refrigerate for 1 hour or until fully set. Note: You can also add chocolate to the bottom red layer; to do so, allow the top layer to chill and set completely, then repeat the process.
- Once fully set, place the cake on top of a cutting board. Using either a serrated knife or a chef's knife, score the chocolate in the way in which you plan to slice the cookies, ensuring that breakage doesn't occur. Then, once scored, cut the cookies into about 5-6 equal sections, width-wise, then cut them into 10-12 sections lengthwise, cleaning your knife after each slice to ensure neat cuts.
- The rainbow cookies should be refrigerated in an air-tight container and will keep for about 1-2 weeks.
Notes
- Makes approximately 50 1 1/2 x 3/4″ cookies or up to 100 if they are cut smaller.
- Refrigerating time should be at least 6 hours, but best overnight.
- Apricot or raspberry jam can be used. It is far easier to spread a seedless version. The jam should be warmed for 10-20 seconds in the microwave to make it spreadable.
- This recipe was written for a conventional oven. For convection ovens, reduce the temperature by 25 degrees and begin checking for doneness at the 75% mark.
Nutrition
Nutrition information is automatically calculated, so should only be used as an approximation.
Follow Me
The Sip and Feast Cookbook
- 100+ recipes
- Essential tools and ingredients
- Entertaining ides
- Stunning photography


Excellent recipe love the results. What I did was, I scored the chocolate before letting it set so cutting was easier.
Can I make the cake layers in a 13×9 jelly roll pan
A jelly roll pan is very close in size to a quarter sheet pan so you should be fine to use.
The recipe itself was fantastic and very reminiscent of the 7 layers/rainbow cookies i had growing up in queens. And I shared with some non-Italians who hadn’t had these and they loved it.
Maybe i got the measurements wrong, but it seemed the recipe wasn’t enough to cover a 13×9 pan. I also made it again this morning, but put it in 8×8 pans and it seemed to work out a bit better.
Keep it up Jim! (or rather, Jim & Tara’s daughter!)
Hi Tony, thanks for the comment. The layers are not that thick, so if you were expecting this to be a little thicker that could be why it wasn’t enough to cover the 13×9, which was what we used in the process photos. I’m happy you still enjoyed them and had success with the 8×8 pans.
Hi, James, I have made this and it’s very good .The first time I made it was fine.The second time my chocolate cracked when I cut it can you tell me what I did otherwise my family loves it, and I love making it. Thank you
Hi Luci, it could have to do with the temperarture of the chocolate. If it is too cold/almost frozen, that could cause the chocolate to crack. The sharpness of the knife you’re using could also impact the results.
Knowing the health concerns regarding food dyes, I would feel uncomfortable about making these. Are there any safer substitutions for coloring the different layers?
You can 100% use natural food coloring, Bobby. You can often find these at Whole Foods or other natural grocery stores. They use vegetables to create the colors. The colors aren’t as vibrant as these, but they will 100% get the job done.
Thank you very much!
My first time making..but I’m really excited ..got all three pans cooling..reminds me of jelly roll cake..and shortbread mixed in one..I’ve heard nothing but good comments about this rainbow cookies..thank you for sharing and God 🙌 bless
These are my grandaughter’s favorite cookie. Now I can make her some for Christmas.I really enjoy all your recipes.
We’re so happy you enjoyed the recipe, Christine!
I’ve wanted to make these for a while. Can these be frozen so I can make them ahead of time before the Christmas rush?
Yes, you can definitely freeze them!
Thank you for the reply! I’ll let you know how the turn out 🎄
Totally delicious and beautiful
We’re so happy you enjoyed them, Caryn!