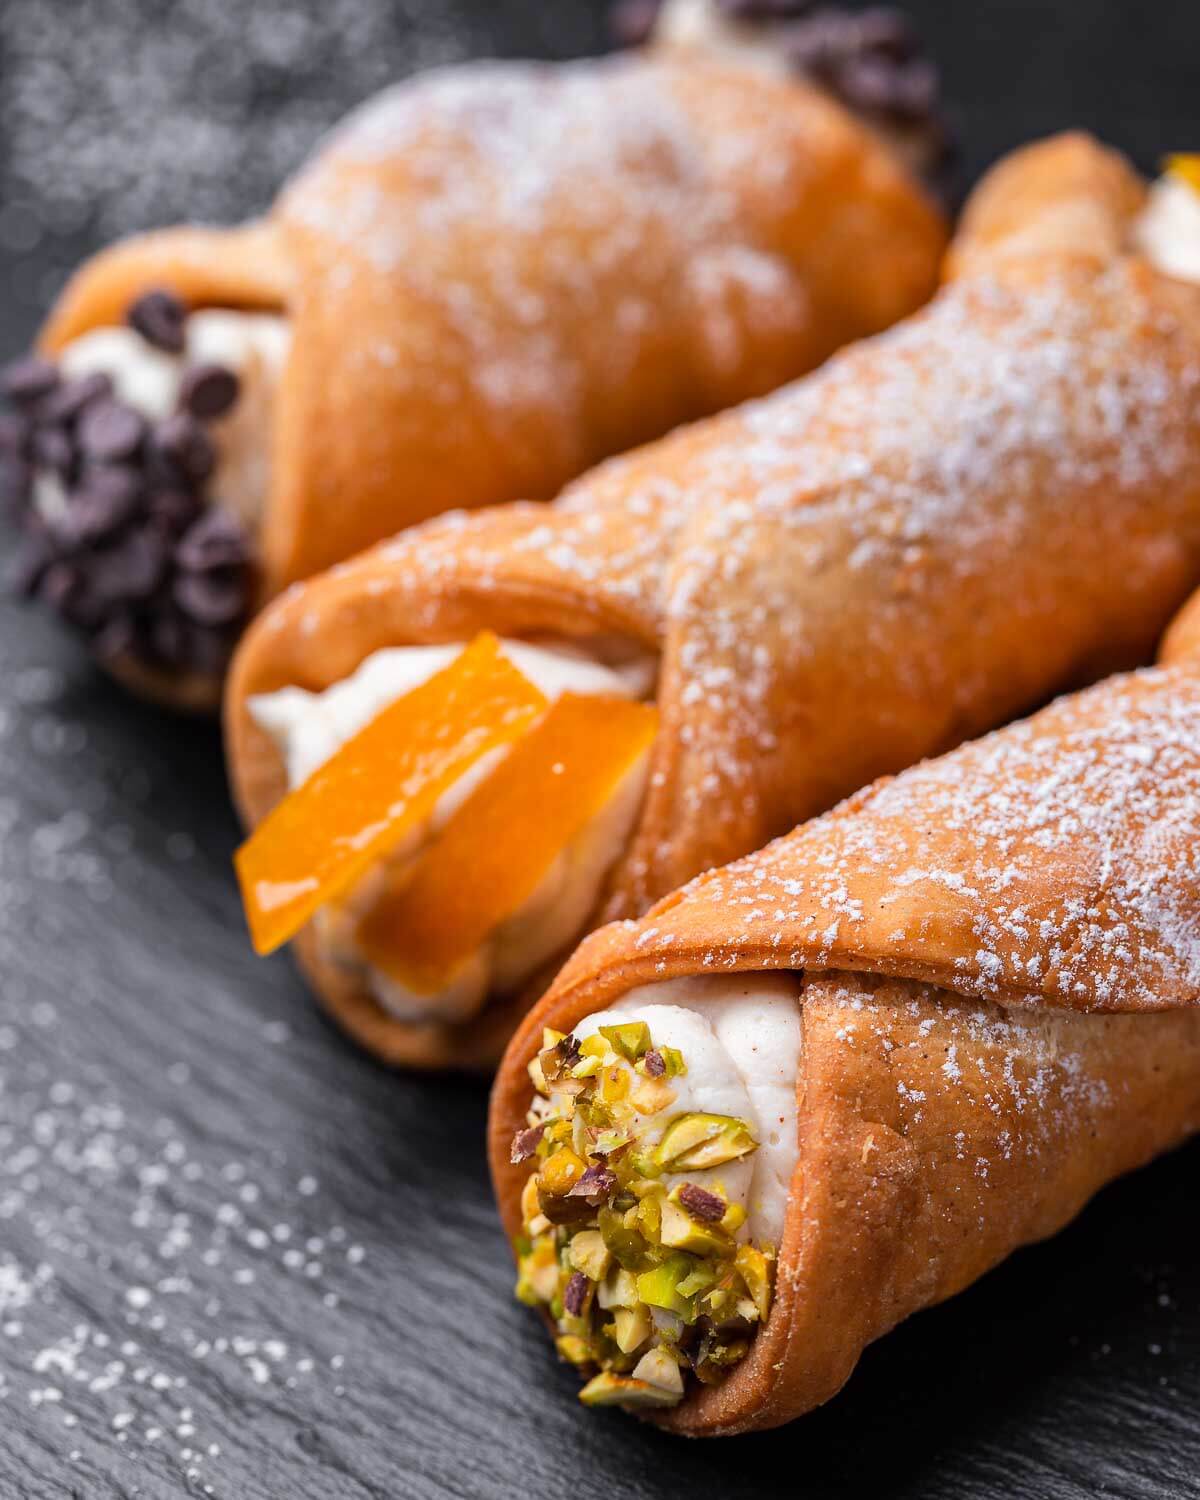
Cannoli are a wonderful Italian pastry that hails from southern Italy and Sicily and are very popular in the New York metro area. Crisp and blistery pastry shells are filled with a sweet ricotta-cinnamon cream and topped with chocolate chips, pistachio, candied orange peel, or any topping you’d like!
This post may contain affiliate links. Our disclosure policy.
Cannoli are one of the most well-known Italian pastries, especially where we live in the New York area.
As kids, we grew up having cannoli at every holiday, or family gathering alongside rainbow cookies, reginelle, and pignoli cookies.
Most of the time they were topped with green colored sprinkles, but over the years they’ve become more popular with chocolate chips and even chocolate-dipped cannoli shells.
Traditional Sicilian cannoli can include citron, orange peel, candied pumpkin, cherry, or pistachio.
However you decide to top them, they’re sure to be incredibly delicious!
Homemade cannoli can be intimidating but our step-by-step instructions walk you through how to make these in your own kitchen.
Want To Save This Recipe?
Special equipment you’ll need
- Cannoli forms – These metal tubes a perfect for shaping and frying the cannoli.
- Candy or oil thermometer – to ensure your frying oil is at the proper temperature. This oil thermometer works well.
- Rolling pin, pasta maker, or pasta attachment for a Kitchen Aid stand mixer – while you can certainly make these using elbow grease and a rolling pin, if you own a pasta maker or KitchenAid mixer with a pasta attachment, now is the time to use these as you’ll have a much easier time.
- Kitchen tweezers or needle nose pliers – for removing the cannoli shells from the cannoli forms.
- Pastry bag with a piping tip – for filling the cannoli. You can also use a gallon-sized Ziploc bag with the tip cut off, but a reusable pastry bag with a coupler and piping tip will work better.
- Round cookie cutters – for cutting the cannoli dough. Alternatively, you can simply cut the dough into squares with a knife. 4 to 5-inch cutters work well but you really can make these any size you want.
How to make authentic cannoli
Each number corresponds to the numbered written steps below.
- In a large bowl, or the bowl of a stand mixer fitted with a dough hook, combine 2 cups (240g) of all-purpose flour, 1 tablespoon of sugar, 1/4 teaspoon of cocoa powder, 1/2 teaspoon of ground cinnamon, and a pinch of salt. Mix just until combined (less than 15 seconds).
- Add 3 tablespoons (39g) of shortening and work into the flour until the mixture is grainy.
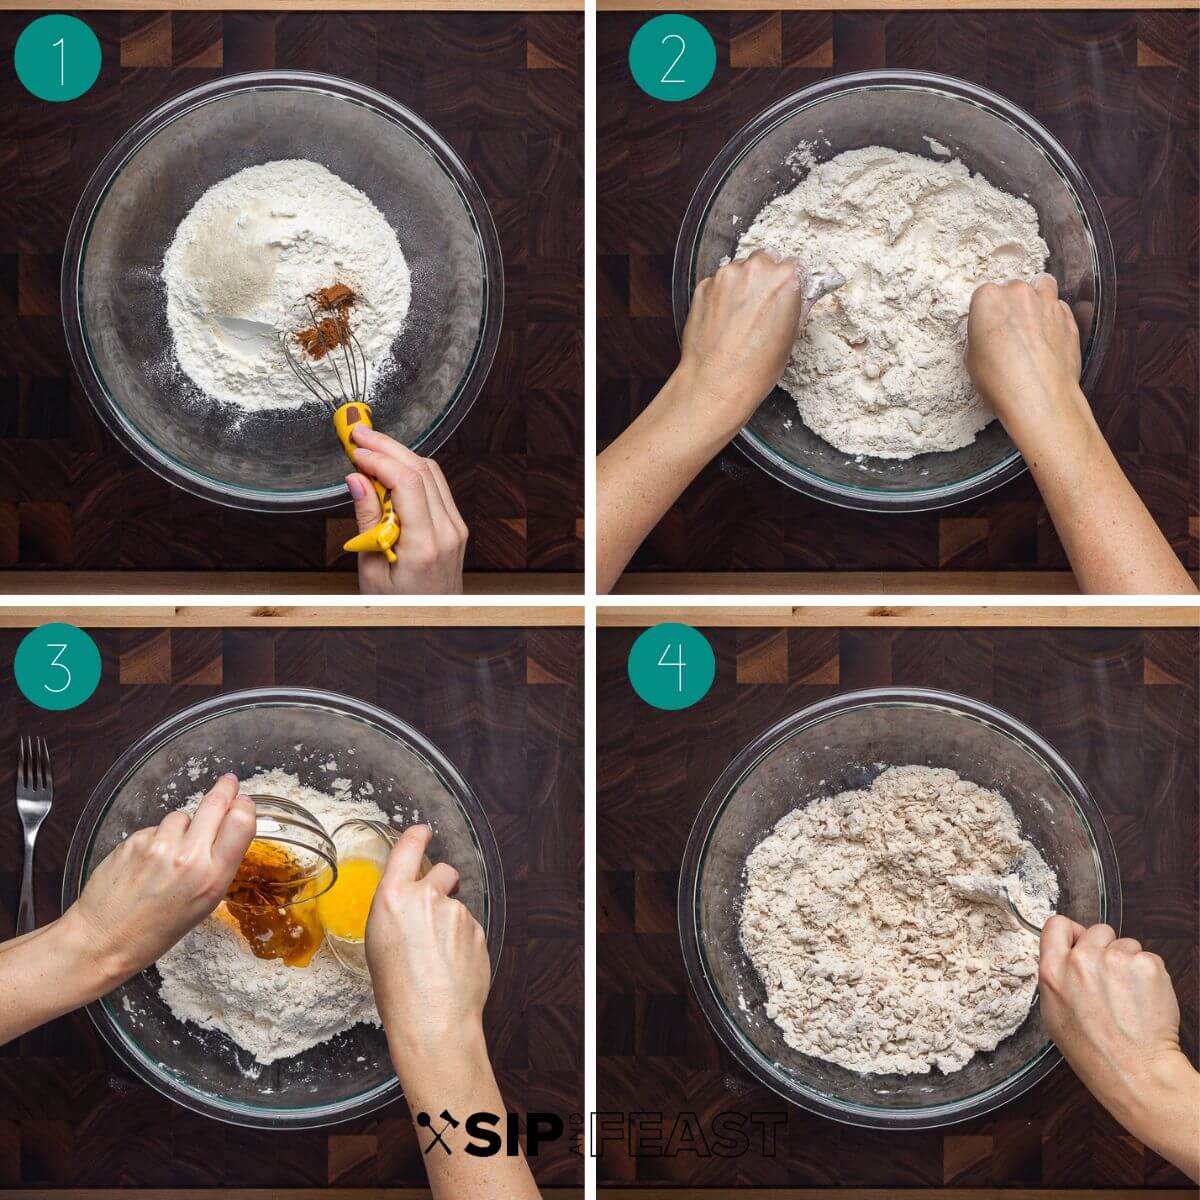
- If making by hand, make a well in the center of the flour mixture and add 1/4 cup (56g) of Marsala wine, and 1 large beaten egg.
- Mix with a fork until a dough is formed. If using a stand mixer, continue to mix on low speed with the dough hook until the dough is formed. Note: No need to knead by hand in step 5 below if you have been using a stand mixer. Kneading on speed level 3 for 3-4 minutes is more than enough. We just wanted to demonstrate that this whole recipe can be made without a KitchenAid-style mixer.
- Move the dough to a clean, flat work surface that’s dusted with flour and knead for approximately 8-10 minutes. The dough will be very firm and hard to knead but will eventually become more pliable as you continue to knead.
- After the kneading, wrap the dough in plastic and allow it to rest in the refrigerator for at least 30 minutes but longer than 60 minutes is better.
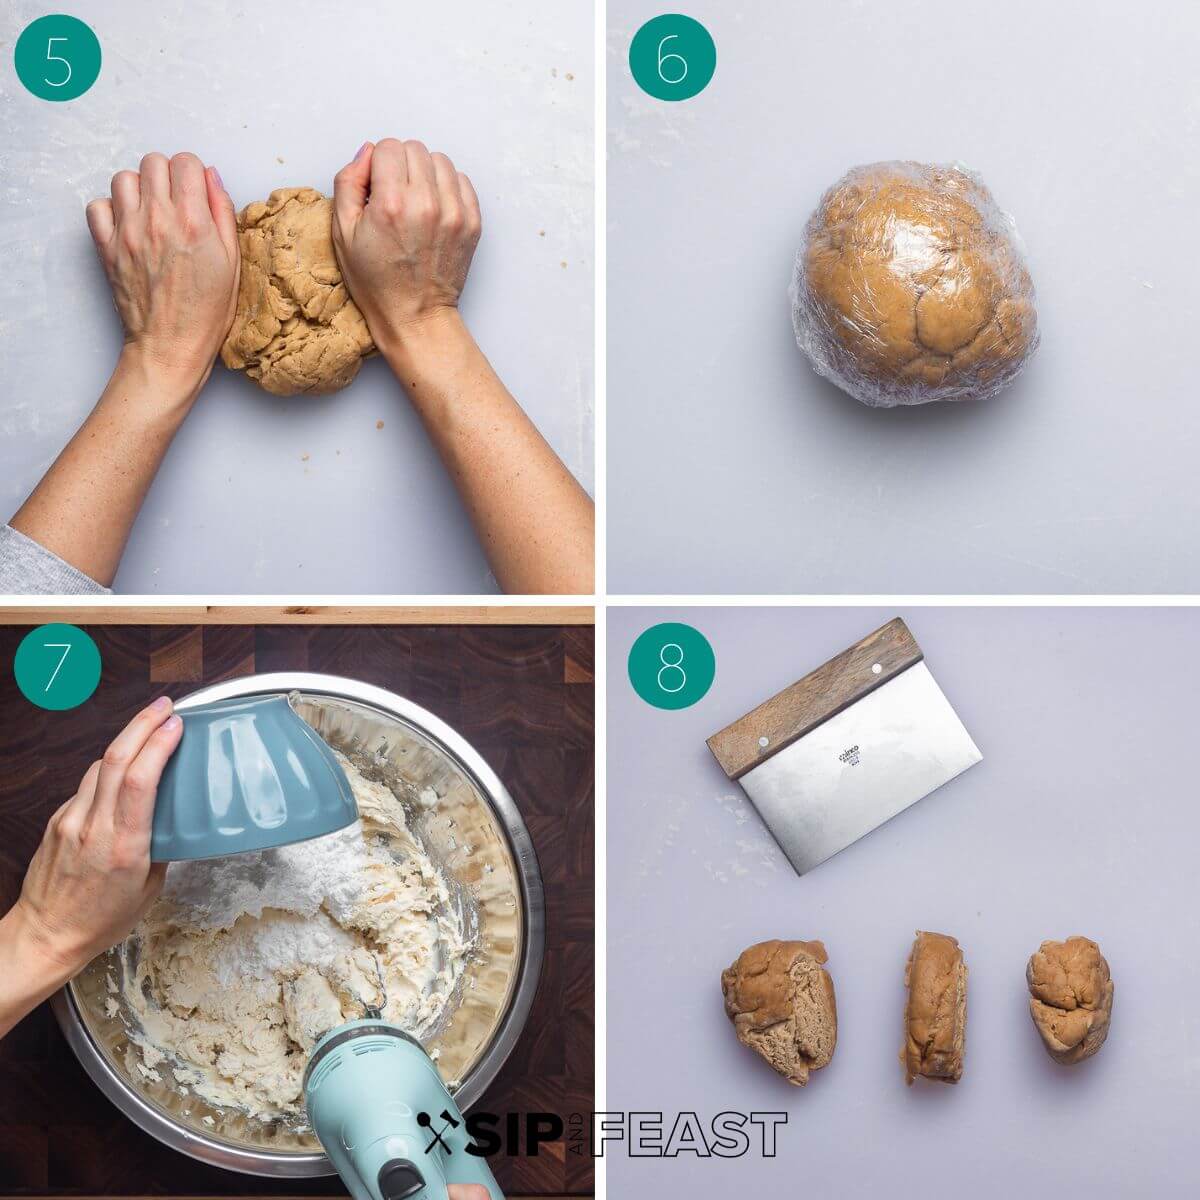
- While the dough is in the fridge, make your cannoli cream by combining 32 ounces (907g) of impastata or dry, well drained ricotta, with 1 cup (113g) of confectioner’s sugar, 1/2 teaspoon of ground cinnamon, and a 1/2 teaspoon of vanilla extract. Once combined, set the mixture aside in the refrigerator until you’re ready to use it.
- Remove the dough from the refrigerator and allow it to come to room temperature for at least 20 minutes. Cut into 3 equal-sized pieces.
- On a lightly floured surface, roll out the dough until it’s thin enough to begin to pass through a pasta machine. Note: This can be done just with a rolling pin, but it can be quite challenging. A pasta machine or mixing attachment will ensure equally thin pieces.
- Pass the strip of dough through the machine starting with the thickest setting. Once a sheet has formed fold the dough by thirds (laminating it) and pass it through the machine again until the width of the dough equals the width of the pasta machine.
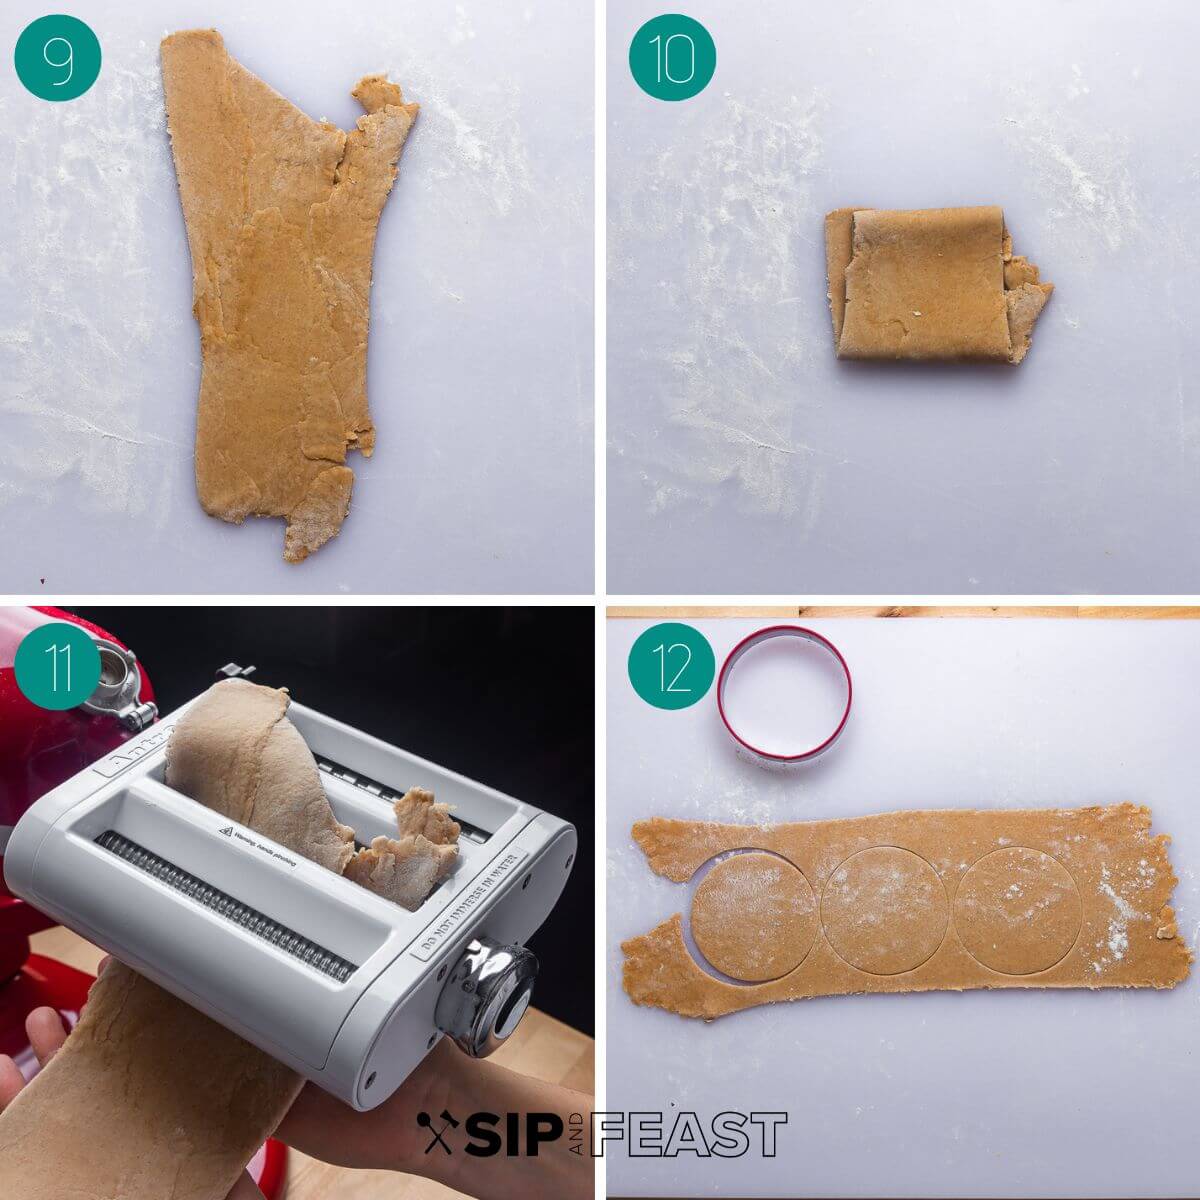
- Continue passing the dough through the pasta machine adjusting the thickness settings down until you reach a thickness of approximately 1/16 of an inch. If you are rolling by hand, continue rolling until you’ve achieved the same thickness. Note: This doesn’t have to be as precise as pasta making, so don’t go crazy if you don’t have beautifully long sheets.
- Using a 3 1/2-inch round cookie cutter, begin to cut the dough into circles. If you don’t have a cookie cutter you can use a jar to cut the circles, or simply cut the dough into 3 or 4-inch squares.
- If cutting into circles, use a rolling pin to shape the circles into ovals as this will allow for easier wrapping of the cannoli form in the next step.
- Begin to wrap the dough around the cannoli form, dipping your finger in the egg white and dabbing the overlapping pieces of the dough to create an envelope-type seal. Note: Take special care to not get any egg white on the form as it will make it difficult to remove the shell after frying.
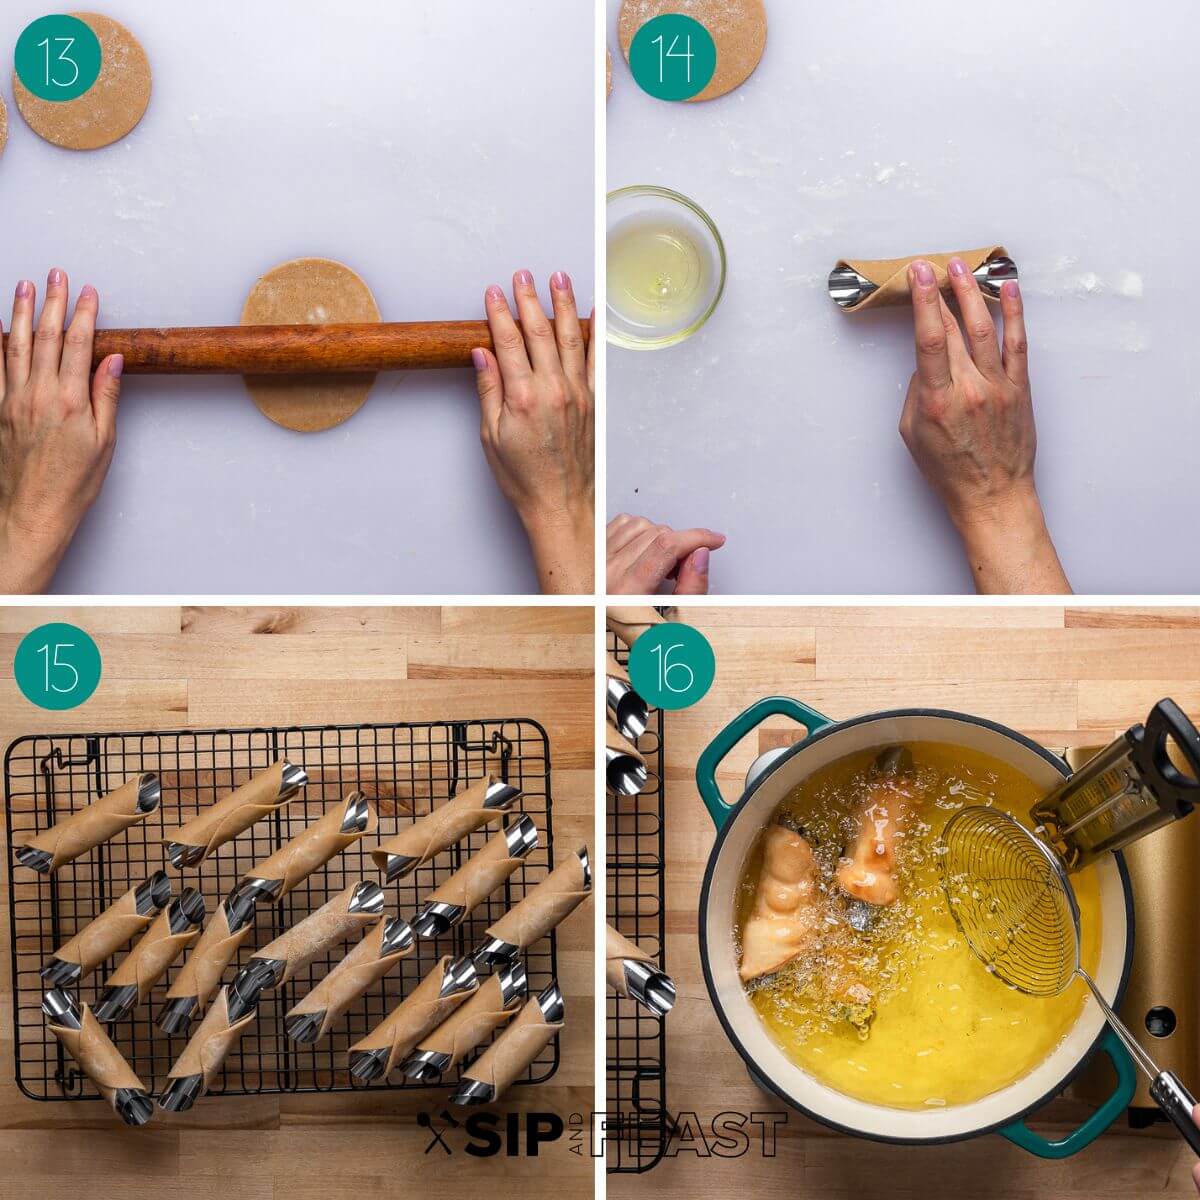
- Fill a large heavy pot with 2 inches of vegetable oil. Using an oil thermometer, heat the oil to 365-375f. Line a baking sheet with paper towels for draining. While the oil is heating, continue wrapping the dough until you’ve used up all your forms and have them ready to go.
- Gently drop the cannoli into the oil and fry until blistered and golden (about 2 minutes). Don’t overcrowd the pan. Depending on the size of your pan/pot, 3 is usually a good amount to start with. Use a pasta spider or slotted spoon to remove them once done.
- Remove the shells immediately from the cannoli forms using kitchen tweezers or needle nose pliers to hold the shell. Be careful as the cannoli forms will be extremely hot.
- Allow the shells to drain on paper towels while they cool. Any scraps or errors (some will almost certainly open during the frying process!) can be used for cannoli chips as seen below.

- Once the shells have cooled and you’re ready to serve, fill a piping bag with the cannoli cream and begin to pipe the cream into the shells. Fill the shell halfway on one side, then flip and fill the other side. Note: Cannoli are best if filled right before serving otherwise the shells may become soggy. It’s best if you wait to fill them when you’re ready to serve or within an hour of serving.
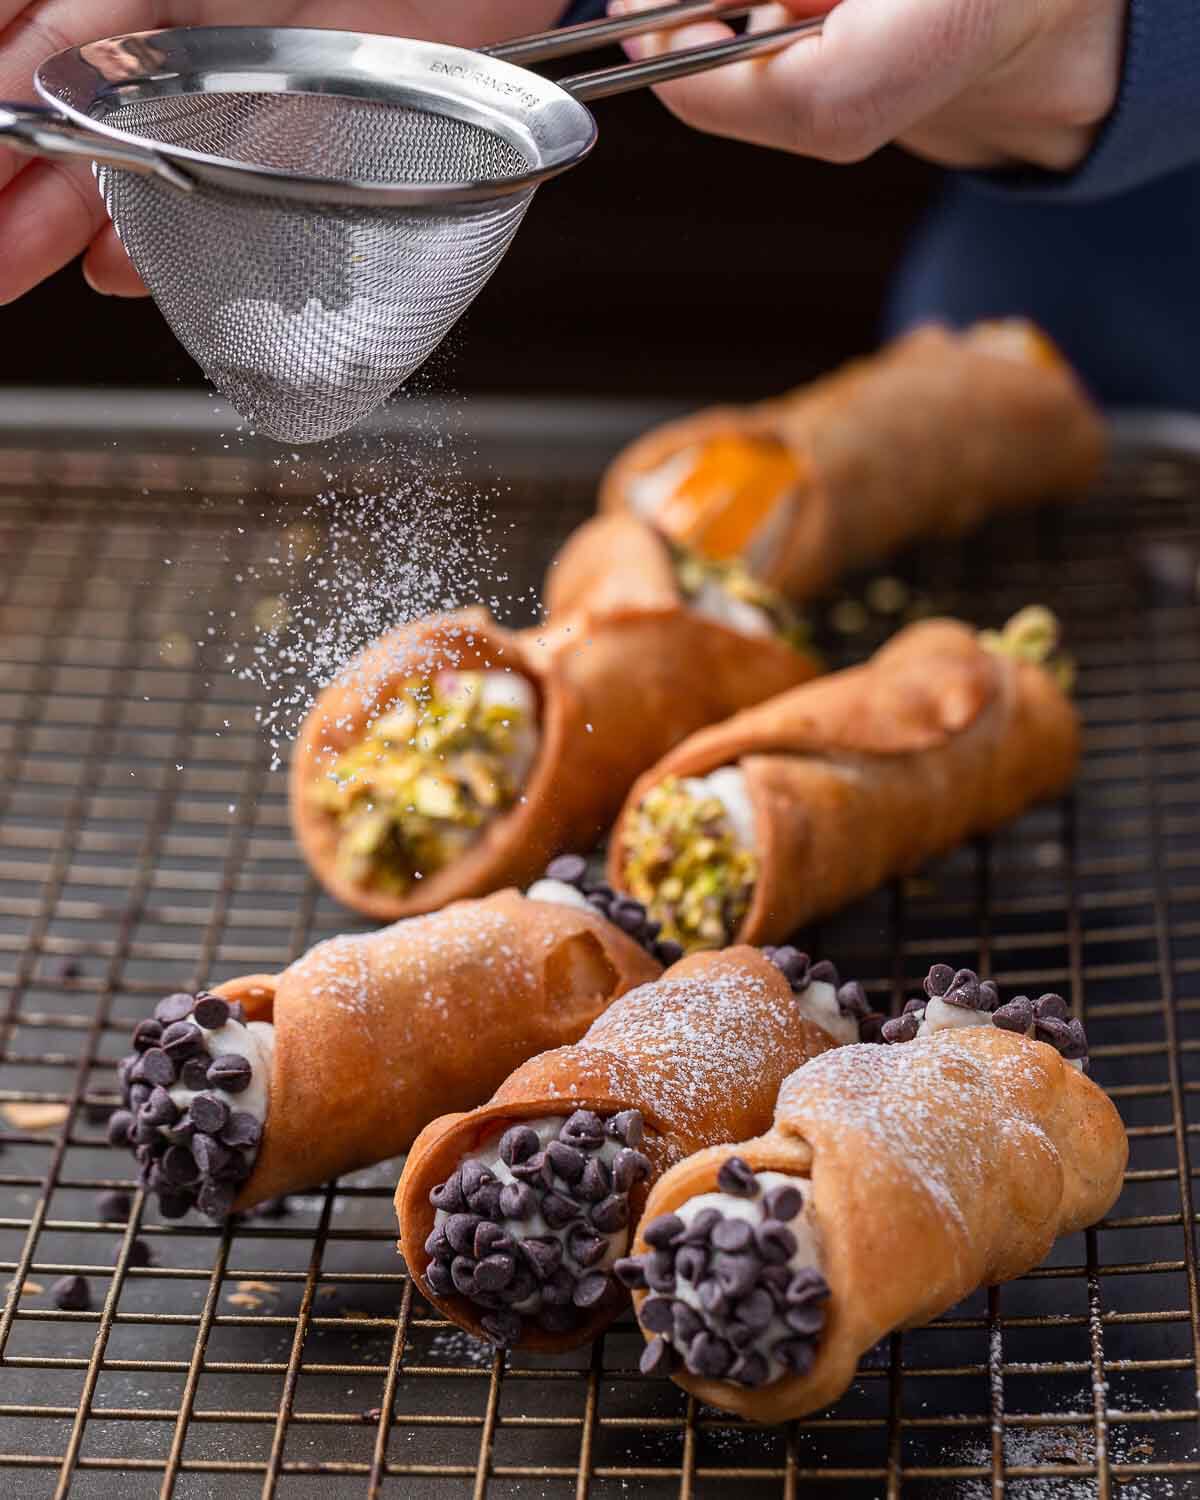
- Dip the cannoli cream-filled sides into the topping of your choice. We used mini chocolate chips, chopped pistachio nuts, and candied orange peel, but there are many other options so use what you like! Dust with powdered sugar and serve immediately. Enjoy!
Top tips
- Be patient. Similar to Italian cheesecake, cannoli are not something to make on a whim. They require prep time, equipment, and patience. You will no doubt do better on each subsequent attempt. Trust me, they are well worth the effort though. There’s nothing like homemade cannoli, except of course enjoying one in Sicily with an espresso.
- Cannoli cream with impastata. We used impastata for our cannoli cream. Impastata, also known as dry ricotta, is an extremely dry almost spackle-like textured ricotta that’s used in bakeries all over the New York metro area. If you can’t find impastata, I recommend buying a brand of ricotta that’s on the drier side, like Galbani, and draining overnight through a cheesecloth or fine mesh sieve. The drier the ricotta, the better as it will help prevent runny cannoli cream.
- Cannoli dough. The dough for cannoli is similar to pasta dough and requires work. For this reason, I strongly recommend using a pasta machine, hand-cranked, or the electric stand mixer version we pictured here.
- Cannoli forms. Be sure to use caution when removing the cannoli forms from the oil. They retain their heat for a while and are extremely hot. For this reason, we recommend using gloves and needle nose pliers, or kitchen tweezers to remove the forms. The forms should be removed minutes after they come out of the oil. If you don’t have enough forms, allow them to cool completely before wrapping any remaining cannoli dough.
- Frying. Heat the oil over about medium heat or until it reaches 365-375f. I strongly recommend using a candy or oil thermometer to make sure the temperature is correct and in range when frying.
- Filling the cannoli. Cannoli are best eaten right after they’re filled. Filling too far ahead of time can lead to the shells becoming less crisp. The best part of the cannoli is the difference in texture between the creamy filling and the crispy shell! You can also use cannoli cream to make pizzelle sandwiches!
- Cannoli toppings. Use any toppings you’d like for your cannoli. We used chopped pistachios, mini chocolate chips, and candied orange peel. Green sprinkles or jimmies, maraschino cherries, citron, or chopped hazelnuts would all be great!

More Italian desserts
If you’re a fan of Italian desserts, try these other favorites!
If you’ve enjoyed this cannoli recipe or any recipe on this site, give it a 5-star rating and tell us about it in the comments below.
We strive to satisfy a number of learning styles. If you are someone who prefers to learn by watching, you can find most of our recipes on YouTube and our Facebook Page.
Cannoli

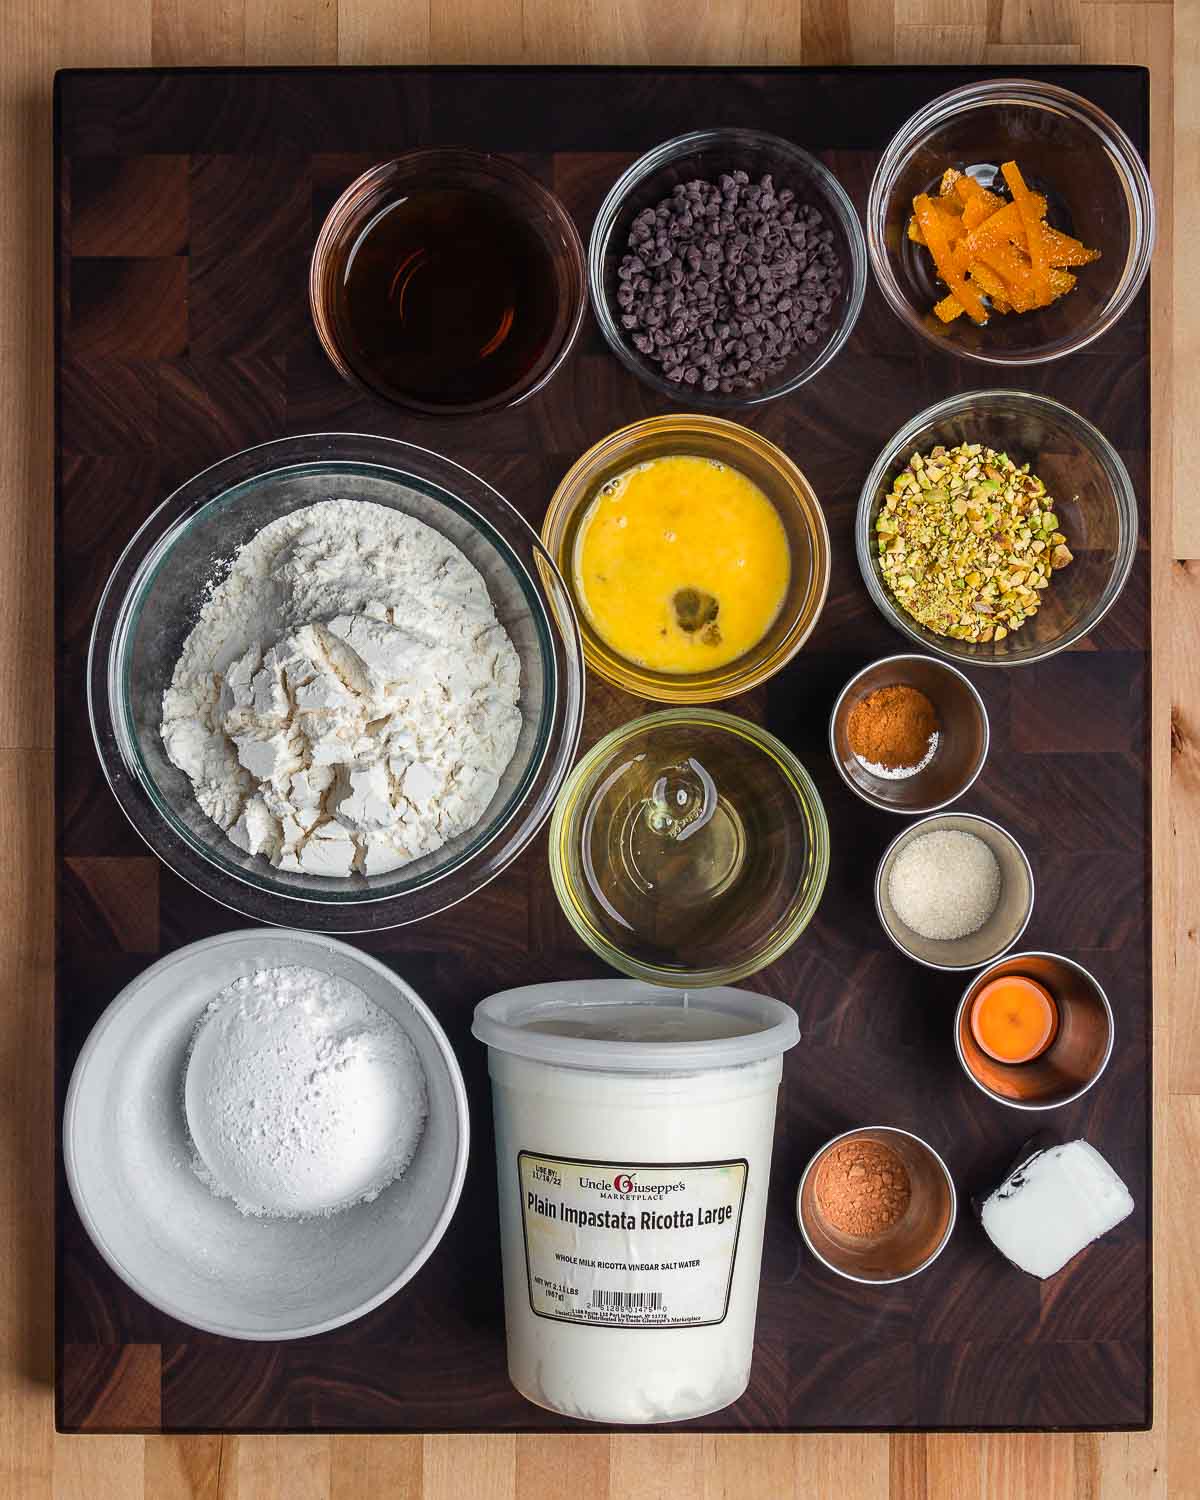
Ingredients
For the cannoli shells
- 2 cups (240g) all purpose flour
- 1 tablespoon sugar
- 1/4 teaspoon cocoa powder
- 1/2 teaspoon ground cinnamon
- 1 pinch salt
- 3 tablespoons (39g) vegetable shortening
- 1/4 cup (56g) Marsala wine
- 1 large egg beaten
- 1 large egg white for sealing the edges
- vegetable oil for frying
For the cannoli filling
- 32 ounces (907g) impastata or dry ricotta that's drained overnight
- 1 cup (113g) confectioner's sugar plus more for dusting
- 1/2 teaspoon ground cinnamon or 1 -2 drops cinnamon oil
- 1/2 teaspoon vanilla extract
- 1/4 cup (45g) mini chocolate chips optional
- 1/4 cup (30g) chopped pistachios roughly chopped, optional
- candied orange peel optional
Want To Save This Recipe?
Instructions
For the cannoli shells
- In a large bowl, or in the bowl of a stand mixer fitted with a dough hook, combine the flour, sugar, salt, cinnamon, and cocoa powder and mix together until combined.
- Add the shortening and work into the flour until grainy.
- Make a well in the middle of the flour mixture and add the egg and Marsala wine, mixing with a fork until a dough is formed. If using a stand mixer, continue to mix on low speed with the dough hook.
- Move the dough to a clean, flat surface that's dusted with flour and knead for approximately 8-10 minutes, or continue to mix on low speed if using the stand mixer. Then, wrap the dough in plastic and allow it to rest in the refrigerator for 60 minutes or longer.
- Remove the dough from the fridge and let it come up to room temperature or at least 20 minutes. Cut into 3 equal pieces.
- On a lightly floured surface roll out the dough until it's thin enough to begin to pass through a pasta machine. Pass the dough through the machine, adjusting down the thickness settings until you reach a thickness of approximately 1/16".
- Once the dough is thin enough, use a 3 1/2" circular cookie cutter to cut the dough into circles. Then, using a rolling pin, roll into an oval shape as this will allow the dough to easily wrap around the cannoli form. If you don't have a cookie cutter, you can cut the dough into 3 1/2" by 3 1/2" squares.
- Fill a large heavy pot with 2 inches of vegetable oil and heat to 365-375f. Line a baking sheet with parchment paper and place a wire cooling rack on top.
- Place the cannoli forms directly onto the ovals or squares and wrap the dough around the form, pressing the overlapping edge to hold them together and use a drop of egg white on your finger to seal. Take care to not get the egg white on the cannoli form as it will stick to the cannoli dough.
- Fry the cannoli in the oil until golden and puffed up, about 1 minute. Remove from the oil as soon as they are crisp and blistered. Remove the cannoli from the form immediately using kitchen tweezers or needlenose pliers. Use caution when removing from the cannoli form as they will be quite hot, then allow to drain and cool on a paper towel-lined baking sheet or rack.
- Allow the forms to cool completely, then repeat the process.
For the cannoli filling
- In a large bowl, combine the impastata, sugar, cinnamon, and vanilla extract and whisk until combined.
For the assembly
- Fill a pastry bag with the mixture and pipe it into the cannoli shells one side at a time.
- Garnish with crushed pistachios, chocolate chips, or candied orange peel.
Notes
- Wrap the dough around as many cannoli forms as you have so they’re all ready to go when you begin to fry. Don’t overcrowd the pot; 3 is usually a good amount to start with.
- Don’t fill the cannoli shells until just before you’re ready to eat. This will ensure the shells stay crisp.
- If you can find impastata, we recommend using that. Otherwise, it’s best to use a drier ricotta, like Galbani, and drain it overnight or longer through a cheesecloth or fine mesh sieve.
Nutrition
Nutrition information is automatically calculated, so should only be used as an approximation.
Follow Me


I am so glad I found you !
Making fried peppers and cannoli in the near future.
BTW…How hot are the Peppers ?
Hi Elissa, we hope you enjoy the cannoli recipe and pepper recipe. We used cubanelle peppers which range from 0-1,000 on the Scoville scale , so not too spicy. If you use long hots, they may be spicier.
Hello. I love cannoli and have bought the moulds but my partner dislikes ricotta. Here in Sydney there are cream and chocolate filled ones. Do you have any recipes for different fillings? Thank you.
Hi Faye, We do not currently have a different filling recipe for cannoli.
Hi Jim,
Attempted to make these over the weekend. They were delicious, however living in South Carolina, impastata was impossible to find. I used Galbani ricotta and drained it in a fine mesh strainer for over 12 hours, then made the cream. I refrigerated the cream for about 5 hours, but once out of the fridge, the cream became runny and filling the cannoli shells was difficult. Should I drain the ricotta for more time mixing it occasionally to get as much water out? Should I make the cream a day or 2 before, to ensure the cream is extremely cold and thick? Any suggestions would be welcome.
Hi Joe, Jim recommends putting the cream in a cheese cloth and twisting the top to the point where you’re wringing the water out of the cream. This should help thicken and dry out the cream. Hope this helps!
I tried this at my son’s request (he’s 25 years old), and it came out great! We used Galbani whole milk ricotta drained overnight (about 15 oz.) and my son squeezed the heck out of the rest of it through a cheesecloth. Kinda funny, but sometimes needs must.
Hi Fran, I’m so happy you enjoyed the cannoli! They’re a lot of work but worth it. Thanks for the comment!
I’m in Conn. Where can I find impastata ricotta?
Hi Lana, I’m not familiar with supermarkets in Connecticut; I do know New Haven has a little Italy section so perhaps there but not sure where you are in relation to that. You can try Italian specialty markets or bakeries. If you can’t find it, try and find a dryer ricotta brand, like Galbani, and strain it through a cheesecloth overnight to remove the excess moisture.
Looks delicious. I’m jealous that you probably ate homemade ones as a kid growing up, all the time. Hard to find empty shells 🐚 in Florida.
Hi Georgianna, thanks for the comment. For the most part, the cannoli I ate growing up were from the bakery but they were still good. I think you can order the empty shells online through Amazon.