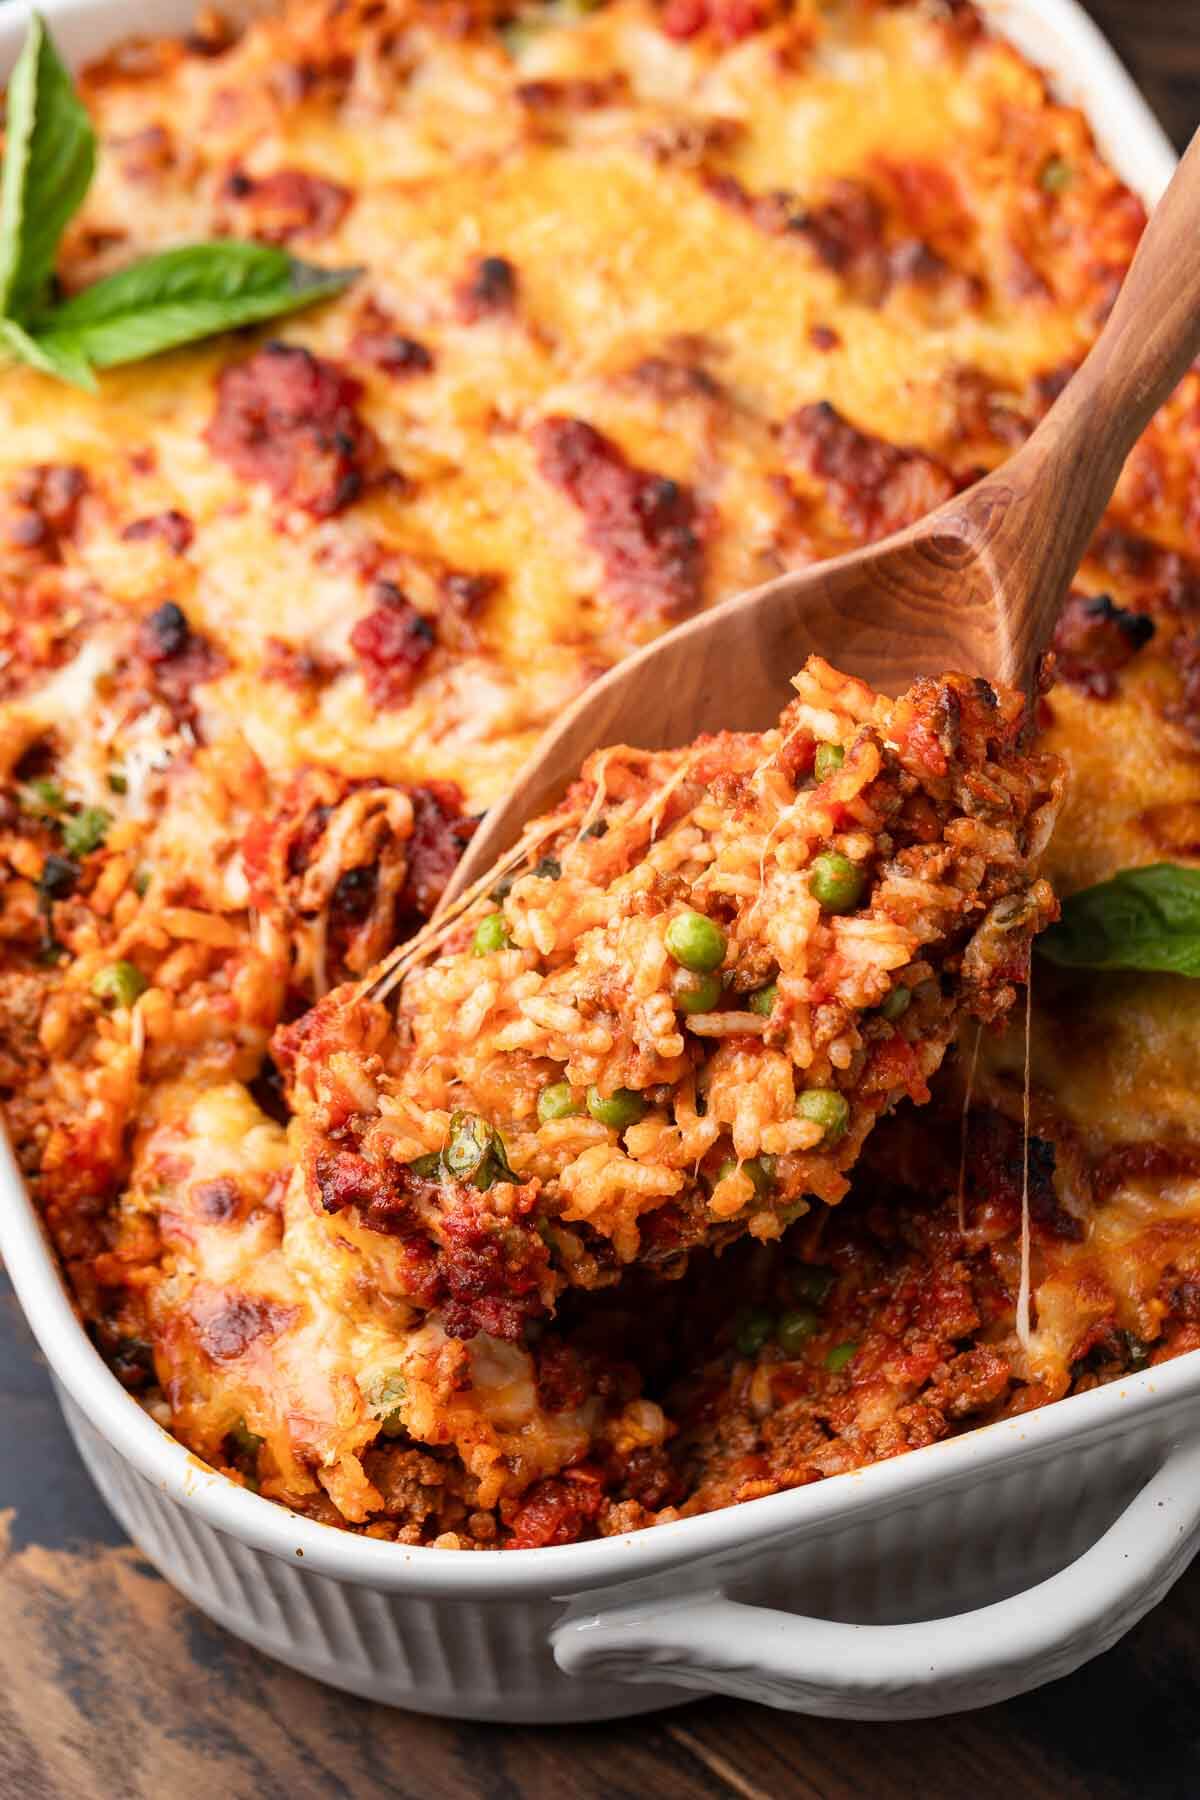
Riso al Forno is comfort food at its best! This baked rice dish combines Arborio rice, peas, and cheese that’s baked in a meat sauce until golden and bubbly. And riso al forno is a great gluten free alternative to baked pastas!
This post may contain affiliate links. Our disclosure policy.

A baked rice dish that is better than pasta!
This baked rice dish is an homage to Sicilian flavors with the addition of peas and Scamorza cheese. As always, feel free to omit an ingredient or two, if, for example, you don’t like peas.
My grandma would make this often, each time a little differently. Sometimes she’d include eggplant, other times it would be made similarly to this version with ground beef and peas.
No matter how she’d make it, I always loved it just as much as I did pasta al forno, meatless baked ziti, and baked orzo.
And since riso al forno is made with rice and naturally gluten-free, it is a wonderful alternative for those who can’t have regular pasta.
We’ll usually serve this dish as the main course alongside a simple sauteed green, like broccoli rabe or garlic broccoli, and some toasty garlic bread.
Recipe Ingredients
All ingredients for this recipe are shown in the pic below and special notes are made in this bulleted list to assist you.
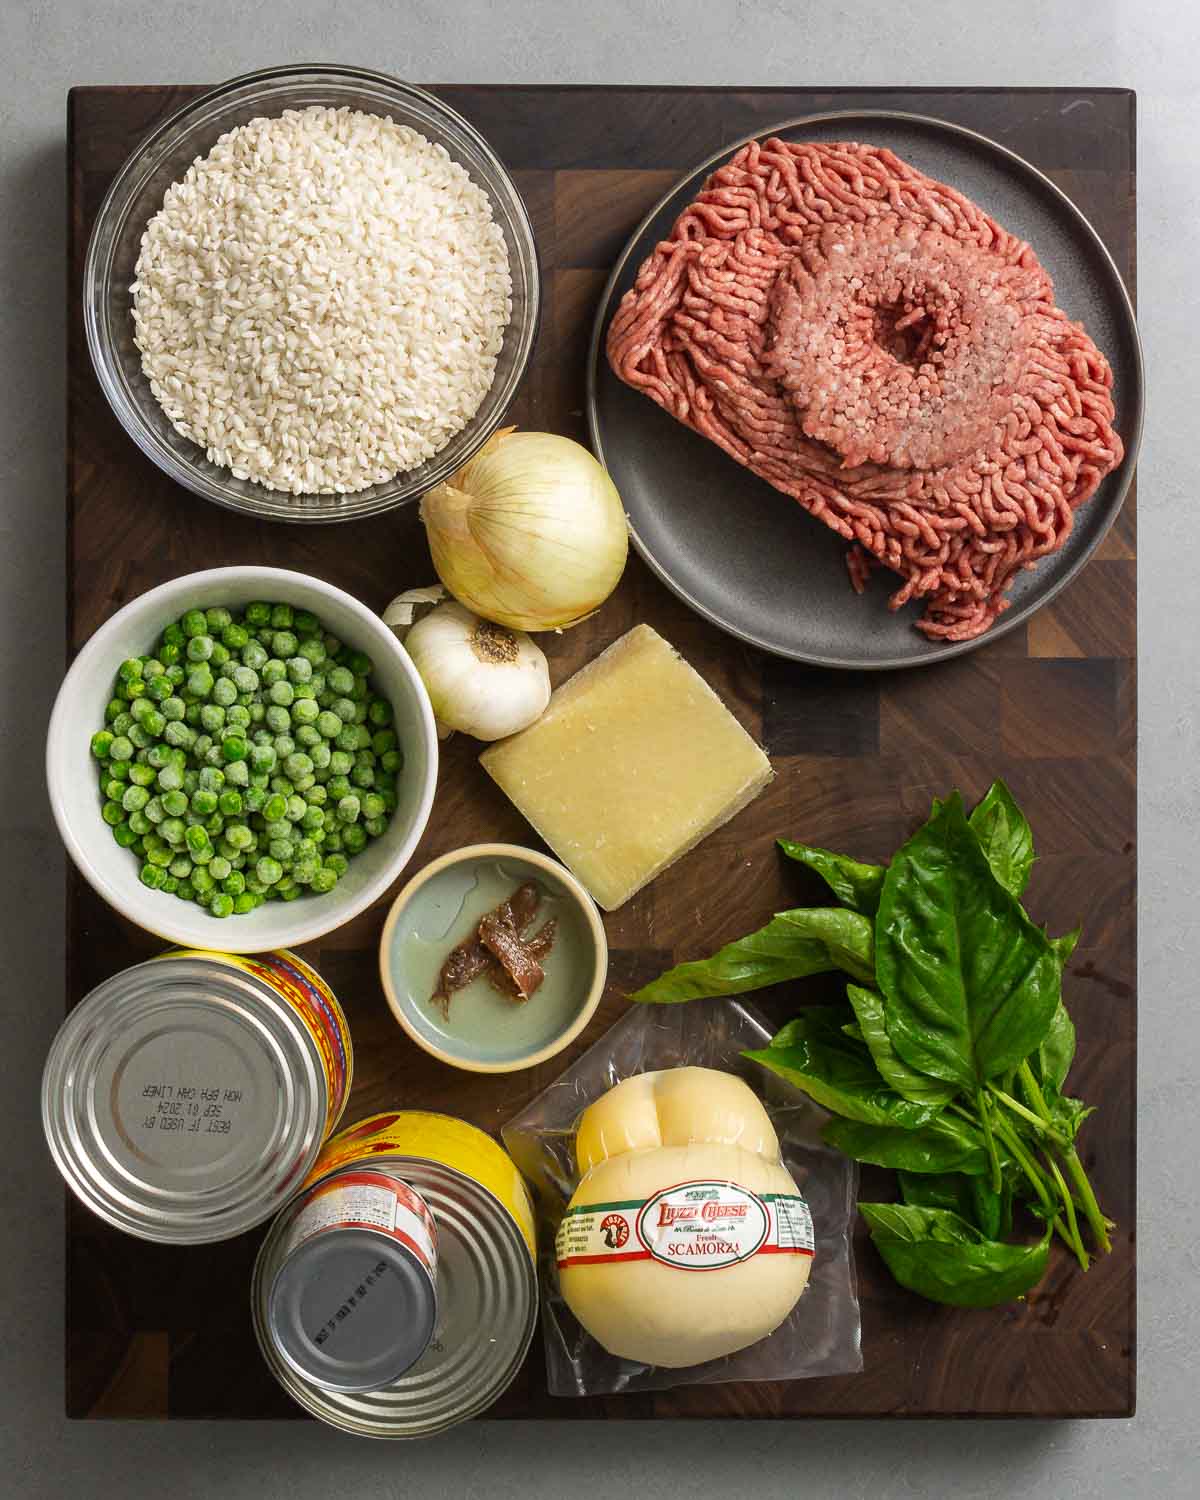
- Ground beef. Ground chuck has a ton of flavor but you can use leaner ground beef if you like.
- Rice. Arborio rice is recommended.
- Anchovies. These add a ton of flavor without making the dish fishy
- Tomatoes. Whole plum and tomato paste are used for the sauce.
- Cheese. We used a blend of Pecorino Romano and Scarmorza cheese for our riso al forno. While Pecorino is easier to find, Scamorza can be more scarce. If you can’t find Scarmorza, smoked or regular mozzarella would be a great substitute.
See the recipe card for full information on ingredients and quantities.
How to make riso al forno
Each number corresponds to the numbered written steps below.
- Dice 1 medium onion and slice 5 cloves of garlic. Chop 1/4 cup of basil leaves (packed), and grate 3/4 cup of Pecorino Romano. Shred 2 cups of Scamorza cheese and set aside. Heat a large saucepan over medium-high heat and add 2 tablespoons of olive oil. Add 2 pounds of ground beef chuck and cook for about 7-10 minutes, or until well-browned, then move to a plate leaving 3-4 tablespoons of fat in the pan. Note: a meat masher works well to help break up the meat!
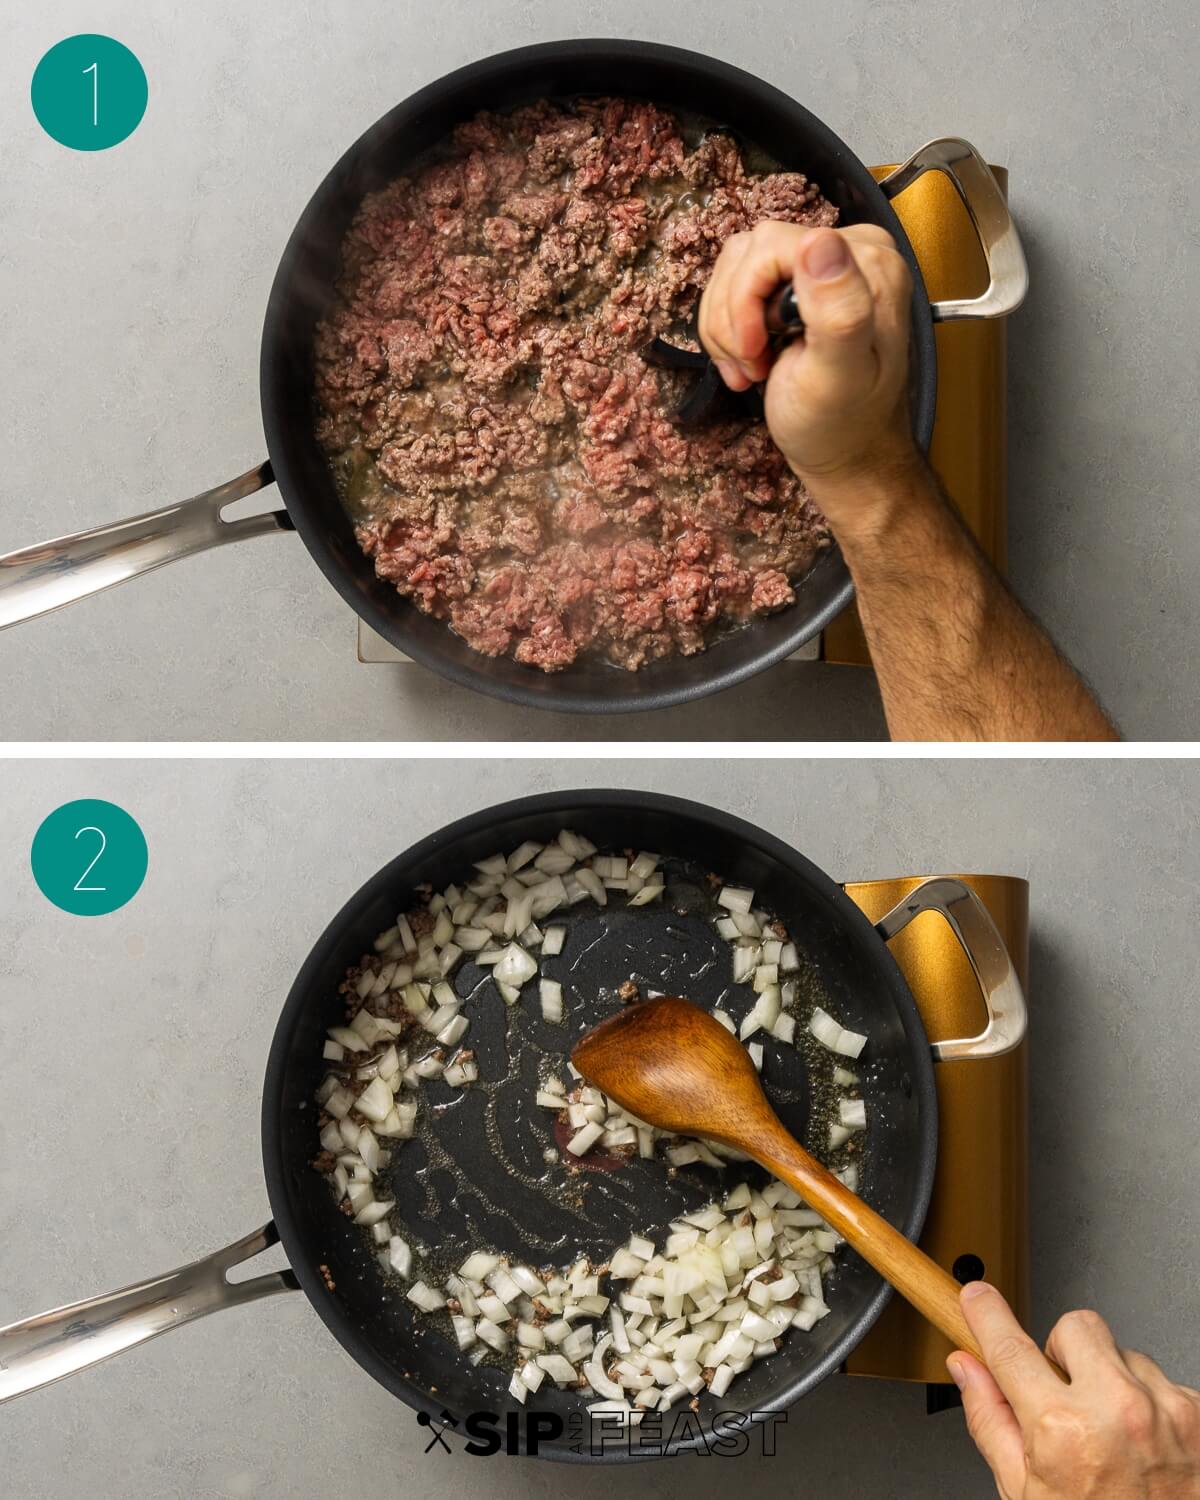
- Turn the heat down to medium and add the onion. Saute for 5-7 minutes or until soft.
- Add the garlic and 2 small anchovy fillets and cook until fragrant and the anchovy dissolves, about 2 minutes. Add 1/2 teaspoon of crushed red pepper flakes and cook for another 30 seconds.

- Return the meat to the pan, add 3 ounces of tomato paste, and cook for about 5 minutes, stirring frequently.
- Add 2 28-ounce cans of tomatoes (hand-crushed or blender-pulsed) and stir to incorporate. Once the sauce starts to bubble, reduce the heat to a low simmer and cook for at least 20 minutes uncovered. Be sure to stir occasionally to avoid any sticking. Taste test the sauce and adjust salt and pepper as needed.
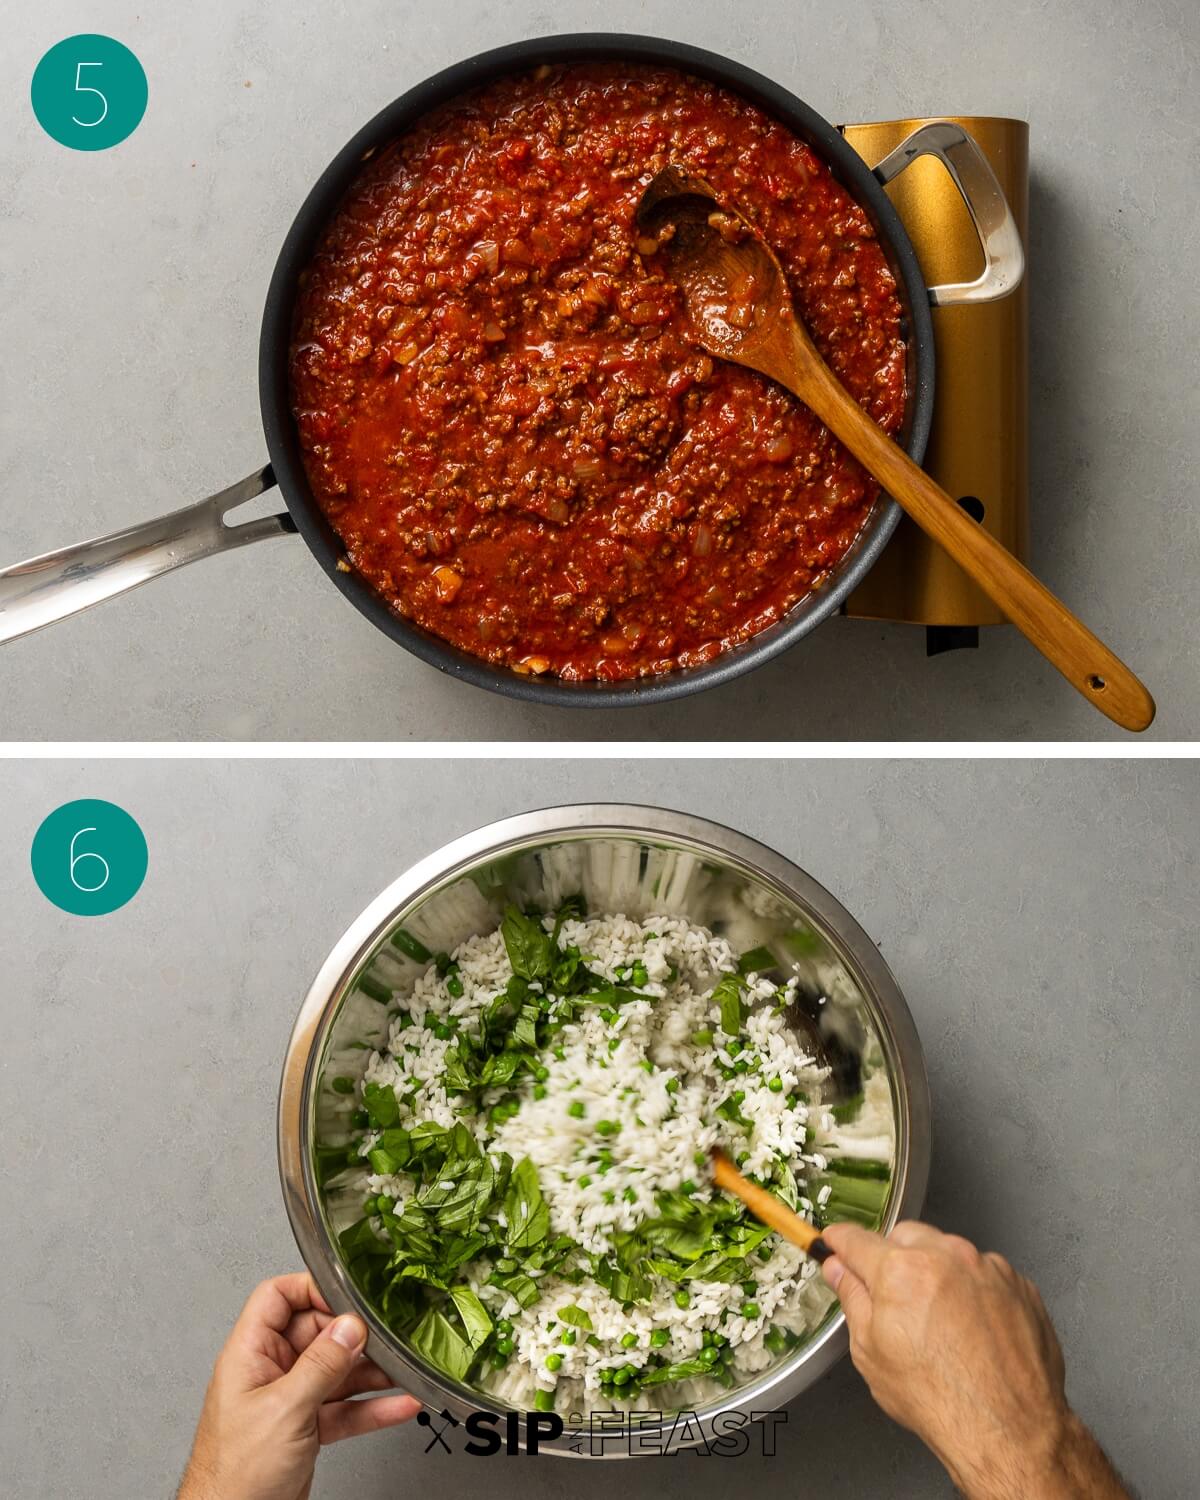
- While the sauce simmers, parboil 2 1/2 cups of Arborio rice in salted water for 8 minutes. Drain the rice and rinse it under cold water to stop the cooking process. Preheat the oven to 375f and set the rack to the middle level. In a large bowl combine the rice with 2 cups of thawed frozen peas and the basil.
- Move 3 cups of sauce to a bowl for later, and add the remaining sauce to the rice and pea mixture. Add half the Pecorino Romano and half the Scarmorza and stir to incorporate.
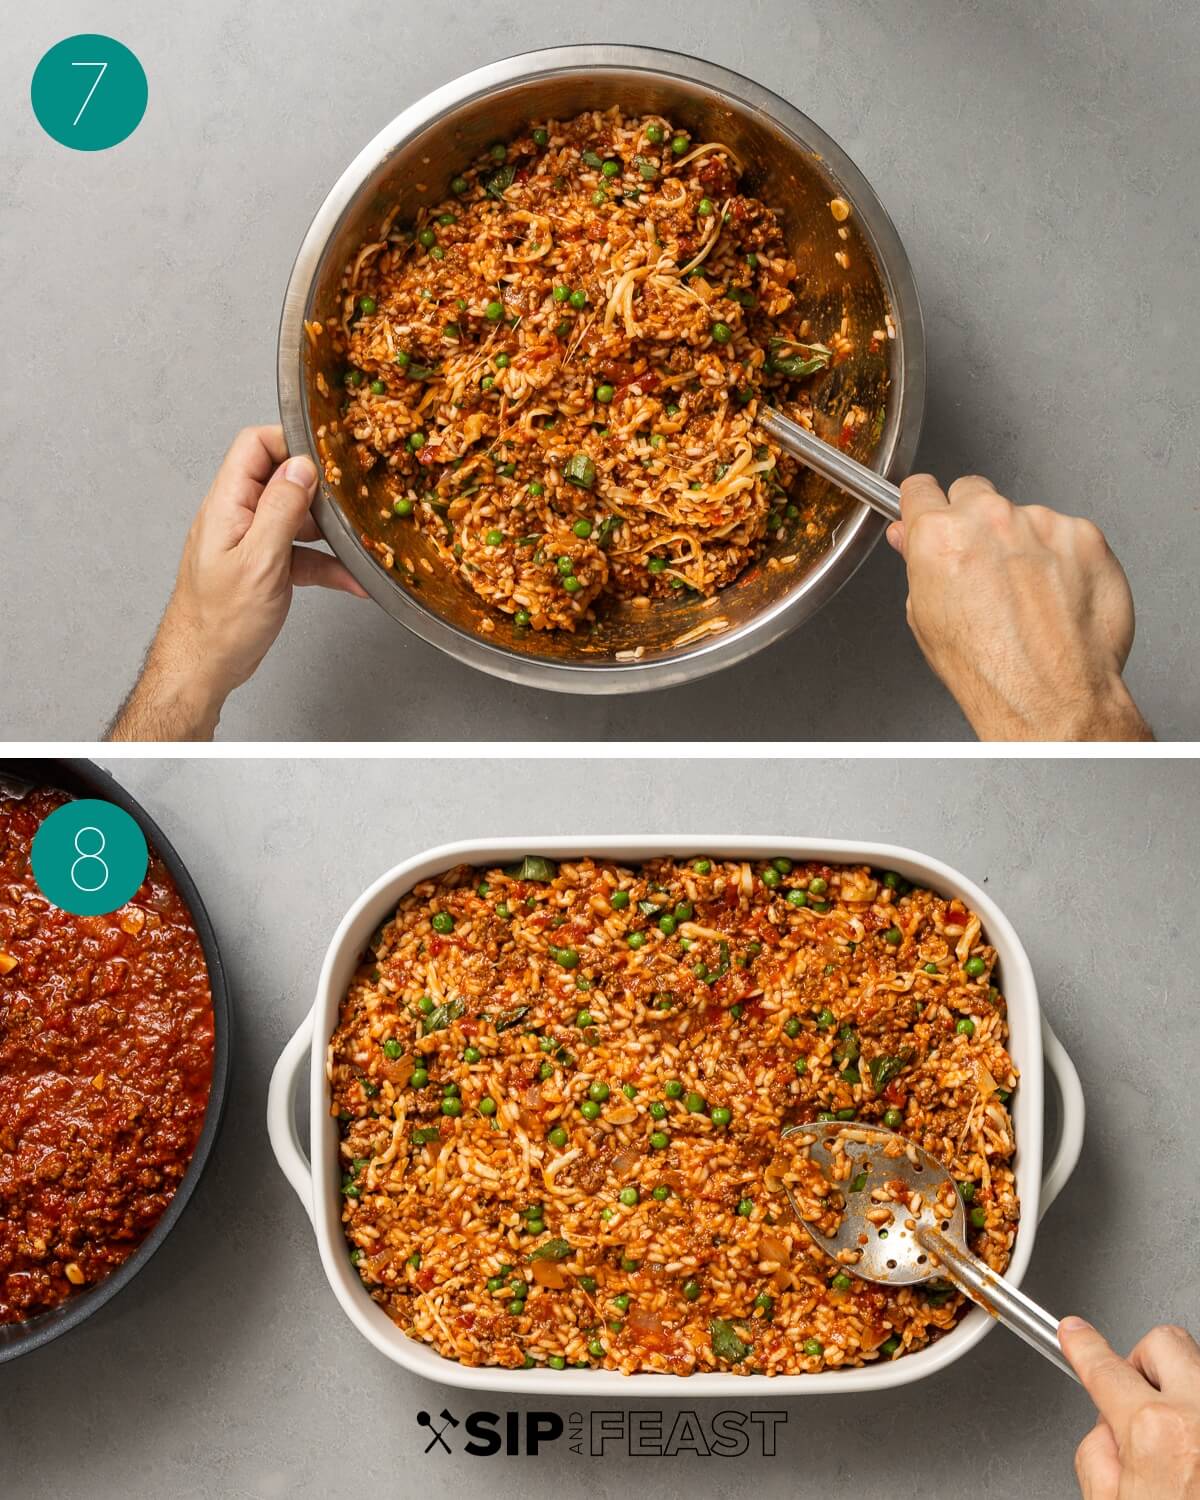
- Coat a 9×13 baking dish with half of the reserved sauce and pour the rice mixture into the dish.
- Top with the remaining sauce and cheese.
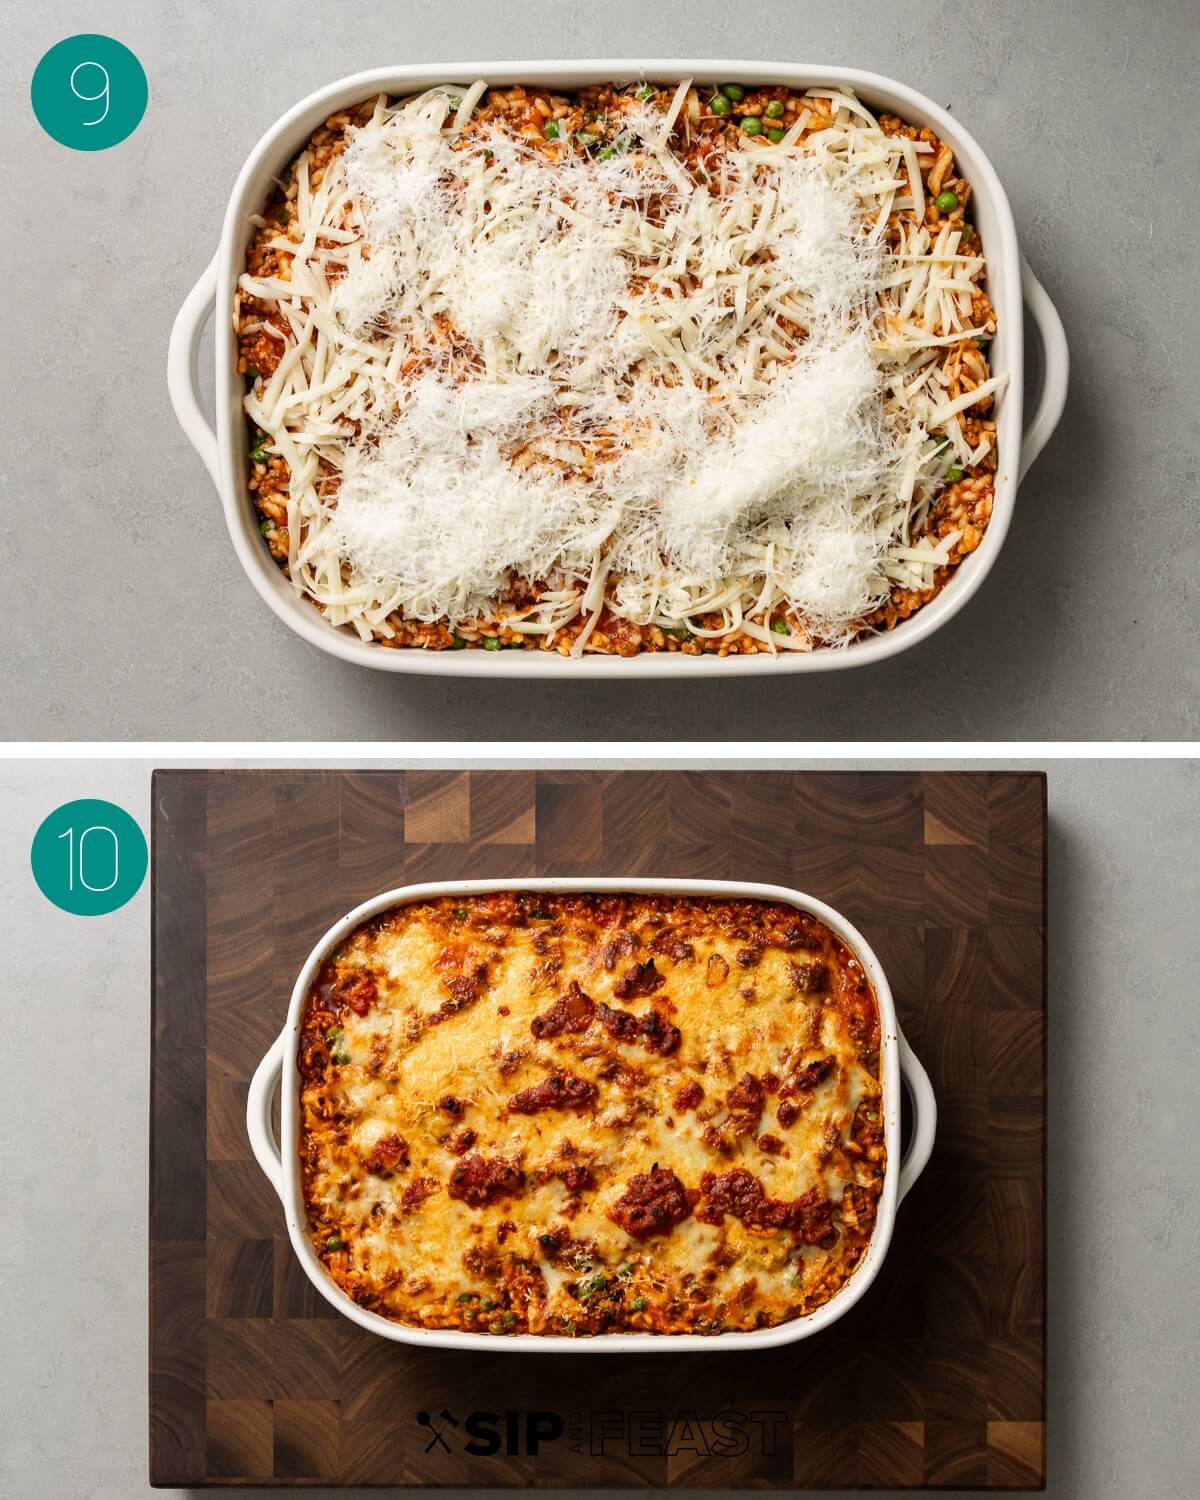
- Bake the rice for 30-35 minutes or until tender. For extra color, turn on the broiler and cook for 1-2 minutes longer but watch carefully to prevent burning. Wait at least 10-15 minutes before eating to give the riso al forno time to settle. Enjoy!
Top tips
- Parboil the rice. Be sure to just partially cook the rice since it will continue to cook and become very tender after baking in the oven for 30-35 minutes.
- Sauce. You will use all the sauce for this recipe. If you are the type of person who likes to add extra sauce to baked pastas when they’re served, we recommend adding an additional 28-ounce can of tomatoes to the sauce. You’ll need to adjust the salt and pepper to taste, and the sauce will be thinner than the one we made here, but you’ll have the extra sauce you desire.
- Variations. If you prefer to make this vegetarian, you can omit the ground beef and anchovy and use a basic marinara sauce. Feel free to substitute the peas for other veggies like asparagus or eggplant.
- Settle down. As with lasagna, or baked penne with sausage, it’s important to let the riso al forno settle a bit before eating. 15 minutes or so does the trick.
More rice recipes
If you love rice as much as we do, check out these other awesome rice recipes.
Riso al Forno

Ingredients
For the sauce
- 2 tablespoons (30ml) olive oil
- 1 medium onion diced
- 5 cloves garlic sliced
- 2 anchovy fillets optional
- 1/2 teaspoon crushed hot red pepper flakes optional
- 2 pounds (908g) ground chuck
- 3 ounces (85g) tomato paste
- 2 28-ounce cans plum tomatoes hand crushed or blender pulsed
- salt and pepper to taste
For the riso al forno
- 2 1/2 cups (500g) Arborio rice
- 2 cups (340g) frozen peas thawed
- 2 cups (226g) shredded scamorza
- 1/4 packed cup basil leaves chopped
- 3/4 cup (68g) grated Pecorino Romano
Want To Save This Recipe?
Instructions
For the sauce
- Heat a large saucepan to medium-high heat with olive oil. Add the beef and cook until browned (about 7-10 minutes). Remove the meat to a plate, leaving 3-4 tablespoons of the fat in the pan.
- Turn the heat down to medium and add the onion. Saute until soft (5-7 minutes) then add the garlic and anchovy and cook for another 2 minutes more or until fragrant and the anchovy dissolves. Add the hot red pepper flakes and cook for another 30 seconds.
- Return the meat to the pan and add the tomato paste. Cook for 5 minutes, stirring frequently.
- Add the plum tomatoes and mix in to incorporate. Once the sauce starts bubbling, turn the heat down to a very low simmer.
- Cook for at least 20 minutes uncovered at a low simmer, stirring occasionally to avoid any sticking. Taste-test the sauce and adjust salt and pepper if required.
Assembling the riso al forno
- While the sauce is simmering parboil the rice in salted water for 8 minutes. Drain the rice and rinse under cold water. Mix the rice with the peas.
- Preheat oven to 375f and set the racks near the middle level.
- In a very large bowl combine the rice and peas with the sauce, reserving 3 cups of sauce for later. Also, mix in the basil, half of the scamorza cheese, and half of the pecorino.
- Coat a 9×13" baking dish with half of the remaining sauce. Pour the rice into the dish and top with the remaining sauce and cheese.
- Bake the rice for 30-35 minutes or until tender. For extra color broil for 1-2 more minutes but watch carefully! Wait at least 10-15 minutes before eating so that the rice settles. Enjoy!
Notes
- Servings. Makes 8 moderate-sized or 4-6 large portions.
- Rice. Parboil the rice! The rice is just partially cooked and will be cooked until tender in the oven.
- Brown it. For extra color, broil for 1-2 minutes, but watch very carefully to avoid burning.
- Leftovers. Riso al forno can be saved in the fridge for up to 3 days.
Nutrition
Nutrition information is automatically calculated, so should only be used as an approximation.
Follow Me
The Sip and Feast Cookbook
- 100+ recipes
- Essential tools and ingredients
- Entertaining ides
- Stunning photography
If you’ve enjoyed this riso al forno recipe, give it a 5-star rating.
Watch us on YouTube, follow along on our Facebook Page, and become a Patreon member to receive access to exclusive full-meal videos and content.


Absolute comfort food. I live in central Florida and scamorza cheese is non- existent here. I tried the two Italian markets in the area and neither had it. Its times like this that make me miss living in NY. Thanks for suggesting the mozzarella which was much easier to find. This would make a great dish to bring to a potluck as it makes A LOT of food. Perfect for a cold night. Keep the delicious recipes coming!
So glad you enjoyed, Lisa!
I have not heard of Scarmorza Cheese.
What cheese do you suggest instead.
I reside in Spain.
Smoked or regular mozzarella would work in place of the scamorza.
The only thing I changed was the cheese, only because I couldn’t find it so I used smoked provolone.
I thought this was really bland.
I’d like to try again and use half farro for some chewy texture and add more herbs and seasonings
Is it 2-1/2 cups cooked or uncooked rice?
Hi Dale, the rice starts as uncooked, then Jim parboils the rice in water for 8 minutes. Jim goes over all the ingredients in the video and demonstrates how to make if you’d like more clarity.
Can you cut this recipe in half and what would the measurements be?
Yes, you can halve the recipe. If you’d like to scale the recipe down, you can do so in the print version of the recipe card using the “-” button.
I made this with pulled chicken instead of ground meat. I used two big chicken breasts. Cooked it and then shredded it. Everyone loved it. Thank you!
So glad you enjoyed, Denise, and thanks for sharing your substitution of pulled chicken for ground beef.
This recipe has been in my “to try” folder for a while now – I finally made it tonight. It was delicious! I followed the instructions exactly as written with one exception. I added some Italian seasoning to the rice mixture. Okay, maybe 1 other change. I don’t like peas so i omitted that ingredient. I couldn’t find scamorza so I used mozzarella. The next time I make it, I will find a store that sells scamorza. I do have one question though. Can I add a splash of white wine to the recipe for another depth of flavor? Where would I do that in the list of instructions? Thanks again for everything you and your family do for all us. Speaking for myself (100% Italian) and my husband (who thinks he’s Italian because he married one), we love your family recipes. They are delicious and made from the heart! Thank you!
Hi Elena, we’re glad you tried the recipe and enjoyed it. Yes, you can definitely add some white wine. You can add it after the tomato paste cooks and before you add the canned tomatoes.
I appreciate your time in answering my question. 🙂
Making this for Easter Sunday Side Dish, but I will make Risotto Rice. Keep you posted YUMMMM cant wait
We hope you enjoy it, Theresa!
They went for thirds. Enough said. 🤣
As always, amazing. Thank you.
We’re so happy to hear that, Steph!
Made this for Sunday dinner yesterday. Huge hit. Very tasty, warming, and plentiful. When making the sauce, I used an extra can of tomatoes as suggested for having some on the side. Set aside 5 cups of sauce (3 for recipe) so I would have 2 for the table. Highly recommend this recipe!
We are so happy you enjoyed it, Father! Thanks for the comment!
I make my own marinara. Could I incorporate this into the mix? Like if I use 28 oz of my sauce and then the rest with the canned tomatoes?
Yes, you can do that.
This recipe was INCREDIBLE. It is going into the rotation for sure!
So happy to hear that!
My wife has been making something very similar to this for years. Calls it her arancini casserole. She does one thing differently that you might want to try – she sprinkles a fairly good layer of goat mozzarella on top before baking. Adds a sharpness that is wonderful
Hello Sip & Feast,
Can you recommend a substitute cheese for scamorza? We can’t find that in our part of the country.
Love your recipes!
John Earhart
Hi John. I would go with block mozzarella. Thanks for liking the recipes.
This was very good. I love these types of comfort dishes. I used scamorza cheese, but really, in the final dish, I couldn’t tell it from mozzarella. Just the two of us. We made half and we have plenty for another meal.
So happy you enjoyed, Lucinda!
Can you use brown rice?
Hi Michael, you can, but it will have a different taste and texture so we can’t say for sure how the finished product will be.
Hello James I was wondering would I be able to make this ahead of time and then bake it? Thank you!
Hi Rosa. That would 100% work. It might need a bit extra time in the oven though. Since it’s starting from a cold state, I would cover it for the first 25 minutes then uncover and bake until hot. Enjoy!
This recipe is a keeper. I made a half-portion and used Impossible Sausage instead of ground beef and provolone with a 28oz and 14oz can of tomatoes to have some extra sauce for serving. Very filling and easy to make. The most difficult part was finding a big enough bowl to mix all the ingredients before baking.
This recipe looks great. As an alternative, can it be made with orzo?
Hi Mike, you can use orzo, but be sure to par-cook it because it may become mushy. We can’t say for sure what the timing would be because we haven’t tested it.
Can I sub anchovy paste? if so, how much?
About 1 teaspoon of paste equals 2 anchovy fillets.
Made this today for the kiddies.. delic.. thanks..
So happy you enjoyed!