
Mouth-watering, pizzeria-quality slices at home were once a pipe dream, but not anymore, thanks to the pizza steel. A fully seasoned, turnkey steel ranges from $150 – $200, making the baking steel the most underrated kitchen tool. But, you’re probably here because you are money savvy, and derive satisfaction from doing things yourself. I’m going to show you how to make your own DIY homemade pizza steel at a fraction of the cost. Once you’re done, you’ll not only feel accomplished but empowered to make some insanely awesome pizza!

The trick to making great pizza in a home oven is the pizza steel. It destroys other home methods and truly is a game-changer!
For naming sake, baking steel and pizza steels are the same things.
They are pieces of steel that typically range from 3/16″ all the way up to a 1/2″ thick. I’m sure some people use 3/4″ steel, but that would be insanely heavy.
More on thickness in a bit, but for now, know that the reason a pizza steel yields such incredible results is because it’s ultra-efficient at conducting heat.
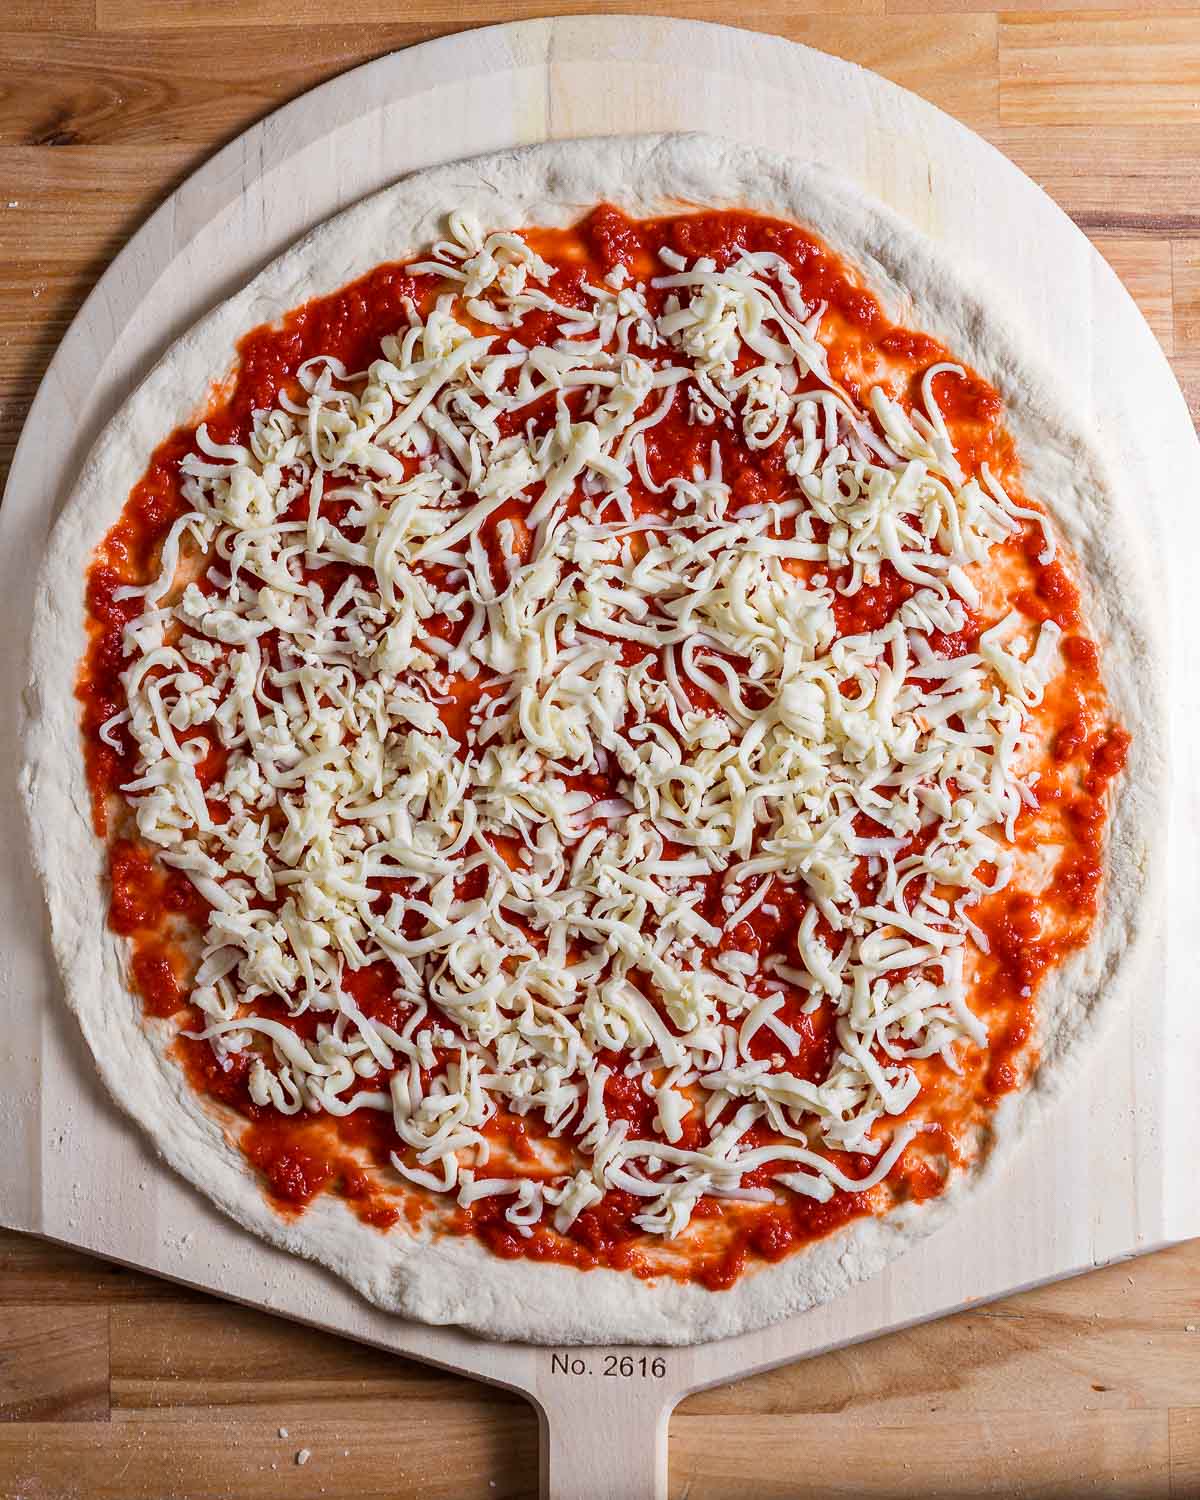
The heat travels directly from the steel to the pizza creating that classic charred bottom that New York pizzas are known for. Essentially, pizza made on a steel will have the same look as a pizza that came straight out of an expensive deck oven in a professional kitchen.
Getting started
To get started making your DIY pizza steel, you’ll need the following items:
- One ¼” x 16” x 16” A36 steel plate, and the cardboard packaging
- Flax oil, such as Barleans 100% organic flax oil
- 150 grit sandpaper
- 1 small block of wood for wrapping sandpaper
- 1 gallon of white vinegar
- 1 gallon of water
- spacers, or pencils (see below instructions)
- 1 wheelbarrow, bathtub, or something large enough to hold the steel and vinegar without draining
- 1 sponge with an abrasive edge, such as Scotch-Brite
- Disposable blue shop towels
- Infrared thermometer (for making your pizza!)
DIY pizza steel instructions
- Begin by removing the steel from the cardboard. Save the cardboard for later.
- A 150 grit piece of sandpaper is all you need. Wrap it around a small block of wood and gently sand the edges of the steel to remove any burrs (sharp edges from where the steel was cut). You just need to do a few swipes.
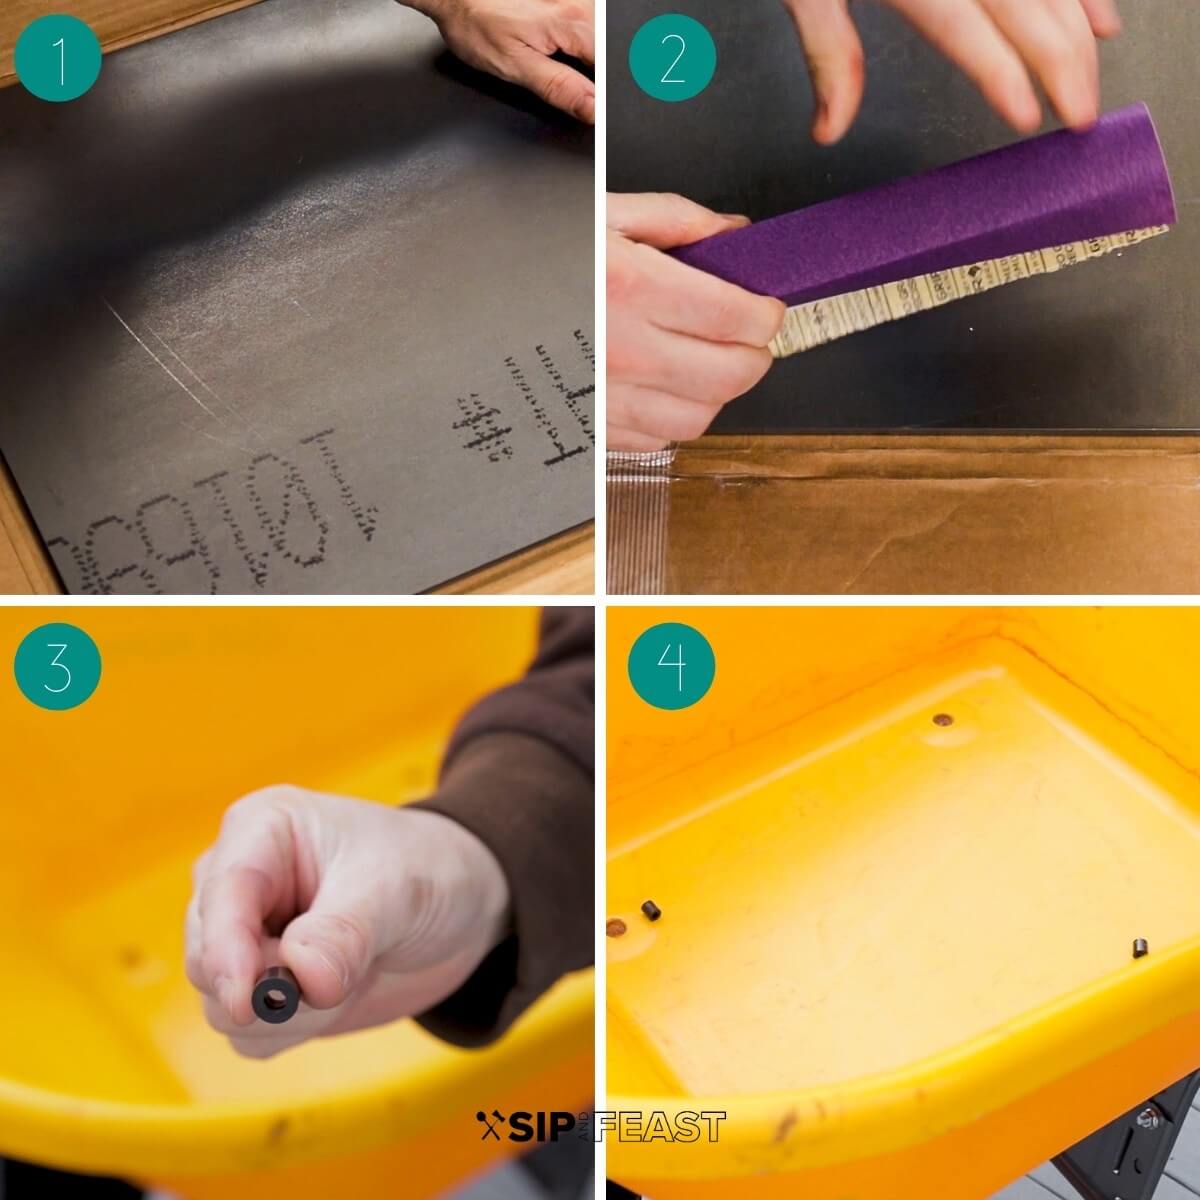
- I have some plastic spacers that are used for mounting a TV. If you have something like that use it or just use 4 pencils.
- Place the spacers or pencils into the 4 corners of a large container. The container needs to be large enough to hold the steel when placed flat. I am using a wheelbarrow that’s propped up at the front wheel to level the container section.
- Place the steel onto the spacers.
- You need to cover the steel completely with a 50/50 ratio of water to white vinegar. For my size wheelbarrow, it took one gallon of each.
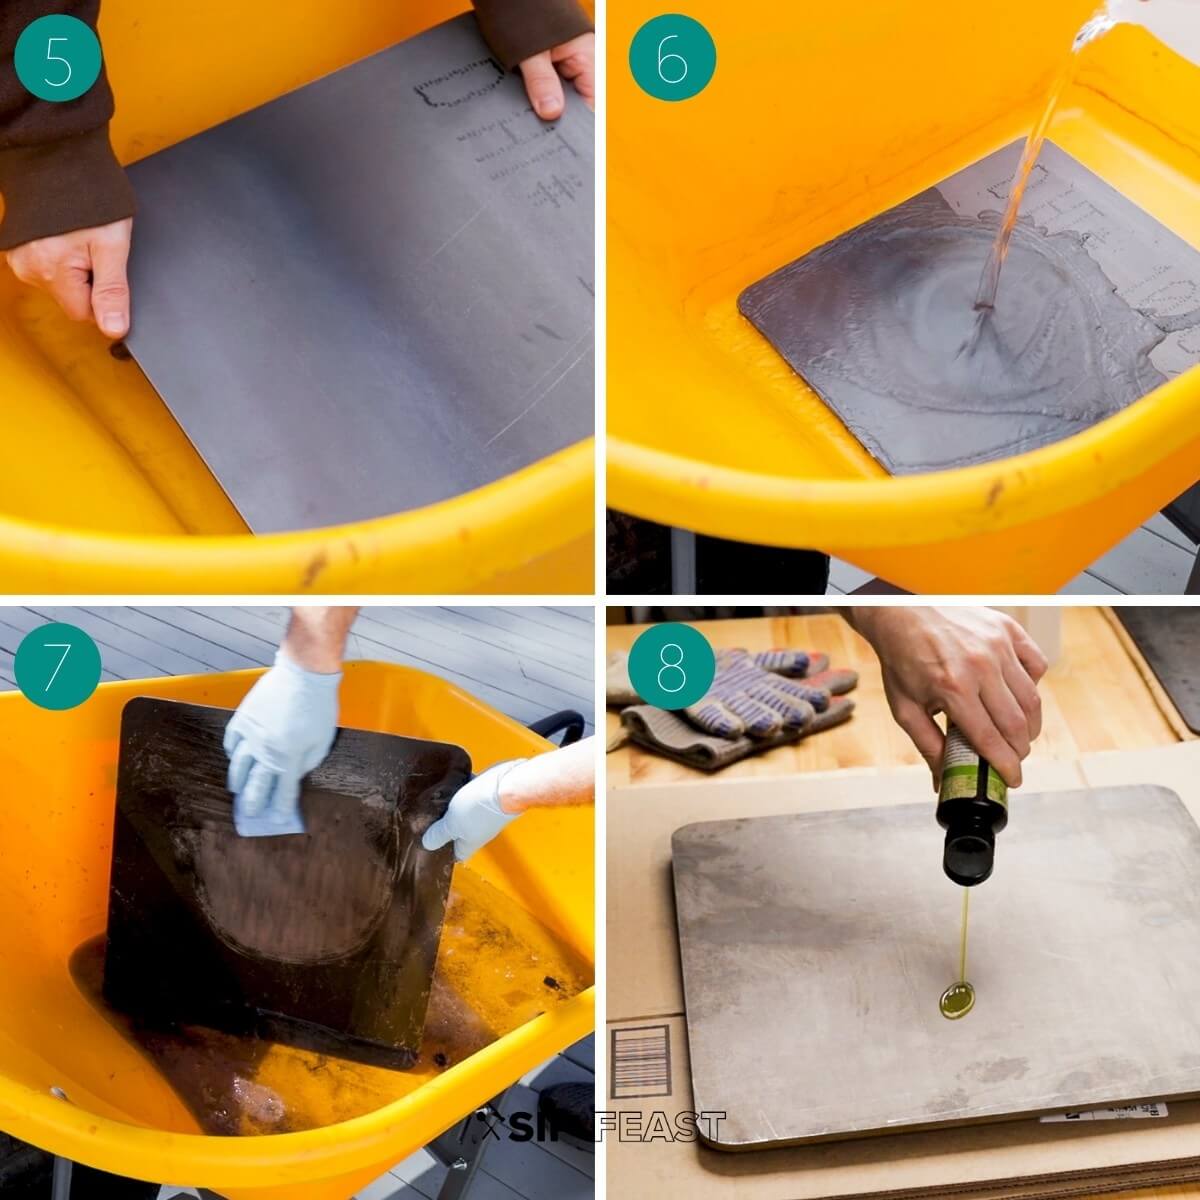
- After 48 hours the mill scale will come off very easily. Any tough spots can be scrubbed with a Scotch-Brite pad. After removing the mill scale, hose off the steel and dry it off as quickly as you can. Immediately place it in a 170f oven to dry off even more.
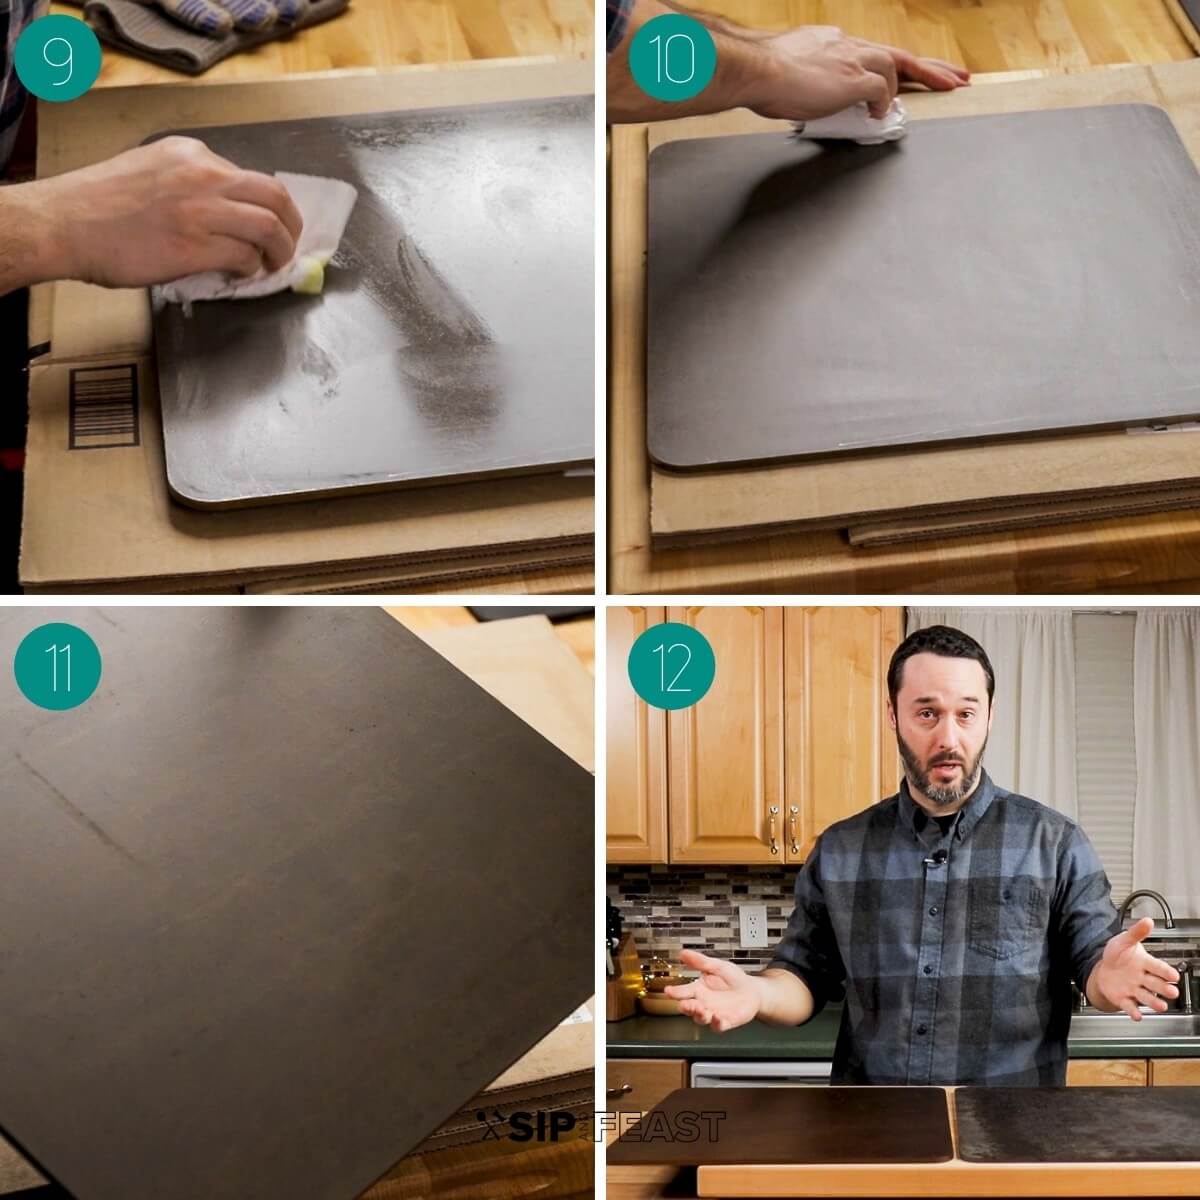
- After 20 minutes remove the steel from the oven (it will be hot) and place the steel on a work surface. Then, turn the oven to 450f. You can see the cardboard has come in handy. Squeeze a bit (less than a tablespoon) of flax oil onto the steel and rub it all over.
- Do the same for the other side and the 4 narrow side edges. All 6 sides of the steel need to be coated.
- Once all sides are coated, rub all the flax oil off. You’re not really rubbing it all off, but try your best. A thin layer of flax oil will still be on the steel. Blue shop towels work well because they don’t release any lint, but regular paper towels will do the job too. At this point place the steel onto the middle rack of your oven and let it cook for 1 hour at 450f. After 1 hour, turn the oven off. Keep the door closed the whole time, and wait two more hours before removing the steel.
- This is the steel after 1 coat. It will get more maroon/brownish after every coat. Remember to allow enough time for the whole process to get at least 3 coats on. Starting early in the day for the seasoning process is a good idea.
- On my right is the new pizza steel after 3 coats of flax oil. The other steel is a well-used one that probably baked at least 100 pizza pies by that point.
- With your new pizza steel, you’ll want to have a laser temp gun to check the temperature of the steel after preheating the oven. 600f makes a great pizza!
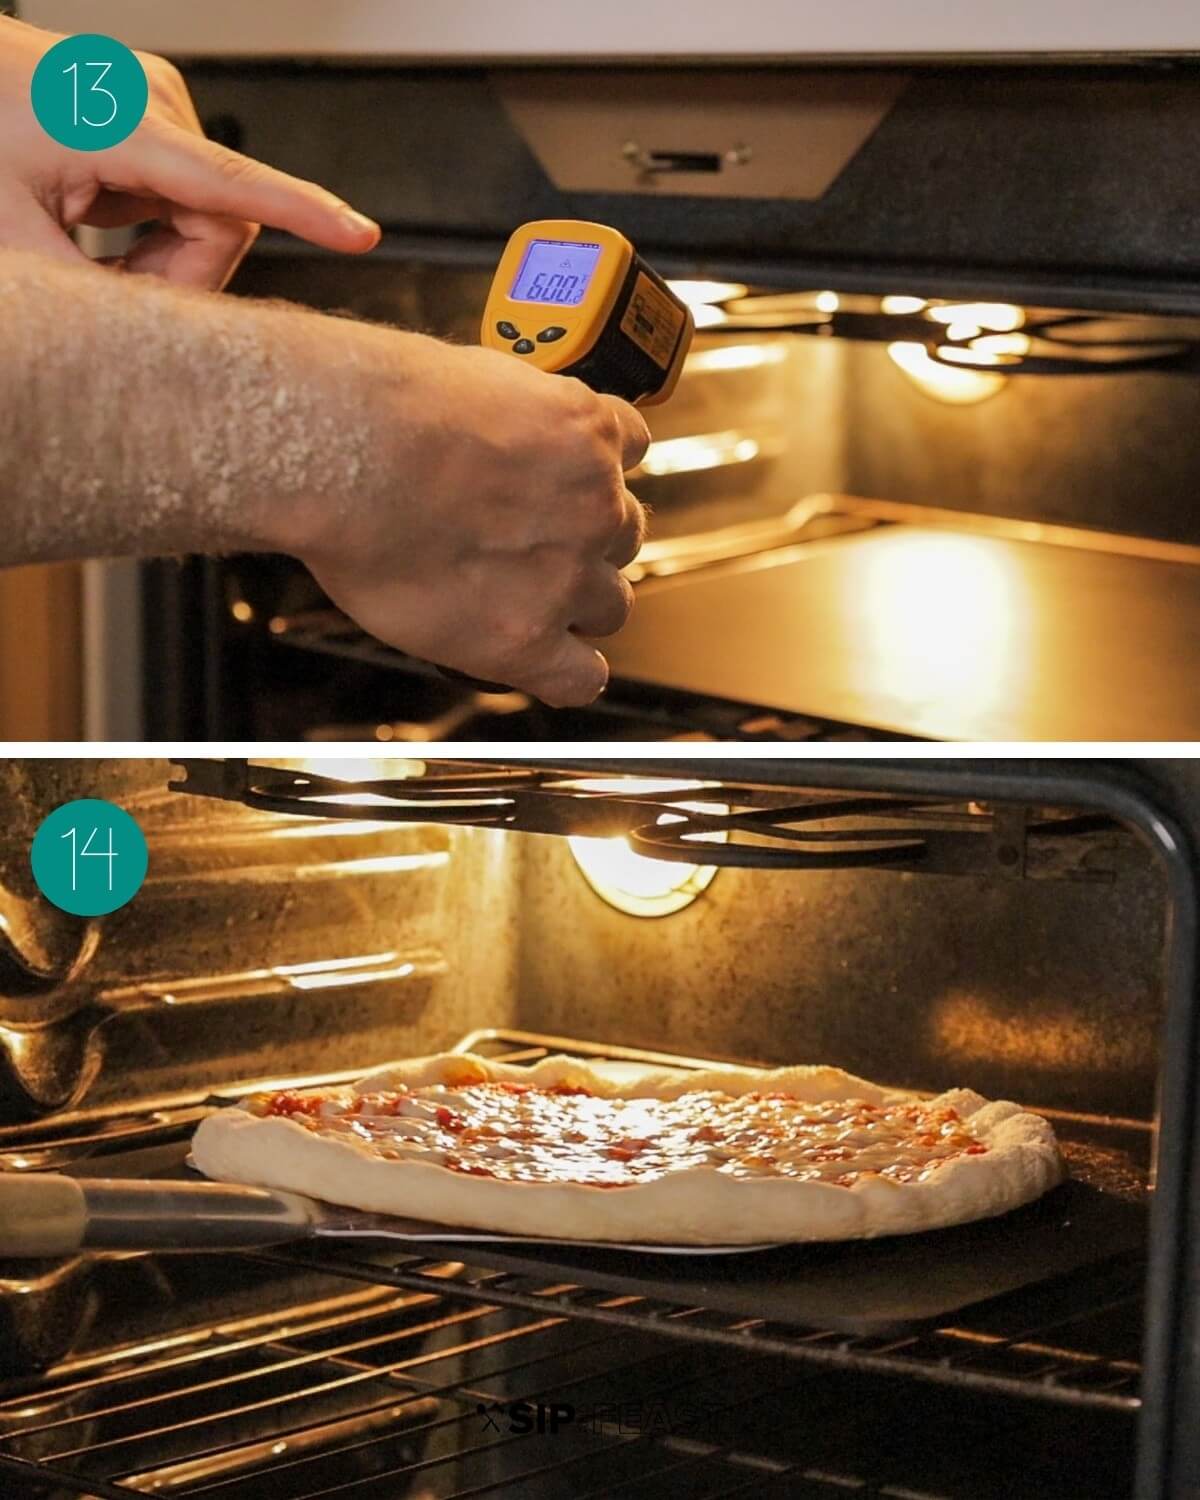
- The baking steel acts as the oven floor. All you have to do is slide a metal peel in there to grab the pizza. Easy peasy!
Why are we seasoning the steel?
The multiple coats of flax oil create a polymerized layer that gives the steel a patina and forms a naturally releasing surface. This allows the pizza or calzone or whatever you’re cooking to easily be removed from the nonstick surface.
The seasoning of the steel prevents rust and also allows for easy clean-up from inevitable cheese spills and other messes.
If you ever want to renew your steel with another coat of oil, all it takes is one more coat in the oven.
Make sure the plate is clean and that any debris has been removed prior to seasoning.
Want To Save This Recipe?
There is no need to go through the descaling process again, provided the steel has been cared for and has no rust.
What role does vinegar play?
The vinegar acts as a natural acidic remover of mill scale. Mill scale is a type of iron oxide that forms on steel during the hot rolling process. It needs to be removed from the steel and using vinegar is a safe and easy way to do it.
Mechanical means such as sanding, or employing the use of stronger acids, like muriatic acid, can be used as well, however, exercise caution as muriatic acid can be dangerous if not handled properly.
Pizza steel vs pizza stone
It’s pretty much common knowledge that inexpensive pizza stones will not yield the same results as a pizza/baking steel for a variety of reasons:
- You will be able to make a pizza in 6 to 6 1/2 minutes with a steel. With a pizza stone, it will take about 3-5 minutes longer.
- You will get a far better bottom on the pizza. Think charred bottom and soft interior.
- You will never have to worry about cracking. Pizza stones tend to crack more frequently than one would think.
Possible downsides
A pizza steel is heavy and can be difficult to move around. Because of that, I normally leave my steel in the oven most of the year.
With a 1/4″ steel plate, the risk of bending the oven racks is quite low, but do keep an eye on them.
Because of the weight, be sure to exercise caution when transporting it during the DIY process, or when removing it from the oven. Treat the steel, in the same manner, you would any heavy object made of steel.
Baking steel thickness
For the home cook, a 1/4″ plate works perfectly. It’s not too heavy to move around and shouldn’t bend the grates. A 1/4″ plate won’t be able to maintain its heat as long as a thicker plate.
So, if you think you are going to be making many pizzas in a row pretty regularly a thicker plate might be a better option. Normally for a 1/4″ plate, I will wait about 7-10 minutes between pies to allow the plate to regain its heat.
That’s the perfect amount of time to cut it up and eat the first pie at the table!
Pro tip: To regain the heat quickly, once a pie is finished, turn the broiler on high for ~5 minutes then turn the oven back on to its highest level. Check for 600f with the infrared temperature gun, and then launch another pizza!

Make these recipes with your steel
- New York pizza – this post has everything you’ve ever wanted to know about making a great pizza and homemade dough.
- New York white pizza – mozzarella, ricotta, garlic, and a touch of Pecorino Romano.
- Garlic knots – classic NY-style knots of dough with garlic butter and olive oil, Pecorino Romano, and parsley.
Watch the video below where Jim will show you how to season the steel with easy-to-follow instructions.
Some people learn by watching. If you’re that type of person, you can find most of our recipes on YouTube and our Facebook Page.

Ingredients
Materials
- 1 piece 1/4 x 16 x 16" steel plate see notes below
- 3 ounces organic 100% pure flax oil
- 1 gallon distilled vinegar
- 1 gallon water
Tools
- 4 pencils to act as spacers
- 1 roll paper towels lint free paper towels or blue shop towels recommended
- 1 sheet 150 grit sandpaper
- 1 small block of wood to wrap sandpaper
- 1 large tub, wheelbarrow, etc see notes below
- 1 abrasive sponge Scotch-Brite or similar
Instructions
Descaling the steel
- Wrap the sandpaper around the block of wood and lightly sand all edges of the steel plate checking for any sharp burrs. You only need to take a few swipes with the sandpaper to knock down any sharp edges.
- In a container large enough to hold the steel plate, lay the 4 pencils or any small object to act as a spacer and prevent the steel from touching the bottom of the container. Place the steel onto the spacers.
- Pour 1 gallon of vinegar and 1 gallon of water into the container making sure the steel plate is completely submerged. If the steel is not submerged add more vinegar and water in a 50/50 ratio to completely cover the steel.1 gallon distilled vinegar, 1 gallon water
- After 48 hours wipe off all the mill scale with paper towels and if needed use the scoring action of an abrasive sponge to remove any tough bits. When finished wiping the scale off, rinse with water then dry off immediately to prevent any surface rust from forming.
- Quickly place the dried-off steel in a 170f oven to remove any remaining moisture.
Seasoning the steel
- After 20 minutes remove the dry steel (use heat resistant gloves to handle) from the oven and place it on a clean working surface. Preheat oven to 450f. Squirt a tablespoon or less of flax oil (you don't need a lot) onto the steel and wipe it all over. Flip the steel and repeat, then wipe the oil on all 4 small side edges. Basically, wipe the oil on all 6 sides of the steel.3 ounces organic 100% pure flax oil
- With lint-free paper towels rub off every bit of the oil that you can. A small film will be left on the steel. Place the steel in a 450f oven for 1 hour. After 1 hour, turn the oven off. Leave the oven door closed and wait at least two hours to remove the steel.
- Continue the process until 3 coats of flax oil have been applied. After the third coat, your pizza steel is ready to be used. Enjoy!3 ounces organic 100% pure flax oil
Notes
- The tub or wheelbarrow must be large enough to hold the steel lying flat so that the water/vinegar can completely submerge the steel.
- I have made 3 pizza steels. One each with 5 coats, 3 coats, and 2 coats of flax oil. They all have held up to dozens of pizzas. For extra insurance 3 coats is my recommendation, but feel free to do as many you want.
- Use this ¼” x 16” x 16” steel plate. You can use a 1/2" plate but you will most likely need to reinforce the oven grates.
- Any 100% flax oil will work.
- Cheese, semolina for launching, and a host of other food will wind up on your steel. The high temps will burn off the food and turn it into ashes. You can scrape off the remaining residue with a nylon brush.
- I prefer to leave the steel in the oven at all times and rarely move it.


This is what I’ve been looking for!! Have you heard of anyone using this as a stovetop griddle for cooking, say, pancakes & eggs at relatively low temperatures?
Hi Sara, we haven’t heard of this but our main concern would be the weight of the steel. It’s heavy and could potentially damage the cooktop.
You discussed the 1/4″ steel, but can you comment about the differences in the pizza by using 1/4″ vs 3/8″ vs 1/2″ steels?
Thanks!
Hi Ron, Thicker is better for heat retention. So if you intend to make 5 pies in a row going with the thicker steel will speed up the waiting time for the steel to regain it’s peak temperature.
You mentioned in the video one could buy the steel already seasoned. Where can it be purchased?
Hi Mary, you can check Amazon, Williams Sonoma, and Sur La Table for starters but Jim hasn’t tested these so he doesn’t have one in particular to recommend.
Jim, I love my new pizza steel, and have successfully used it many times. How would you recommend cleaning it? Most of the cheese and sauce carbonized and flaked off, but the surface is no longer smooth, and I don’t want to leave a burnt taste on future pizza bottoms.
Hi Jonathan, you really don’t need to clean it, but if there is any thick residue you can getnly remove with a spatula as it’s cooling.
Hi Tara, thanks for your reply, but if I didn’t need to clean it, I wouldn’t have asked Jim how to. I tried scraping the charred remains off the steel, but there is still some left, and I don’t want to cook on top of it.
Hi Jonathan, the answer provided was per Jim. He said you can warm up the steel and gently remove the remains with a spatula as it’s cooling.
wonderful
Outstanding instructional video. I’m happy that you kept it to ingredients and utensils that most people can easily find.
I found the instructions for preparing the plate steel, but not for making the pizza, where are they listed?
Thank you for taking your time to make this.
Hi George, thanks for the comment and it’s great to hear you found the video to be helpful. Th pizza recipe is on a different post: https://www.sipandfeast.com/homemade-pizza-dough-new-york-pizza/
Thank you for such an informative article! Though, pure flax oil is not accessible in my country (not that I know of, at least). Can I use refined flax oil instead?
Thanks for the comment. I can’t say for sure the results you will get with refined. Most of the articles on the subject specifically say to use pure for scientific reasons but my guess would be that you’d get similar results with refined.
Hi! Can one use a different type of oil? For example, hemp oil?
Thank you!
Hi Danielle, I didn’t test this with another oil. I used the flaxseed oil because I did a ton of research on this and found that this was the best oil to use. If you want to read more on this, do a Google search for “flaxseed oil polymerization”. That being said, I’m sure you can still achieve good results with other oils.
Hi, Jim, thanks for this detailed article (and the video with it)! Got my hands on A36 steel straight from the factory and it’s soaking in vinegar as we speak. In preparation for the seasoning stage, I have some beeswax/seasoning compound that I’m using for seasoning my carbon steel and cast iron pans with good results. Any reason I should still go and buy some flaxseed oil to season the baking steel with, instead of using what I have on hand?
Thanks in advance!
(PS: I know you and your son rated Classico low on the pasta sauces, but I still use it because I only use it as a base and make a far heartier sauce by adding beef, onion, tomato, mushroom, more spices, etc.)
Hi Ben, you can use the compound you have on hand. I used the flaxseed oil because I did a ton of research on this and found that this was the best oil to use. If you want to read more on this, do a Google search for “flaxseed oil polymerization”. That being said, I’m sure you can still achieve great results with other oils. Good luck with the steel and the pizza making! Enjoy it!
Thanks, Jim, appreciate the reply.
Going through the seasoning step now, and perhaps my oven isn’t hot enough to get the same seasoning result as I had with the beeswax compound over stovetop with my steel pans: it’s not getting that deep black I crave! I did buy some flaxseed oil, and may have to give it a few coats of it tomorrow as you’ve originally suggested.
I was lucky enough to come across this article! pure gold!
Thanks to your tips and efforts showing us every step from start to end.
Hi Ahmed, thanks for reading and so happy you found it to be useful!
Just curious, why do you use flax oil rather than an oil with a higher smoking point? Does it not get smoky with the oven being well over the oil’s smoking point?
Hi Josh, The smoke point doesn’t matter once it is bonded (polymerized) to the metal. You will smell it while seasoning but once it’s properly seasoned you will have no smoke or any issues and will be left with a smooth bonded surface perfect for launching pizza and loaves of bread. I have done 3 steel plates this way and none of them have needed any new seasoning after many bakes and 3 years of use.
Awesome video and details!! Thanks amillion.
Now if I have access to different finish types by the provider. Which finish I would go for to save some scraping and sanding? They offer : mill finish , 2B finish, brush finish and hairline finish. I have no clue what that is… can you help me choose ?
Also they have suggested to go for SS 316L.
Thanks in advance
Hi Ahmed,
Thanks for liking the accompanying video. The steel I used is A36 raw steel and as shown in both the video and this post needed to have the mill scale removed. Mill finished means you will have to remove the mill scale. That I assume will be the cheapest option for you. You don’t need stainless steel, but in principle, any thick piece of steel will work for this and once you properly season it with the flax oil, rusting isn’t a problem regardless of the steel you use. Good luck and enjoy the pizza-making journey.
couldn’t be happier! Thanks a million Jim.
Hi Jim,
I just purchased the Artisan pizza steel from Amazon. The directions say to just wash before using. If I wash, put the oil on and bake 375 degrees for one hr, will that work?
By the way, I really enjoy all of your recipes and videos. I came from a first generation Italian family, so many of your recipes bring back many memories.
Hi Barb, if the steel is already seasoned, you shouldn’t need to oil it. I’d follow the directions on the steel. So happy you’re enjoying the recipes and videos!
Thanks for the very complete instructional video. I purchased the raw steel sheet and made the baking steel as instructed. Came out just perfect. I gave the dough a couple of days in the fridge to do its thing and made my first pies tonight. They were more than acceptable. I will need to work on shaping them better as the middle got very thin and the dough got gradually thicker out towards the edge. I’ll just have to suck it up and eat my mistakes as I learn. Practice makes perfect! Thanks for doing these videos.
Hi Craig, so happy to hear you had success with the steel! Thanks for the comment and hope you enjoy your pizza!
Hello:
Thank you for this pizza steel DIY. I soaked my hot rolled steel in the vinegar/water and then i scrubbed the mill scale off, rinsed well. Put in oven to dry. Then started applying flax seed oil and i notice when i was putting it on the steel, the paper towel that i was using to apply it was black. I washed the steel with soap and water and dried with paper towels. Paper towels did not turn black when drying from wash. However, when i put the oil on again, paper towels that i used to apply oil turned black again.
Do you think I didn’t get all the mill scale off? Is this harmful?
Any suggestions?
Thank you!
CW
I can’t say for sure. It’s possible that you didn’t get it all off. I think you should be alright after the oil polymerizes and forms the coating. I think testing the seasoned steel with a few dough balls will be your best bet. Good luck!
Wanted to thank you, my steel is finished and looks beautiful. Pizza itself will be later this week.
Hi Russell, so happy you finished the steel! Looking forward to hearing how you like the pizza. Thanks for the comment and review!
My husband has access to metals. He asked me if I wanted the pizza steel to be made with 1/4” stainless steel. I don’t see anyone using stainless steel online only steel. Is there a preference or would that be because of cost?
Hi Susan, I’d stick with the mild steel. The seasoning process helps prevent rusting and the conductivity is supposedly better than stainless. The majority of pizza makers use the mild steel.
Great instructional video! 5 Stars!
Hi Joe, really appreciate the comment and so happy you found the video to be helpful!
Please give me source for a seasoned steel pizza pan.
Hi Julie. My shop is linked above in the main menu. You can find a good option under pizza-making equipment. Another option is the baking steel website where they sell a few different sizes and thicknesses.
Hello Jim,
Thank you for your informative reply. I just read your reply on my PC (no smartphone) today (11/29/2021). Between the time I posted my reply and read your reply, I ordered the ThermiChef 16″ x 16″ x 3/16″ pizza steel. I talked to ThermiChef/Cooking Steels customer service and was told that if my pizza volume was low, 1 to 2 pizzas per baking session, that the ThermiChef 16″ x 16″ x 3/16″ pizza steel should work. They suggested that the recovery time to heat the steel back up to baking-ready temperature could be about the same time it takes to assemble the next pizza pie. And since I only have 1 wood pizza peel, only one pie at a time can be made on it. I would have liked to have seen the various sized pizza steels in a store to judge which size I felt safe to handle for oven use. Unfortunately, the local Columbus, Ohio kitchen supply stores I checked did not stock the steels. So, I was left to order the steel online.
Hey Ron. Since you’re going to only make a couple of pies in a night you will definitely be fine with the 3/16″ plate. We often make a pie and eat it and decide on the next toppings while letting the plate come back up to temp. Using your high broil setting will bring the temp of the plate back up more quickly. Just remember to change back to bake before adding the next pie in. Hope you enjoy making pizza on your new steel.
Hello Jim,
Thank you for all your work in producing the videos on making NY style pizzas and the other recipes videos. I am looking for a finished pizza steel that will accommodate a 15″ diameter pie made using your NY pizza dough recipe. I have a 7-years old 30″ wide GE gas range with a top inside oven broiler and a baking maximum temperature of 550 degrees F. The oven rack depth is 16″. The only pizza steel I can find online that is close in dimensions to the 16″ x 16″ x1/4″ Amazon DIY steel plate that you prepared for kitchen use is a ThermiChef Standard Square Pizza Steel (weighs 13.6 lbs.) with dimensions 16″ x 16″ x 3/16″ (thick) and not 1/4″ thick. Do you think the thinner 3/16″ thick (1/16″ thinner than 1/4″) pizza steel is thick enough to bake the 15″ diameter pizza and give good results? The other option I have is the ThermiChef Deluxe Square Pizza Steel (weighs 27.2 lbs.) with dimensions 16″ x 16″ x 3/8″ thick (1/8″ thicker than 1/4″) but I have a concern with that amount of weight bending my residential (non-commercial) oven rack. Thank you in advance!
Hi Ron. Sorry for the late reply. The message was wrongly auto placed in my spam folder. I would go with the 3/8″ version. You’ll get better heat retention between pies, which might be important to you. If you are only doing one pie in a night a 3/16″ would be absolutely fine. It’s possible the 3/8 plate could bend your rack, but I think it will be okay. You might want to check your oven’s manual for the max weight per rack.