
A quick search on how to make homemade potato gnocchi will yield hundreds of results. Many of them will scare you into believing that making homemade gnocchi is the hardest thing in the world, and if you don’t follow their precise instructions, your gnocchi will be absolutely terrible. This is so not true!
This post may contain affiliate links. Our disclosure policy.
I’m here to tell you that making great-tasting gnocchi from scratch is way easier than you think and with the exception of a few tools like a ricer, can be made using items you likely already own.
Your very first batch of gnocchi may not turn out perfect, but soon enough you’ll be turning out tender little pillows of potato rivaling those of any restaurant.
Most importantly, yours will be 100% better than any store-bought version!
Want To Save This Recipe?
How to make it
Each number corresponds to the numbered written steps below.
- Place two pounds of russet potatoes in a large pot and fill with cold water (starting with cold water prevents skin from breaking) until it’s two inches above the potatoes. Bring to a boil. Once boiling, turn heat to medium and cover with a lid that’s left slightly ajar. Cook the potatoes for 30-35 minutes or until tender. To check for doneness, insert a knife, and if slides through with ease the potatoes are done.
- Drain the potatoes in a colander then spread out to cool. Once the potatoes are cool enough to handle (about 10-15 minutes) remove their skin. A sharp paring knife works well to scrape off all of the skin.
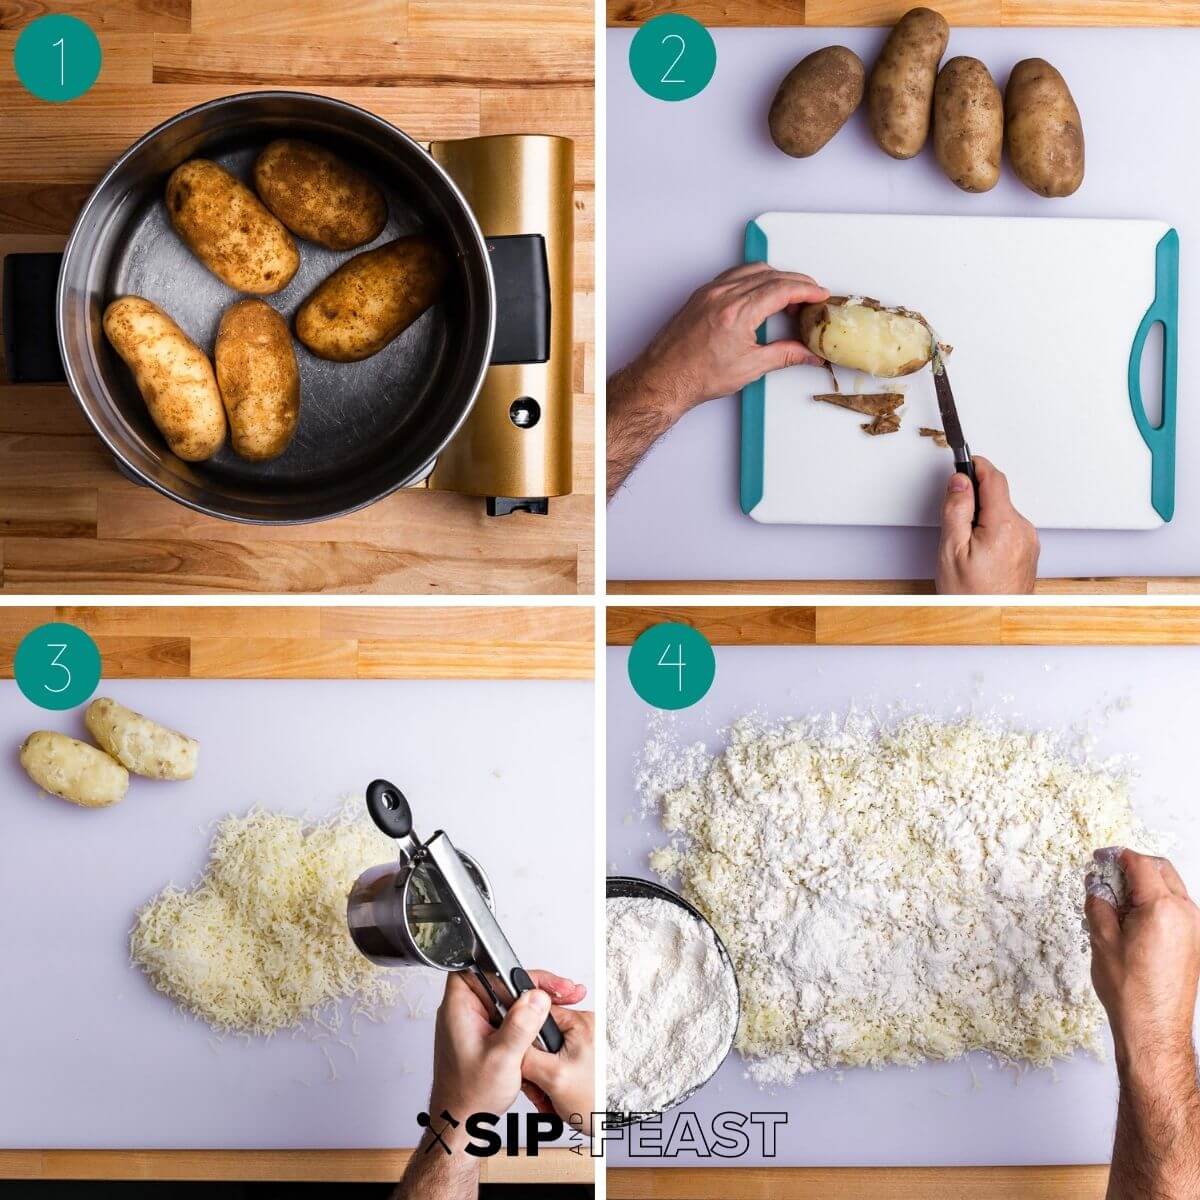
- Rice the potatoes using a ricer tool. You want to do this when the potatoes are still warm.
- Spread the riced potatoes out on a large work surface and let them cool. Sprinkle 1 teaspoon of fine sea salt all over the potatoes, then sprinkle the flour.
- Drizzle 1 beaten egg onto the flour and begin combining the gnocchi dough. A scraper tool works well to cut the dough in and avoid overmixing. You can knead for a very short time (30-45 seconds) but be careful to not overwork the dough. Overkneading will produce excess gluten and therefore tough gnocchi.
- You want to form a rough ball like shown in pic 6 below. Use more flour if needed. The goal is to use as little flour as possible to form a cohesive ball.
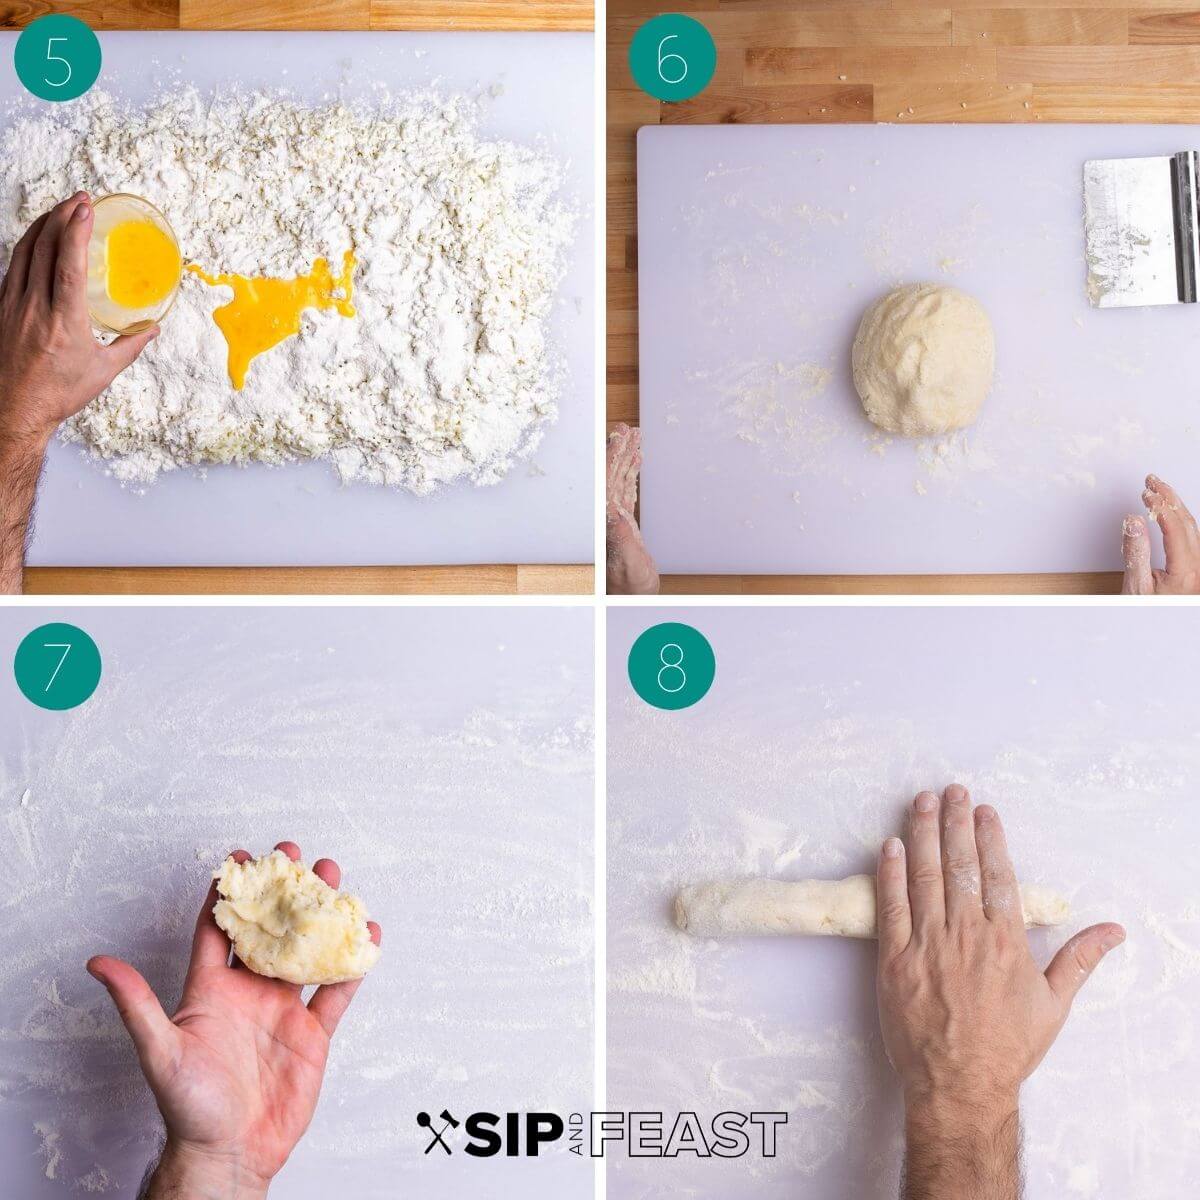
- Move the dough ball to the side and clean the work surface well or use a new clean and dry work surface. Sprinkle the work surface with flour and grab a ball of the dough (about the size of a lemon) with your hands and place it down.
- Begin rolling the gnocchi dough into a rope about 1/2 to 3/4″ thick. Try to use the palm of your hands instead of the fingertips. Fingertips tend to compress or flatten the rope, while the palm is better at rolling.
- I like to cut the long rope in half and continue rolling until reaching the proper thickness. It’s easier to roll out a smaller rope.
- Cut the pieces with a sharp knife or pastry knife into ¾ to 1” long pieces.
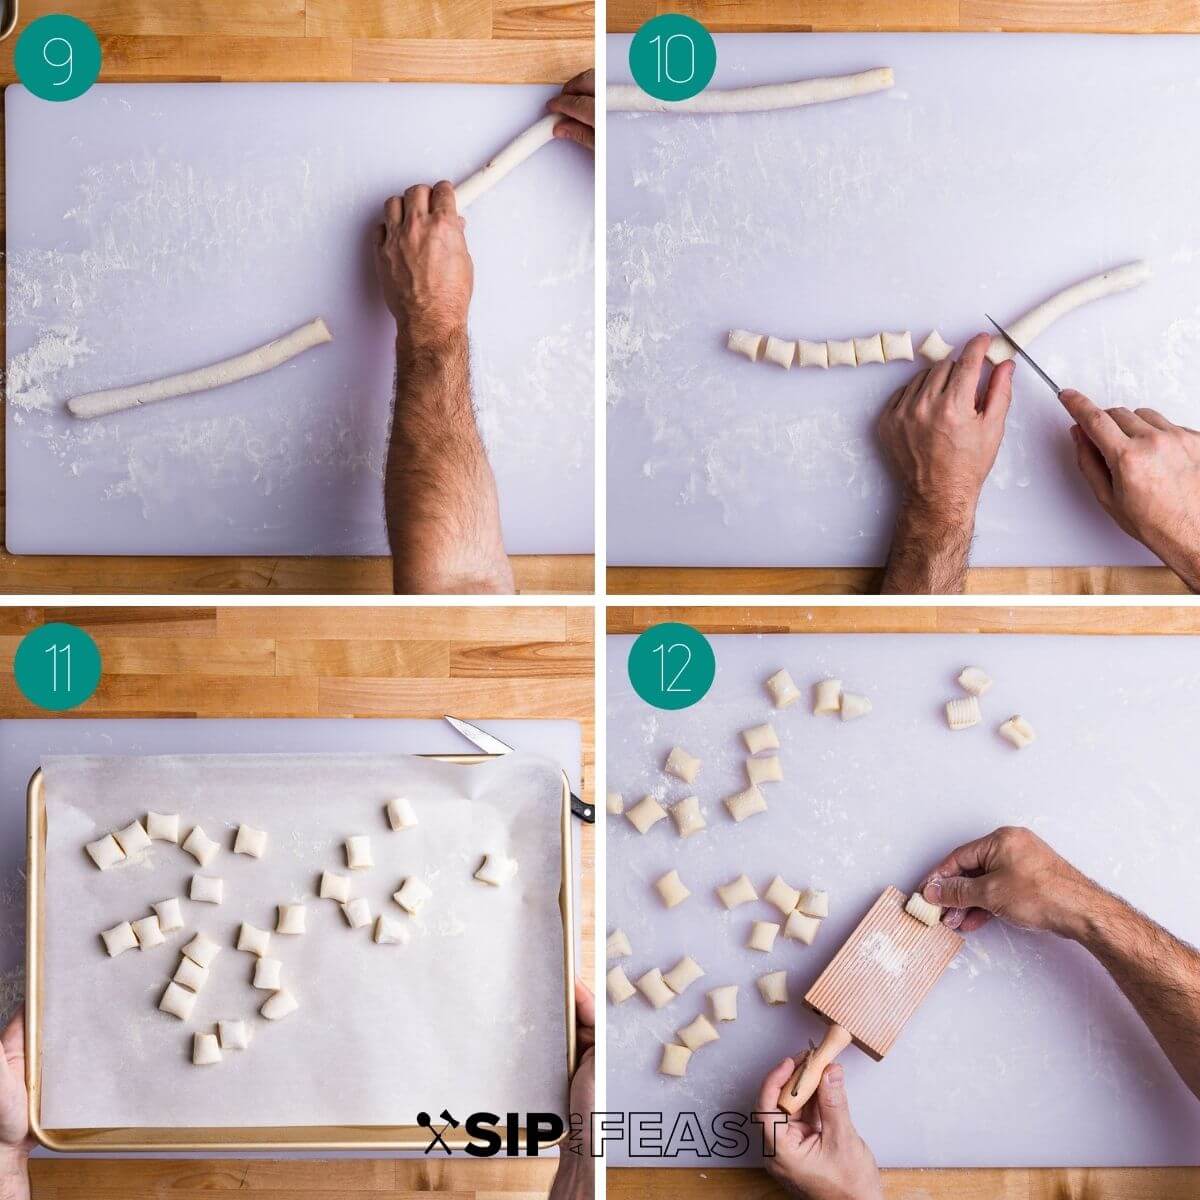
- Sprinkle a parchment paper-lined baking sheet with a bit of semolina flour. Place the cut gnocchi onto the baking sheet and sprinkle with a bit more flour to further prevent any sticking. Make sure than none of the gnocchi touch each other as they will stick together very quickly.
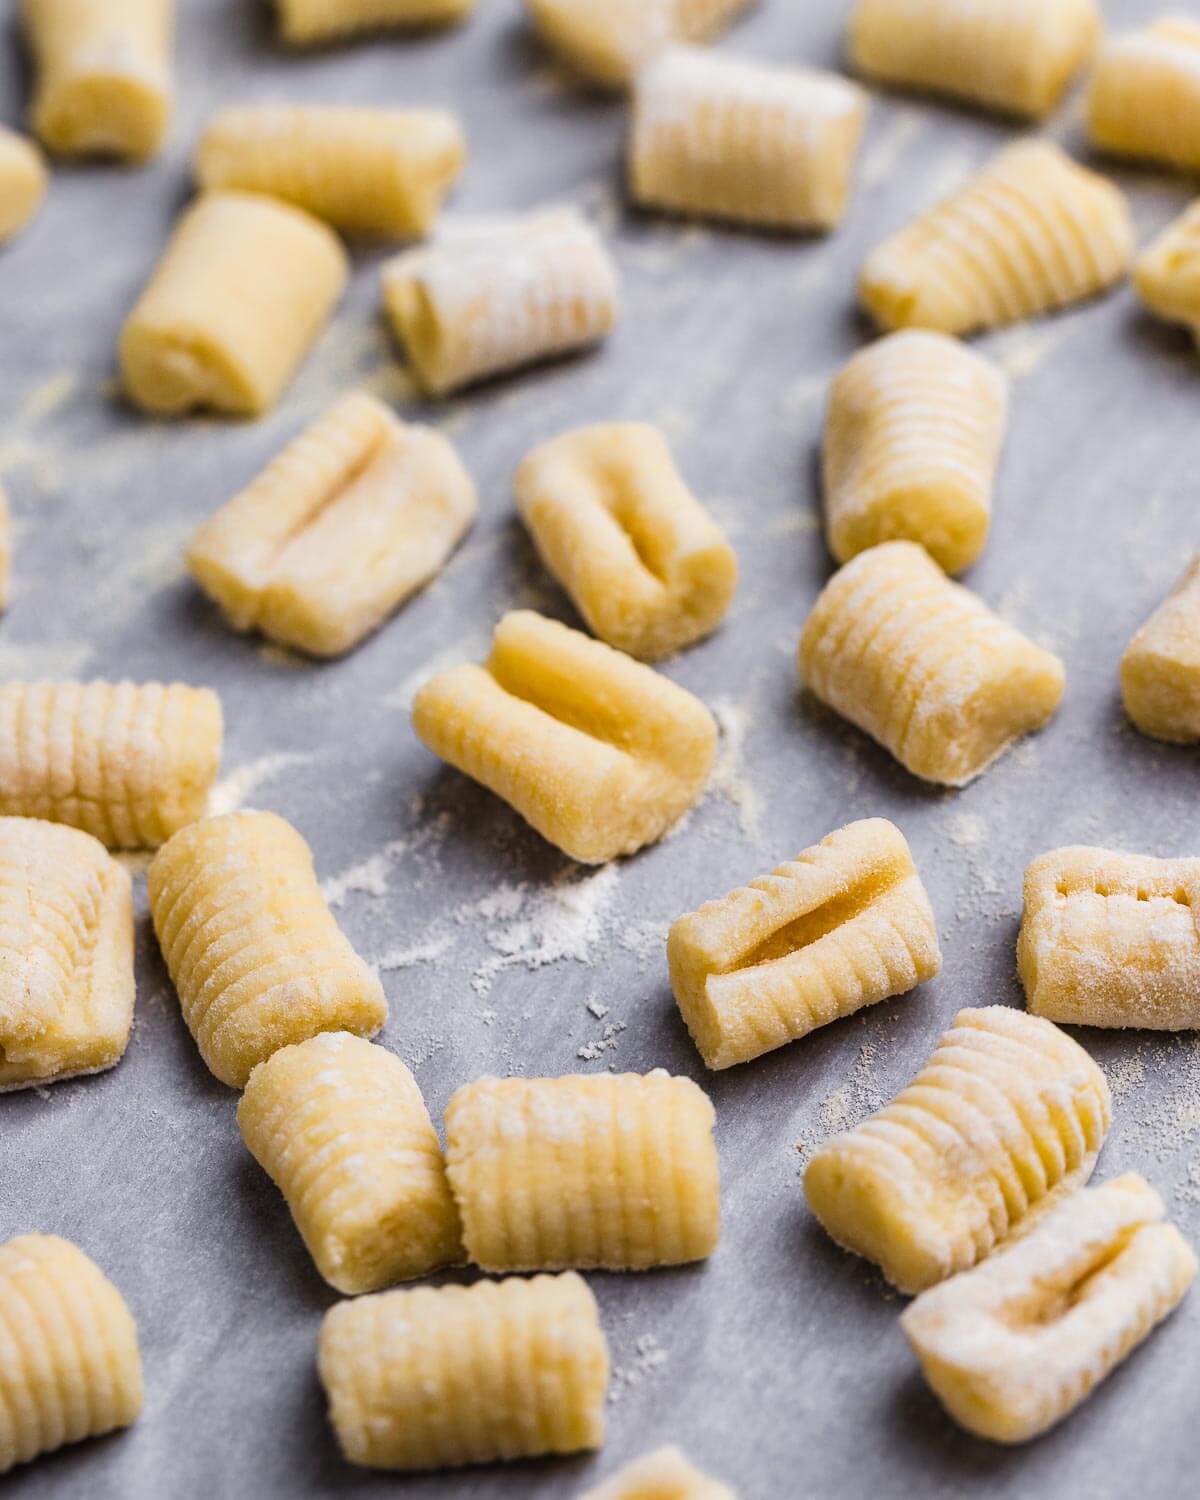
- Potato gnocchi can be grooved with a rigagnocchi (gnocchi paddle), but you can also leave them smooth.
- If you don’t have a rigagnocchi, you can achieve the same result by rolling on a fork.
- You can see the divot or depression on the bottom of the gnocchi.
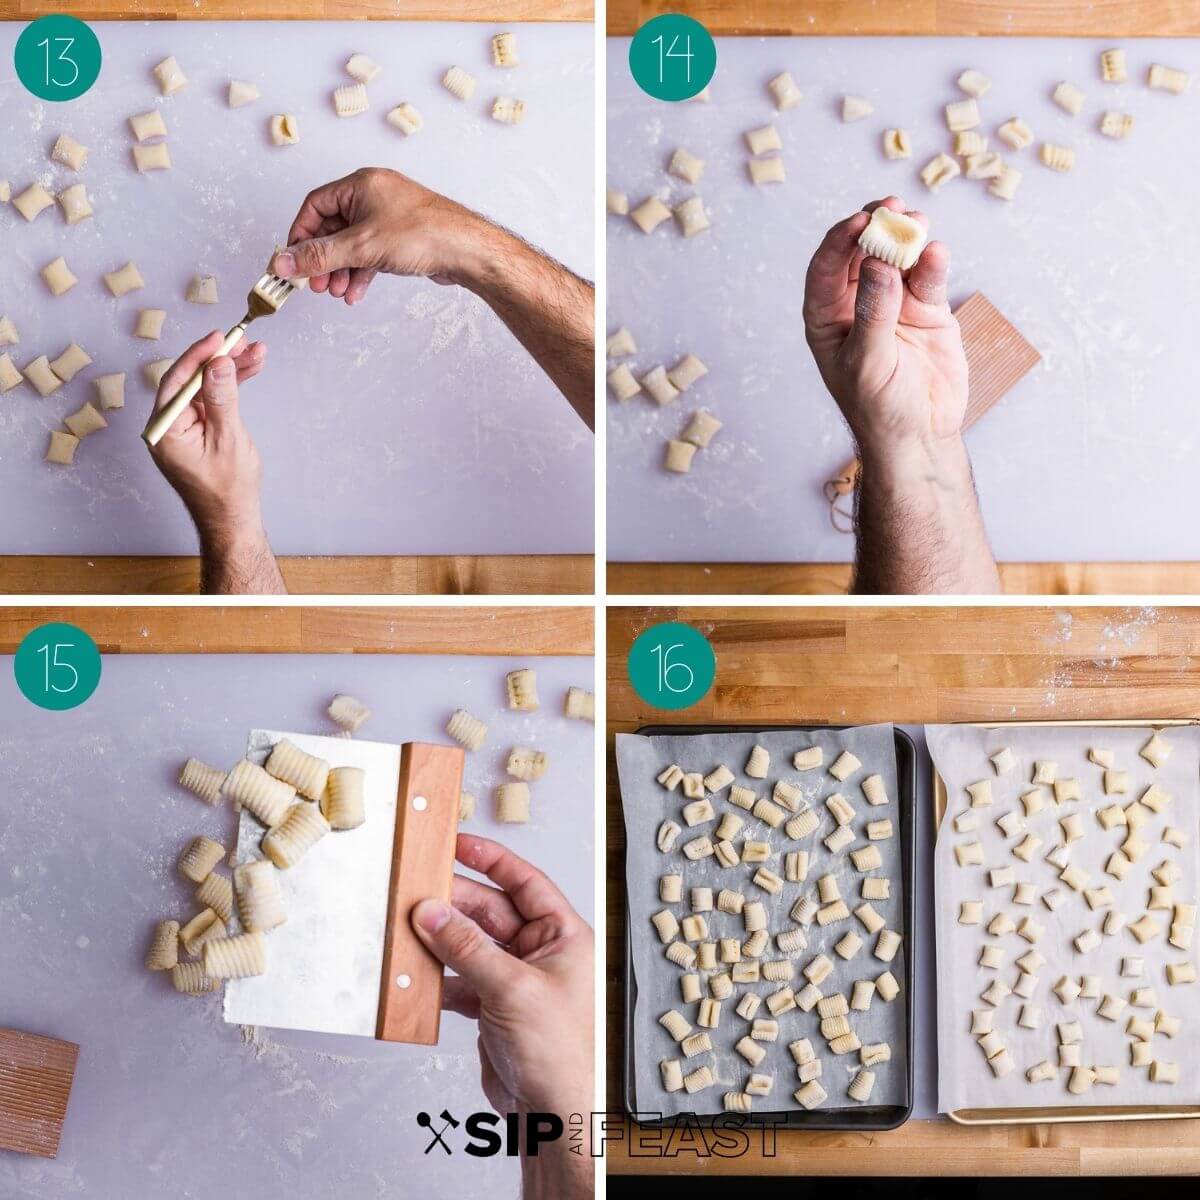
- Instead of picking up the delicate gnocchi with your hand, use a bench scraper or sharp putty knife (my tool of choice for so many kitchen tasks, especially removing pizza dough balls from proofing containers) which can slide right under.
- Here are all the gnocchi ready for the freezer. The tray on the right has gnocchi with no ridges. That’s my preferred way as it’s easier and quicker!
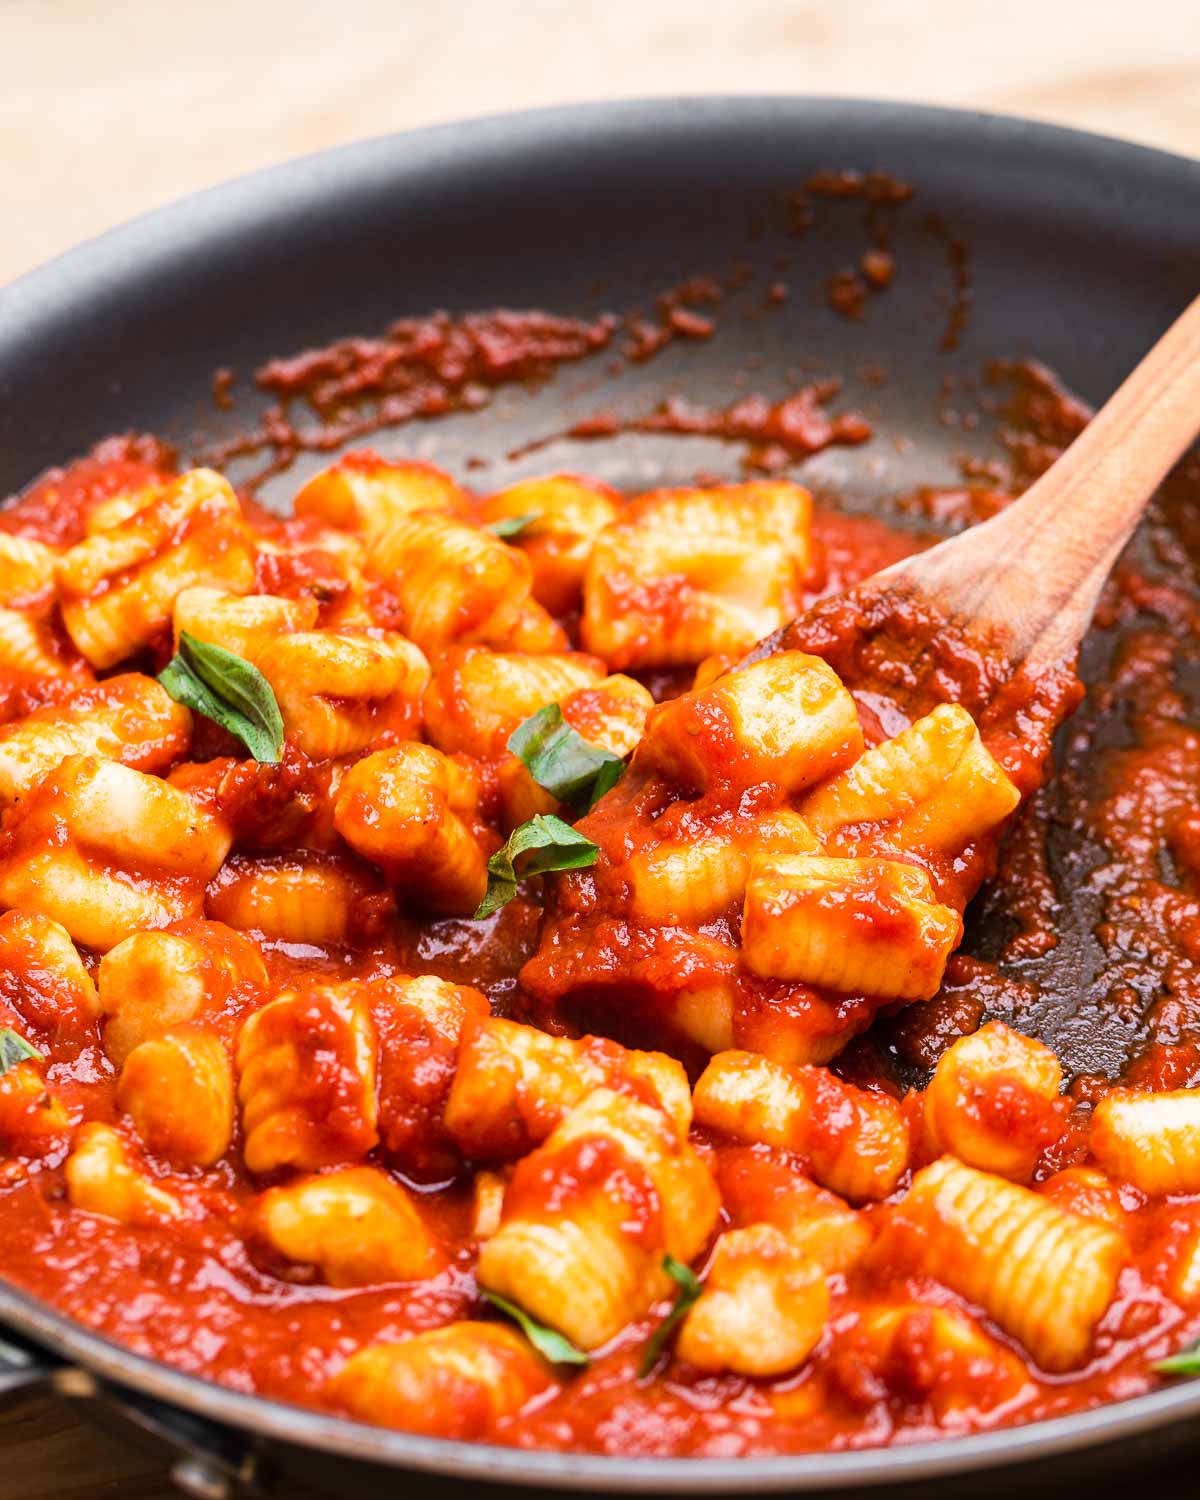
- Note: Before cooking gnocchi make sure you have your sauce of choice hot and ready before dropping any gnocchi into the water. Bring a large pot of salted water (2 tablespoons kosher salt per gallon of water) to a boil and drop only a small amount of gnocchi into the water. Once the gnocchi float, wait 20 seconds, then scoop them out with a slotted spoon to drain.
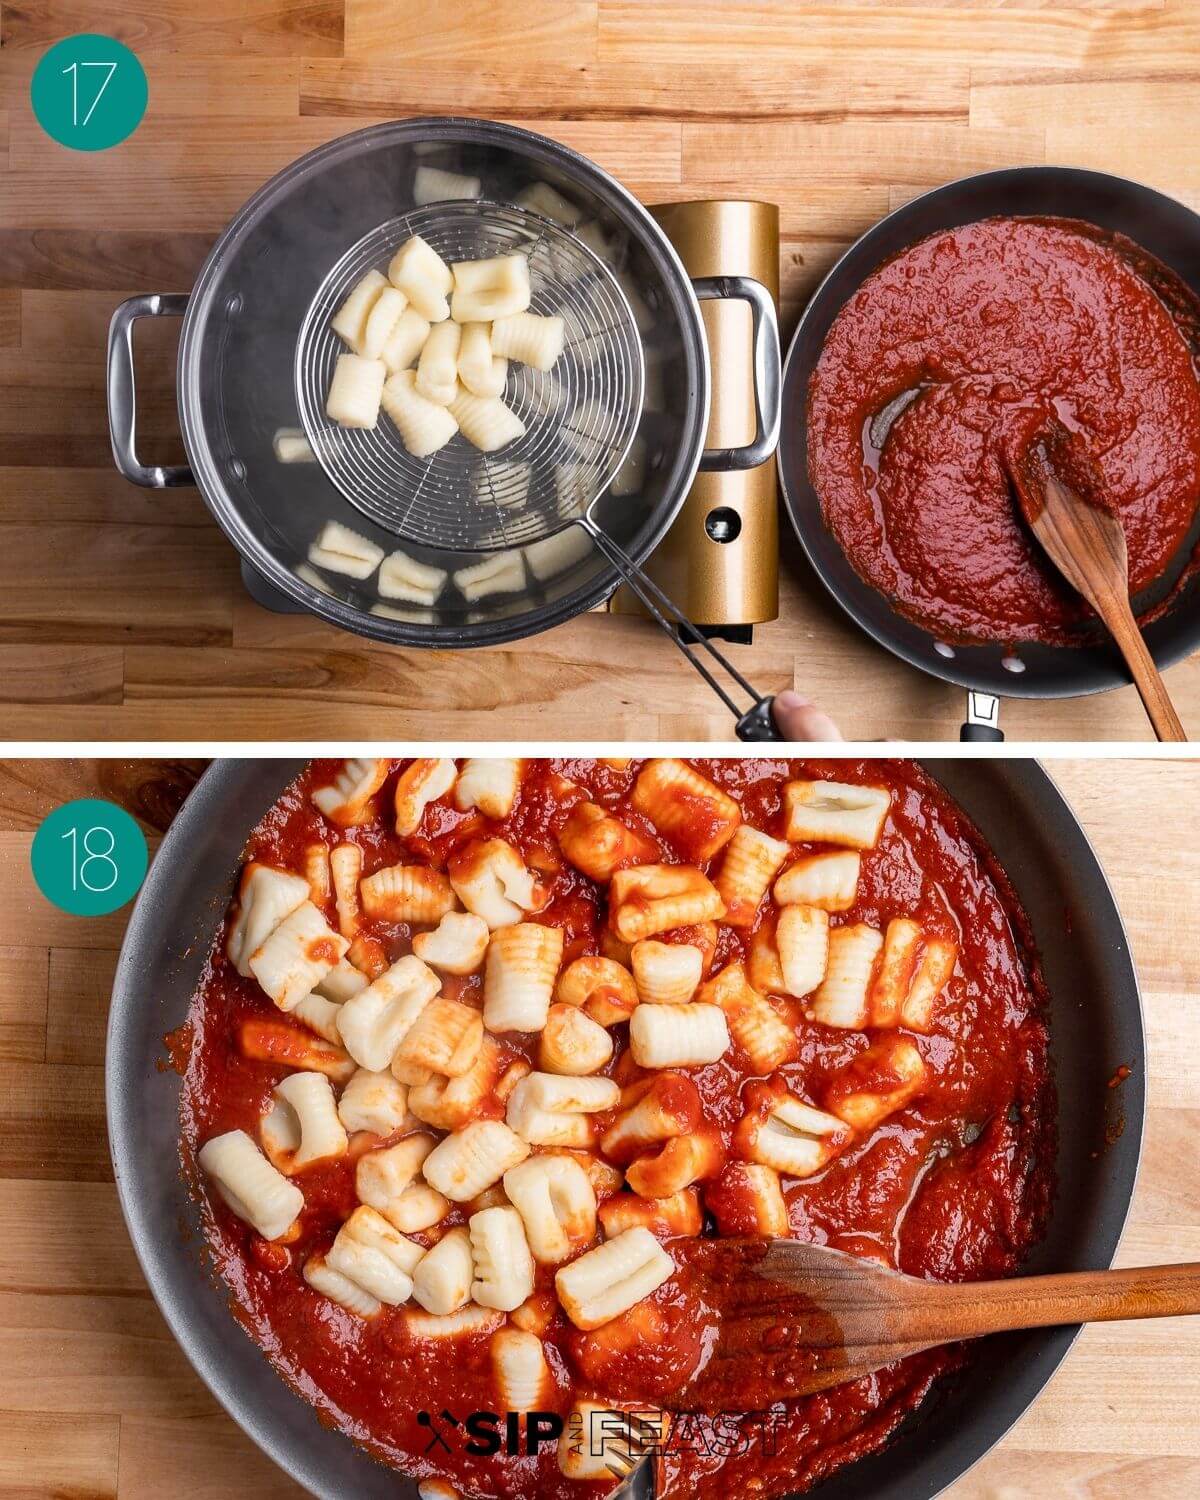
- Place the drained gnocchi into your sauce and repeat for more batches until done. Gnocchi only takes around 3 minutes to cook from a frozen state. You can also cook gnocchi right away after making them, but have your sauce ready because they will get gummy fairly quickly. Serve and enjoy!
Top tips
- Storing. Gnocchi can be stored for up to 3 months in the freezer in freezer bags. Making large batches and storing in 1 pound portions, makes homemade gnocchi and under 20-minute meal during the week!
- Dry starchy potatoes work best. Russets are the best type of potatoes to use in America. Do not peel potatoes, and try to use potatoes that have their skin fully intact. The skin acts as a barrier to prevent water penetration.
- Fill the pot with potatoes and cold water. Bringing the potatoes to a boil, then lowering them to a simmer prevents the skin from cracking and allowing water to leach into the potatoes.
- Use a ricer tool. This is the one I use and makes gnocchi making so much easier.
- Flour. Use just enough flour to form the dough and not a bit more. Only knead long enough to form a cohesive mass. Too much kneading will produce excess gluten which makes the gnocchi tough. Extra all-purpose bench flour should be used to roll out the gnocchi dough as needed.
- Prevent sticking. Place newly formed gnocchi on semolina flour sprinkled sheets (it’s coarse and prevents the gnocchi from sticking to each other and to the paper).
- Cooking. When cooking gnocchi, they are perfect about 10-20 seconds after they float.
How to serve
The possibilities are endless. Just butter and a bit of Parmigiano Reggiano is always great (especially for butternut squash gnocchi) but here are a few other ideas:
- 15 minute marinara – Quick sauce with plum tomatoes, garlic, and basil.
- Ragu alla Bolognese – Authentic recipe from the Bologna Chamber of Commerce.
- Pesto alla Genovese – So delicious and so easy.
- Sausage Gnocchi Soup – drop your gnocchi into this creamy and delicious soup.
If you’ve enjoyed this Potato Gnocchi Recipe or any recipe on this site, give it a 5-star rating and tell us about it in the comments below.
We strive to satisfy a number of learning styles. If you are someone who prefers to learn by watching, you can find most of our recipes on YouTube and our Facebook Page.
For more never-before-seen videos, become a Patreon member today!
Potato Gnocchi

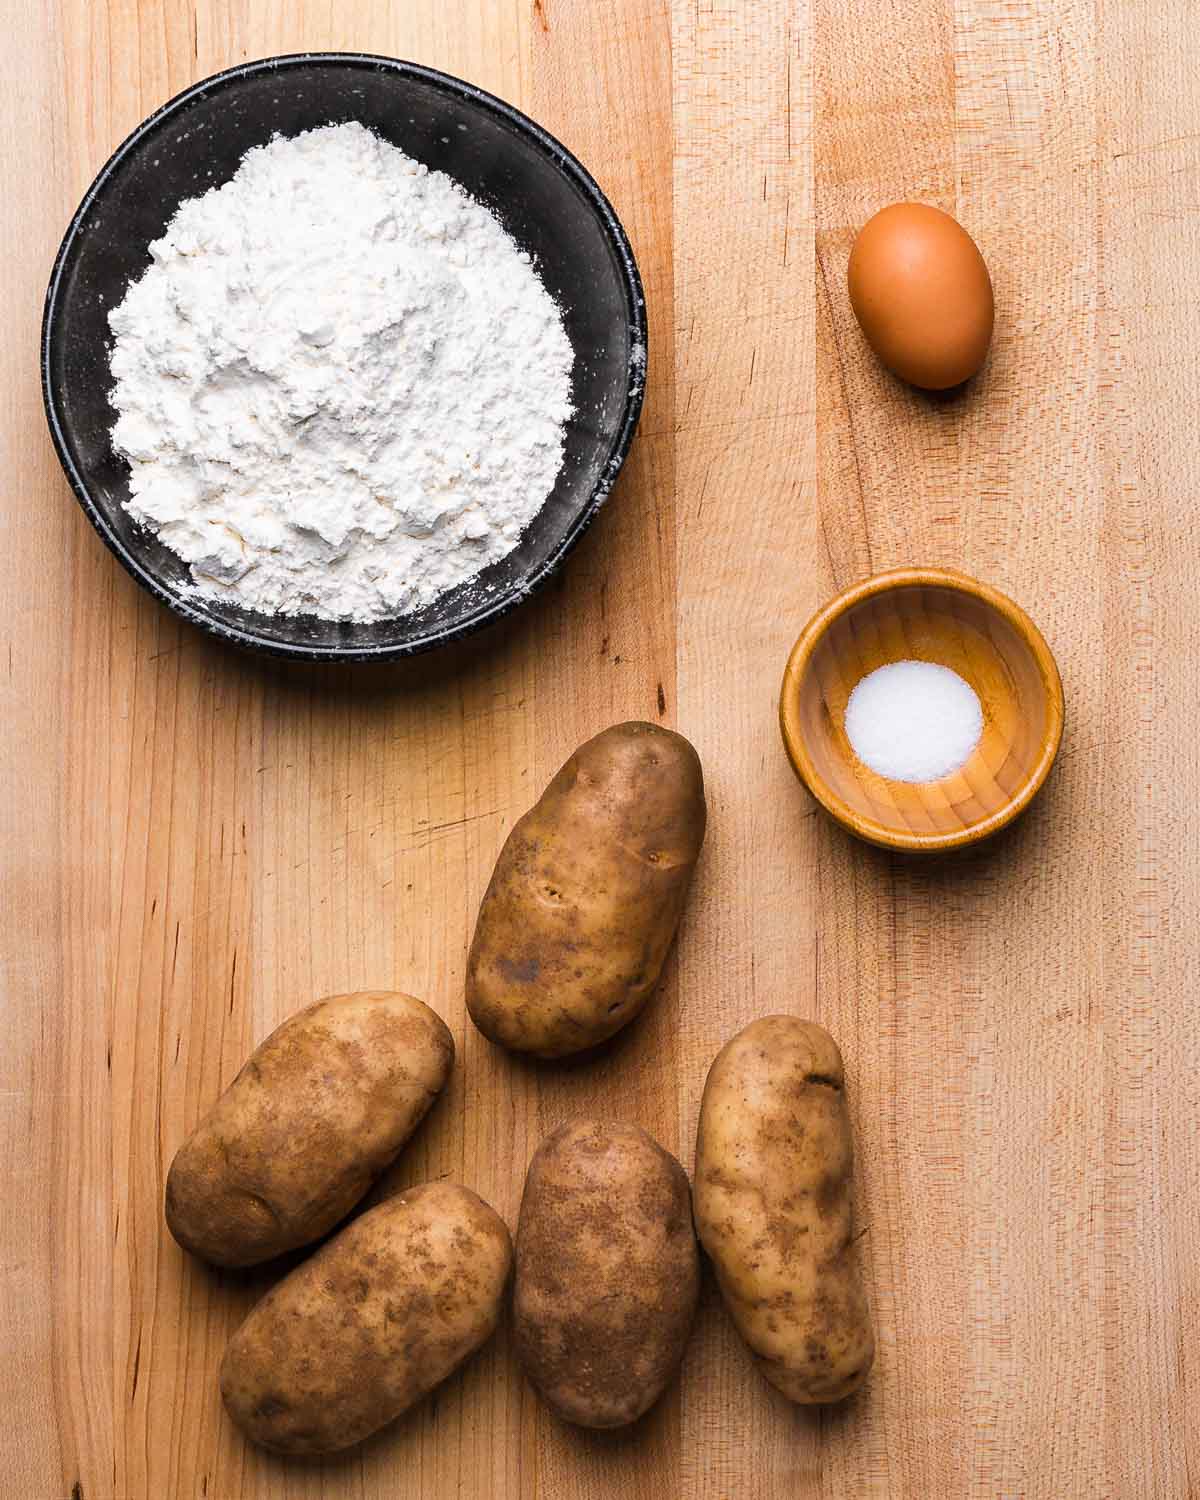
Ingredients
- 2 pounds russet potatoes
- 1 teaspoon fine sea salt
- 1 1/2 cups all-purpose flour plus extra if required and for dusting
- 1 large egg beaten
- 2 tablespoons semolina flour for dusting only
Want To Save This Recipe?
Instructions
- Place potatoes in pot and fill 2 inches above with cold water. Bring to a boil then turn heat to medium and cook partially covered for 30-35 minutes or until potatoes are tender. If a sharp knife slides through the potatoes, they are ready to be drained.
- Drain potatoes in a colander, then spread out on a board to cool. Once potatoes are cool enough to handle, peel and discard all the skin. Run the still warm potatoes through a ricer.
- Place the riced potatoes on a large work surface. Once potatoes are fairly cool, sprinkle with the salt, the flour, and drizzle the egg.
- Fold the mixture together with a bench scraper to incorporate the flour into the potatoes. Form a rough mass by kneading for 30-45 seconds, but don't overdo it. If too wet use a bit more extra flour, working hard to use no more flour than necessary.
- Once a cohesive ball has been formed place it to the side. Clean the work surface completely and sprinkle flour onto the work surface.
- Grab 1/6 of the dough or about the size of a lemon and begin rolling the dough into a string about 1/2 to 3/4 of an inch thick.
- Once completely rolled out, cut with a sharp knife or bench scraper individual pieces about 3/4 to 1 inch long. Gnocchi can be grooved with a gnocchi paddle, fork, or left as is.
- Place the cut gnocchi on a parchment paper lined baking sheet that has been sprinkled with semolina flour or all-purpose flour. Make sure to keep the gnocchi pieces separated to avoid any sticking. Repeat with remaining dough.
- Once a full tray has filled up with gnocchi, place it in the freezer for 2- 3 hours to harden. Gnocchi can be cooked right away or saved in freezer bags for up to 3 months.
- To cook gnocchi, bring a large pot of salted water to boil and drop in a small batch (about 15-20 gnocchi at a time). Once the gnocchi float to the top, remove with a slotted spoon and place into your choice of sauce. Enjoy!
Notes
- The recipe makes roughly 2 pounds of gnocchi or 8 moderate-sized servings.
- Instead of boiling, the potatoes can be steamed or baked at 400f until very tender for 60-75 minutes. Some people have better results with baking the potatoes as they tend to be dryer.
- The exact amount of flour required will vary but a good general rule is 1 1/2 cups to 2 pounds of potatoes.
- Only knead for 30-45 seconds or just enough to form a cohesive mass.
- Use extra flour for rolling and handling the gnocchi to avoid sticking.
- Formed gnocchi should be cooked right away or frozen.
- Freeze gnocchi on floured baking sheets initially (2-3 hours) then store in freezer bags for up to 3 months.
Nutrition
Nutrition information is automatically calculated, so should only be used as an approximation.
Follow Me
The Sip and Feast Cookbook
- 100+ recipes
- Essential tools and ingredients
- Entertaining ides
- Stunning photography


When I was in Italy, I had gnocchi with a white sauce that was delicious. Would you know of this type of sauce, and if so, can you share?
Hi Sandra, was it a gorgonzola sauce? Often gnocchi will be served with that type of sauce. If so, we do make a gorgonzola sauce in this recipe: https://www.sipandfeast.com/gorgonzola-cream-sauce-pasta/
Got the recipe down, any tips on how to easily roll out on the board. Mine come out really ugly!
Easier and delicious!
We’re so happy you enjoyed, Gerardo!
These turned out very well. Could they be made with instant potatoes? Do you have a recipe for Gnocchi di Farina?
Hi Bob, Jim has never made it with instant potatoes but he may experiment in the future, but a quick look online showed me that there are people who are using instant potatoes for gnocchi with success. Jim doesn’t have a recipe for gnocchi di farina at this point. If you try this with instant potatoes, let us know how it turns out!
Love your recipes, Jim! I used to make this recipe with my grandparents years ago and have many fond memories of learning how to form the shapes etc. The whole family got involved in the meal prep. Can’t wait to make this again
Hi Jim,
First, I want you to know I enjoy all of your recipes.
I wanted to make ricotta gnocchi instead of potato gnocchi. How much ricotta is used.
Thanks in advance.
Hi Denise, we’re happy to hear you’re enjoying the recipes. We don’t have a ricotta gnocchi recipe out yet so we can’t say for sure. We hope to have a ricotta gnocchi recipe up at some point, but in the mean time we have potato, sweet potato, and butternut squash gnocchi recipes.
Excellent recipe. I made a bunch today for our monthly family dinner this coming Sunday.
Thank you so much for doing what you do.
Looking forward to making many more of your dishes.
Hi Donna, we’re so happy you enjoyed the gnocchi and really appreciate the comment!
I’ve scared myself out of making gnocchi for way too many years. I love gnocchi! But will not buy the stuff in the grocery store, lol. I’m going to make your gnocchi recipe tonight, and will certainly come back to give a rating (even though I know this is going to be great.. love all your recipes!)
I should’ve asked earlier because now I’m just going to have to wing it. My question is, if the gnocchi were meant to be added to a creamy (not thick) soup, could they be added directly to the soup pot? Or, would you recommend a par-boil first?
Hi Melissa, you can add the gnocchi to the soup and allow them to cook in the soup. They only take a few minutes to cook.
Can’t wait to try this recipe looks so good
😀I have a question ,about saving the leftover Ricotta mixture from Lasagna ? Can it be frozen .I made 4 – 1 pound boxes of Lasagna for family of 34 and made too much filling , help ! Thank Jim ,
Hi Linda, you probably can freeze the leftover ricotta mixture although I haven’t tested it myself.
What a fantastic recipe! I’ve always been scared to try making Gnocchi & it’s been on my Bucket List for many years to make it. I always have it when we eat out. Your instructions & videos make everything seem so easy & your recipes are so delicious. I made this one last night & posted the pictures to my friends. They were all very impressed with me. Thank you again for sharing with us all.
Hi Delyse, I appreciate your comment and I’m so happy you liked the gnocchi!
I love the way you demonstrate and explain your recipes. Tried some of your recipes and they were excellent.
Thanks so much, Wanda! I appreciate the comment!