
The Grandma Pizza is my favorite pizza to make and once you see how easy it is, it will become yours as well. Created at Umberto’s of New Hyde Park in Nassau County, Long Island, this amazing pizza can now be found in most of the New York metro area. Everything you’ve ever wanted to know about the technique and ingredients needed to create the perfect Grandma pizza is below.

This post may contain affiliate links. Our disclosure policy.
What is Grandma pizza?
Grandma pizza is unique and quite different from the ubiquitous traditional New York pizza.
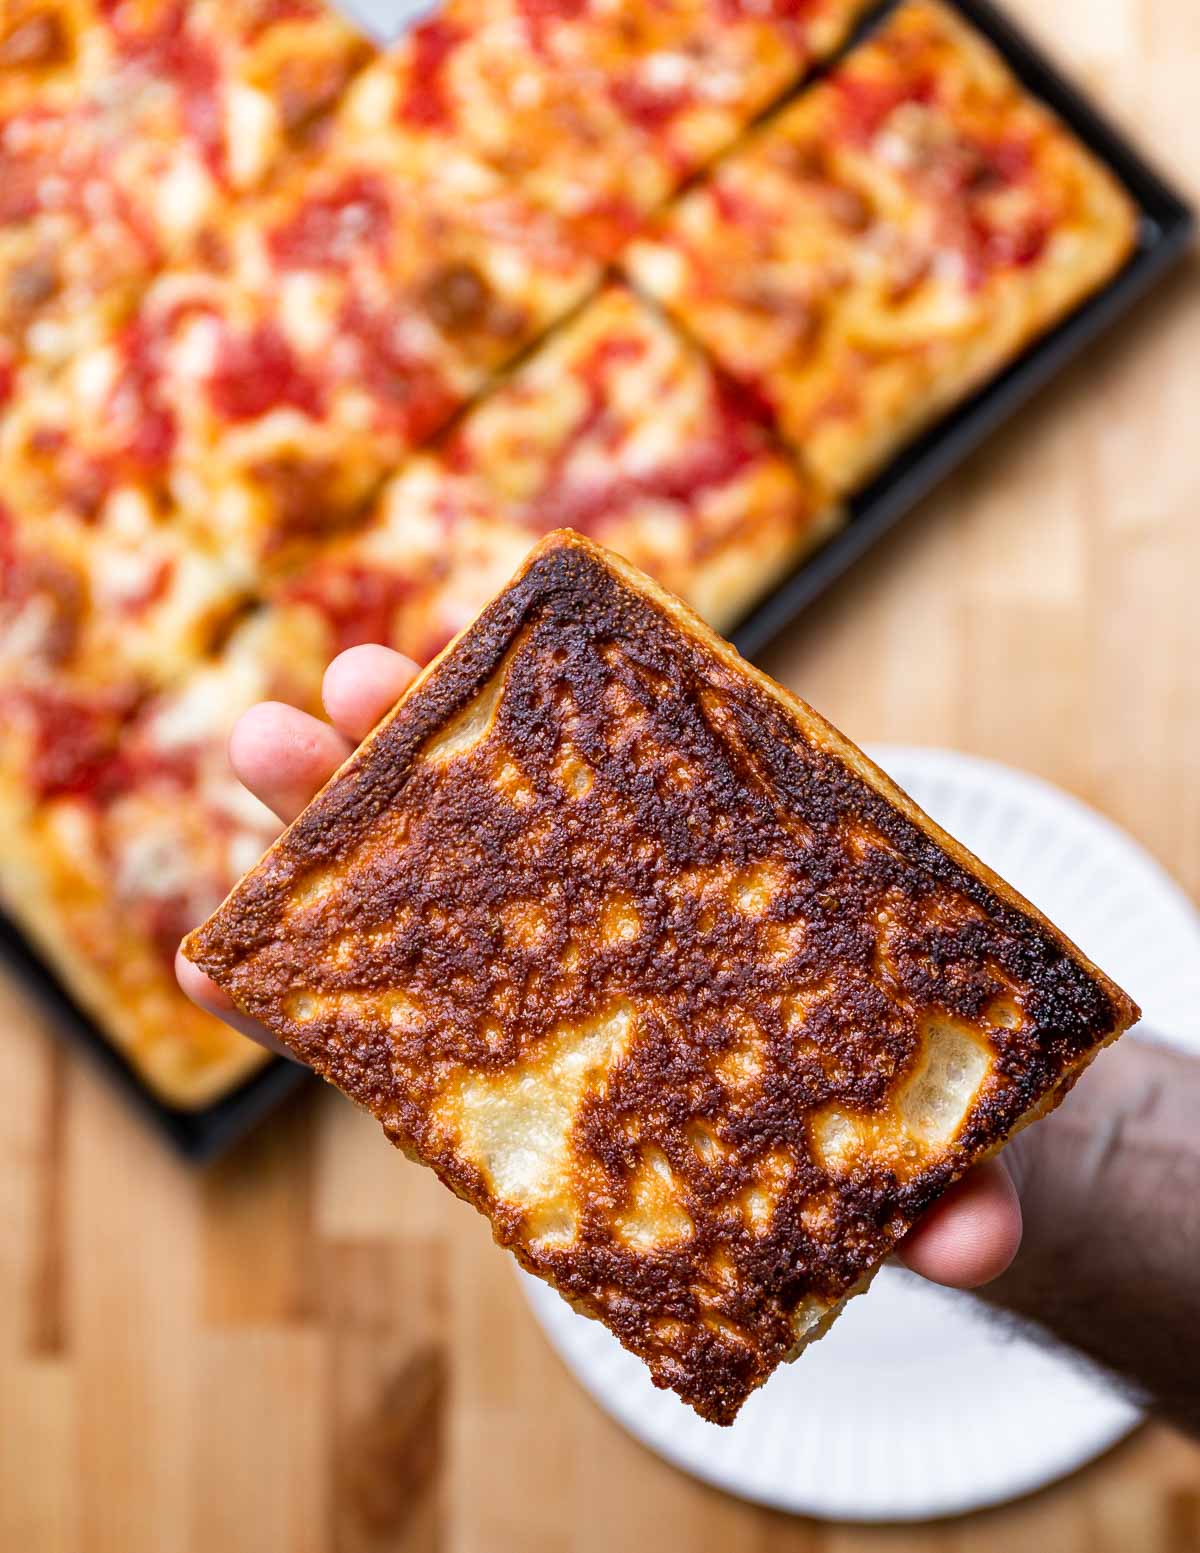
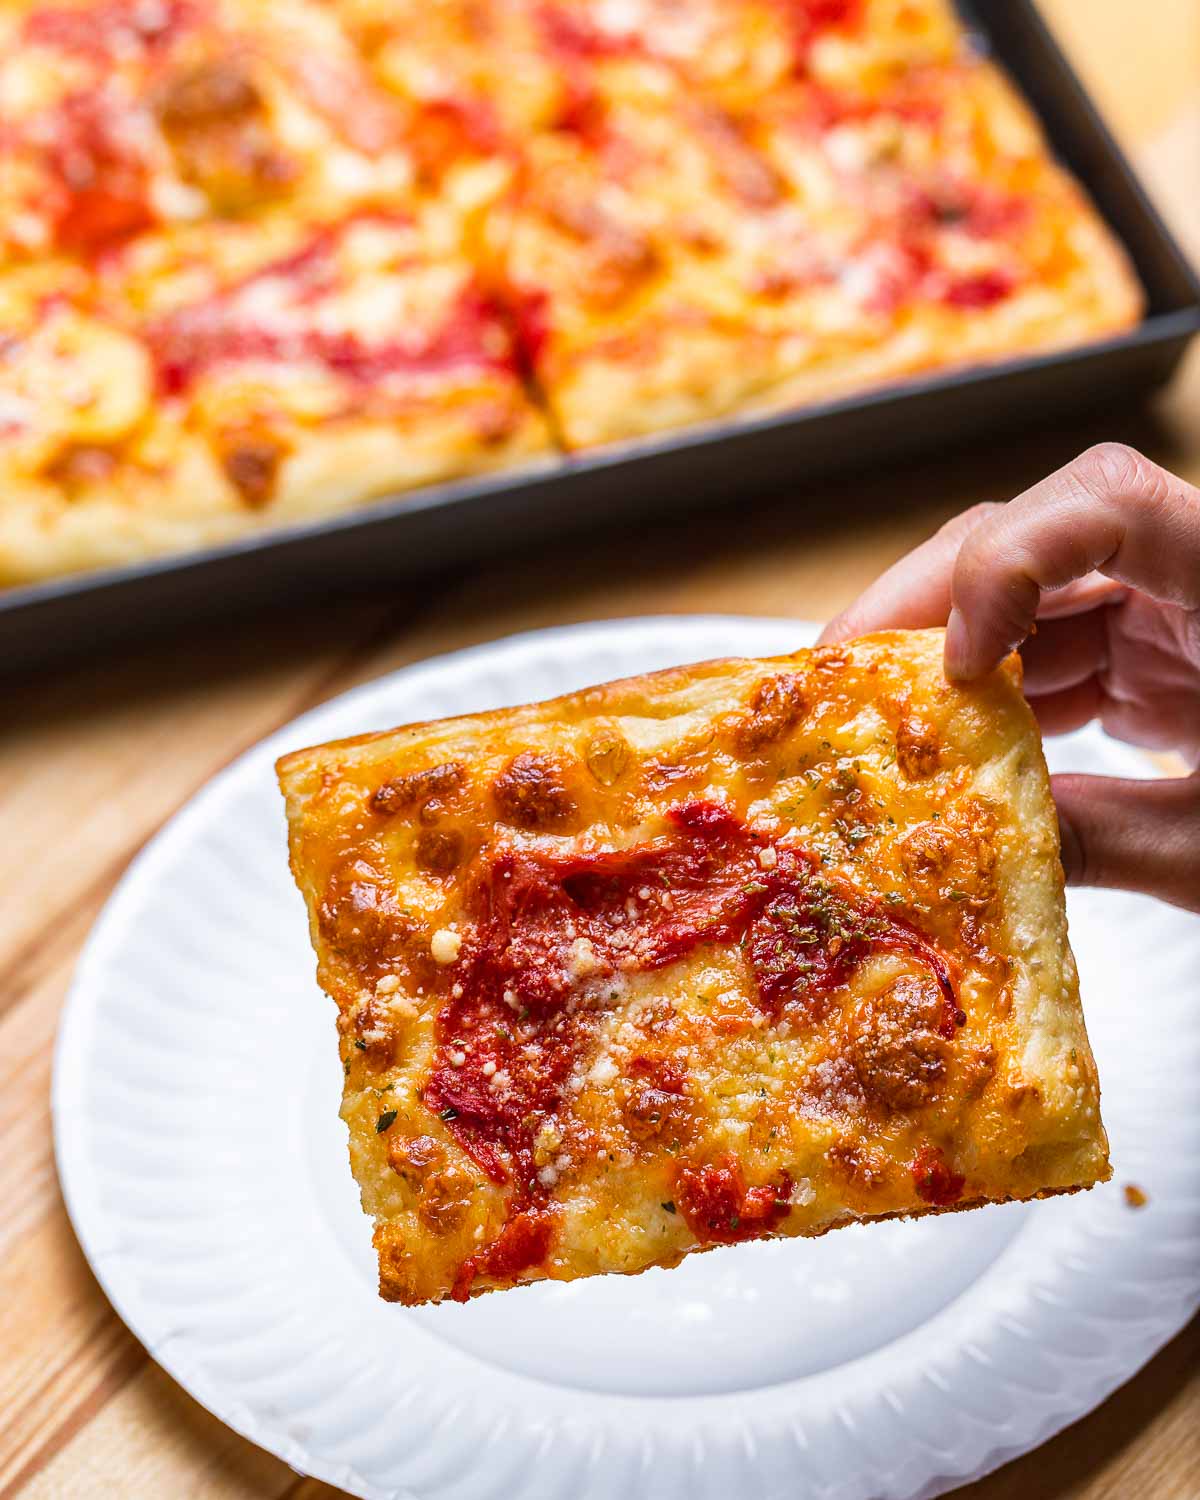
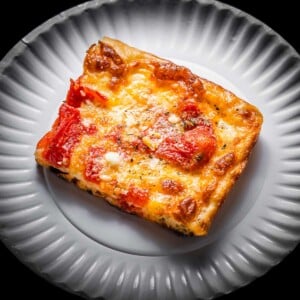
It is a fairly thin sheet-pan pizza that’s baked in a pan that has been heavily coated with olive oil. This creates the perfect environment to fry the bottom of the pizza giving Grandma pizza that unmistakable crunch!
Grandma pizza contains sliced mozzarella cheese and randomly scattered thick plum tomatoes on top.
Kind of like an upside-down pie.
It’s almost always drizzled with a heavy dose of garlic-infused olive oil and finished with some Sicilian oregano and Pecorino Romano cheese.
Because it’s made in a pan, it holds up well to toppings and I use the Grandma pizza as a base for many of my other pizza recipes, such as vodka sauce pizza, pepperoni pizza, and zucchini pizza.
Where did Grandma pizza come from?
The Grandma pie was created on Long Island at Umberto’s of New Hyde Park. Its popularity soared in the 2000s and onward in the New York metro area.
Fun fact: Umberto’s would often make special deliveries for the New York Giants and Yankees. I’m sure the Mets and Jets like it too. 😉
Though the Grandma pie isn’t quite as well known as a traditional New York pizza or a New York Sicilian, it’s still very well known amongst New Yorkers.
Some of the more popular places amongst the hipster crowd will create their own names for the style, but basically, it’s a thin sheet pan pizza.
Just like the one your Nonna would make.
How to make the dough
Each number corresponds to the numbered written steps below.
Note: Mass measurements will always be more accurate than volume measurements. For doughs and bread, this is a good thing, because it provides absolute consistency. I only use mass measurements for baking/dough recipes and always stick to standard cups, tablespoons, etc. when “cooking”. But, I also provide the volume (standard U.S. customary) measurements here and in the recipe card below.
Bakers Percentages: 64% hydration, .4% yeast, 2% salt, 3.4% oil, 1.2% sugar
Note: Baker’s percentages will allow you to scale the dough amount up or down depending on how much you need. To use baker’s percentages you simply divide the amount of flour in a recipe by 100 and then multiply that number by the percentages listed above.
- Weigh out or measure 406 grams (3.25 cups) of bread flour, 2 grams (1/2 teaspoon) of instant yeast, 8 grams (1.5 teaspoons) of fine sea salt, and 4 grams (1 teaspoon) of sugar and combine into a large bowl.
- Mix the dry ingredients together.
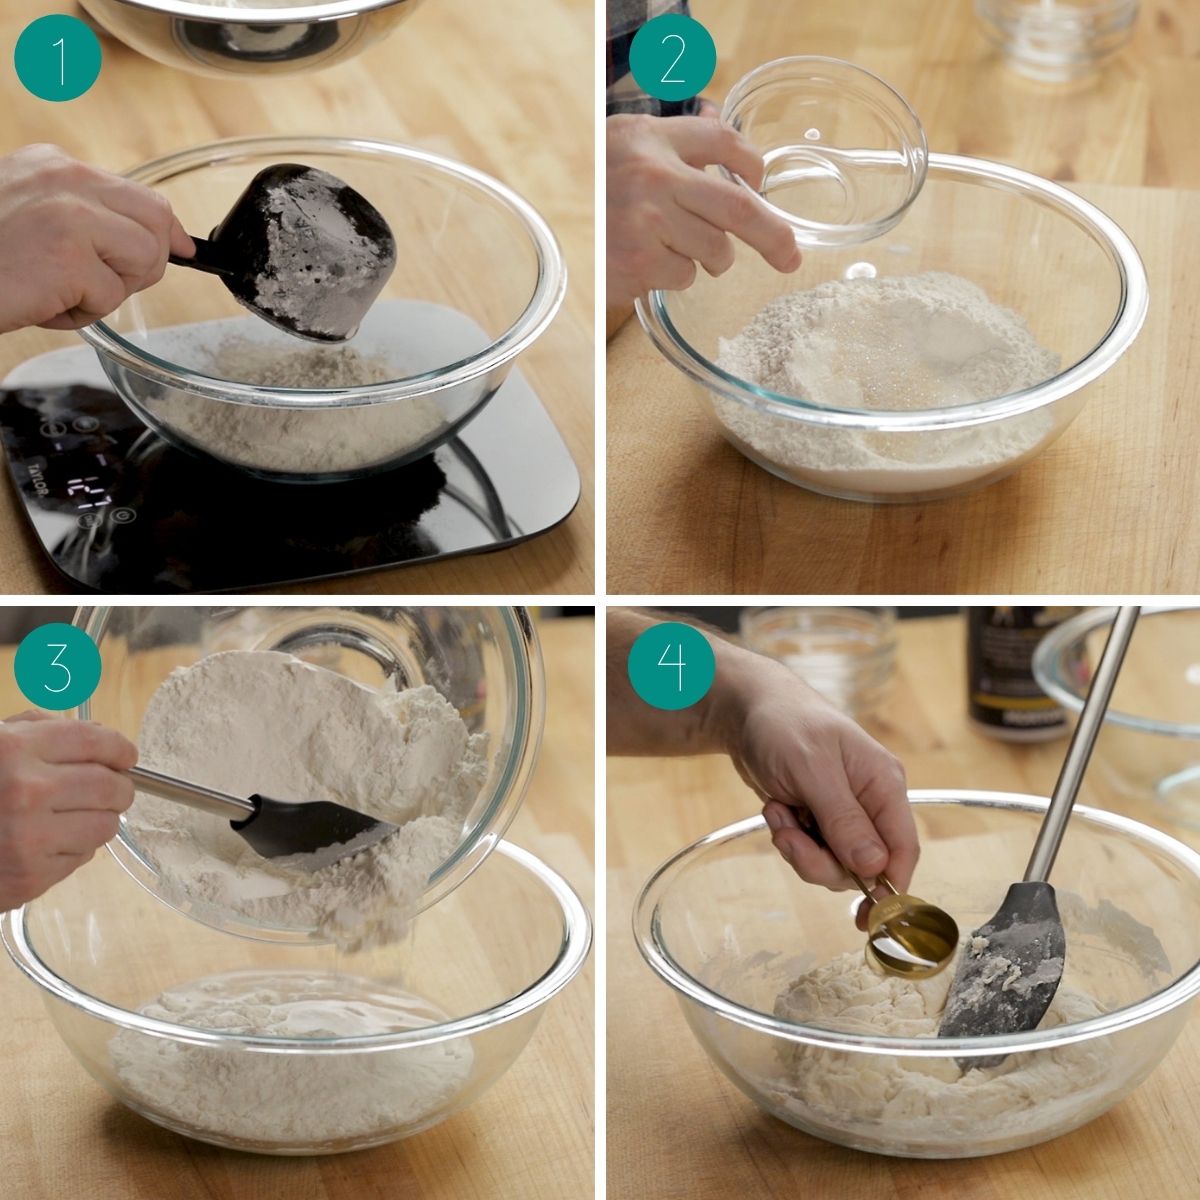
- Pour 9 ounces of cold water into another large bowl. Slowly add the dry ingredients to the water and mix together.
- Pour 14 grams or 1 tablespoon of olive oil all over the dough and continue to mix well to incorporate all of the ingredients.
- Place the dough onto a large work surface (a plastic cutting board or granite/marble countertop work best) and begin kneading. To knead, you want to fold the dough over and press down and away on the cutting board with a bit of force. Turn the dough 90 degrees and repeat. Knead for at least 5 minutes. If the dough becomes too sticky, cover it for 30 minutes with plastic or an inverted clean bowl and let the dough warm up. Return to kneading (just make sure to knead for at least 5 minutes total) and then form a dough ball.
- You do not need a perfect dough ball for Grandma pizza so don’t go crazy. To form the ball, fold the dough tight and create a seam. Rotate the dough and fold again. Do this 20 times, then pinch the seam side. Place the dough ball seam side down in an oiled container and cover with plastic wrap. Refrigerate the dough for at least 12 hours to cold ferment. Do 24-48 hours if you can plan ahead.
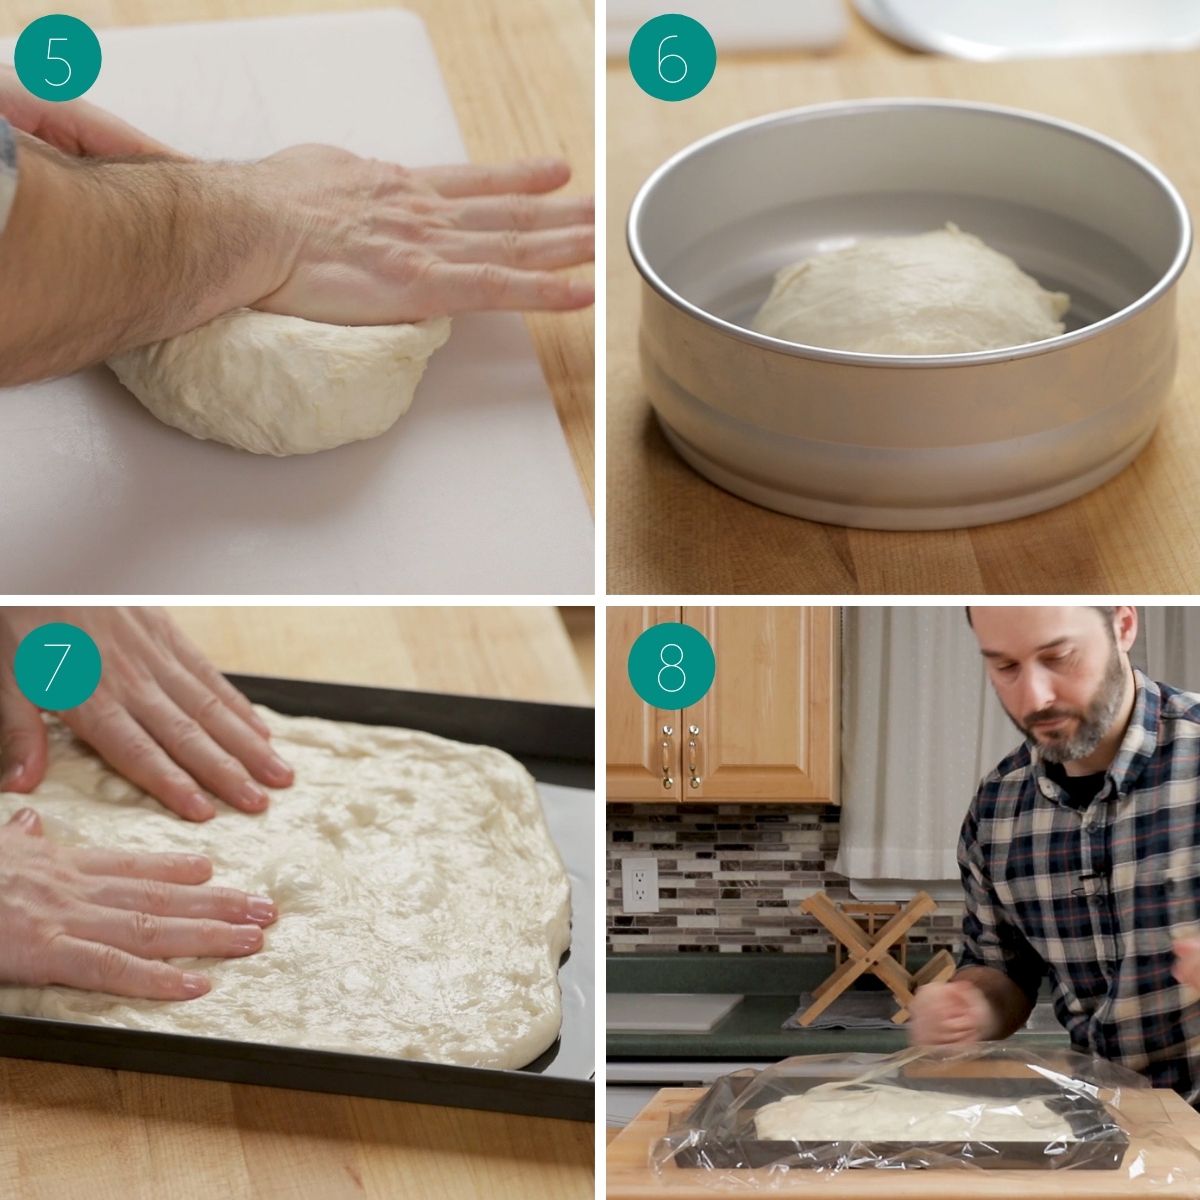
- Remove the dough 2 hours prior to use to warm up. Oil the sheet pan with a 3/8 cup of olive oil. You need plenty of oil. Remove the dough and place it into the oiled pan. Using your fingers press down and try to stretch the dough into the pan. You will not be able to do this right away.
- Cover the sheet pan with plastic wrap and wait 45 minutes, before returning to stretch the dough. Depending on how warm the dough is, you might need to repeat the process one more time to completely fill the pan.
How to make the best Grandma pizza
Each number corresponds to the numbered written steps below.
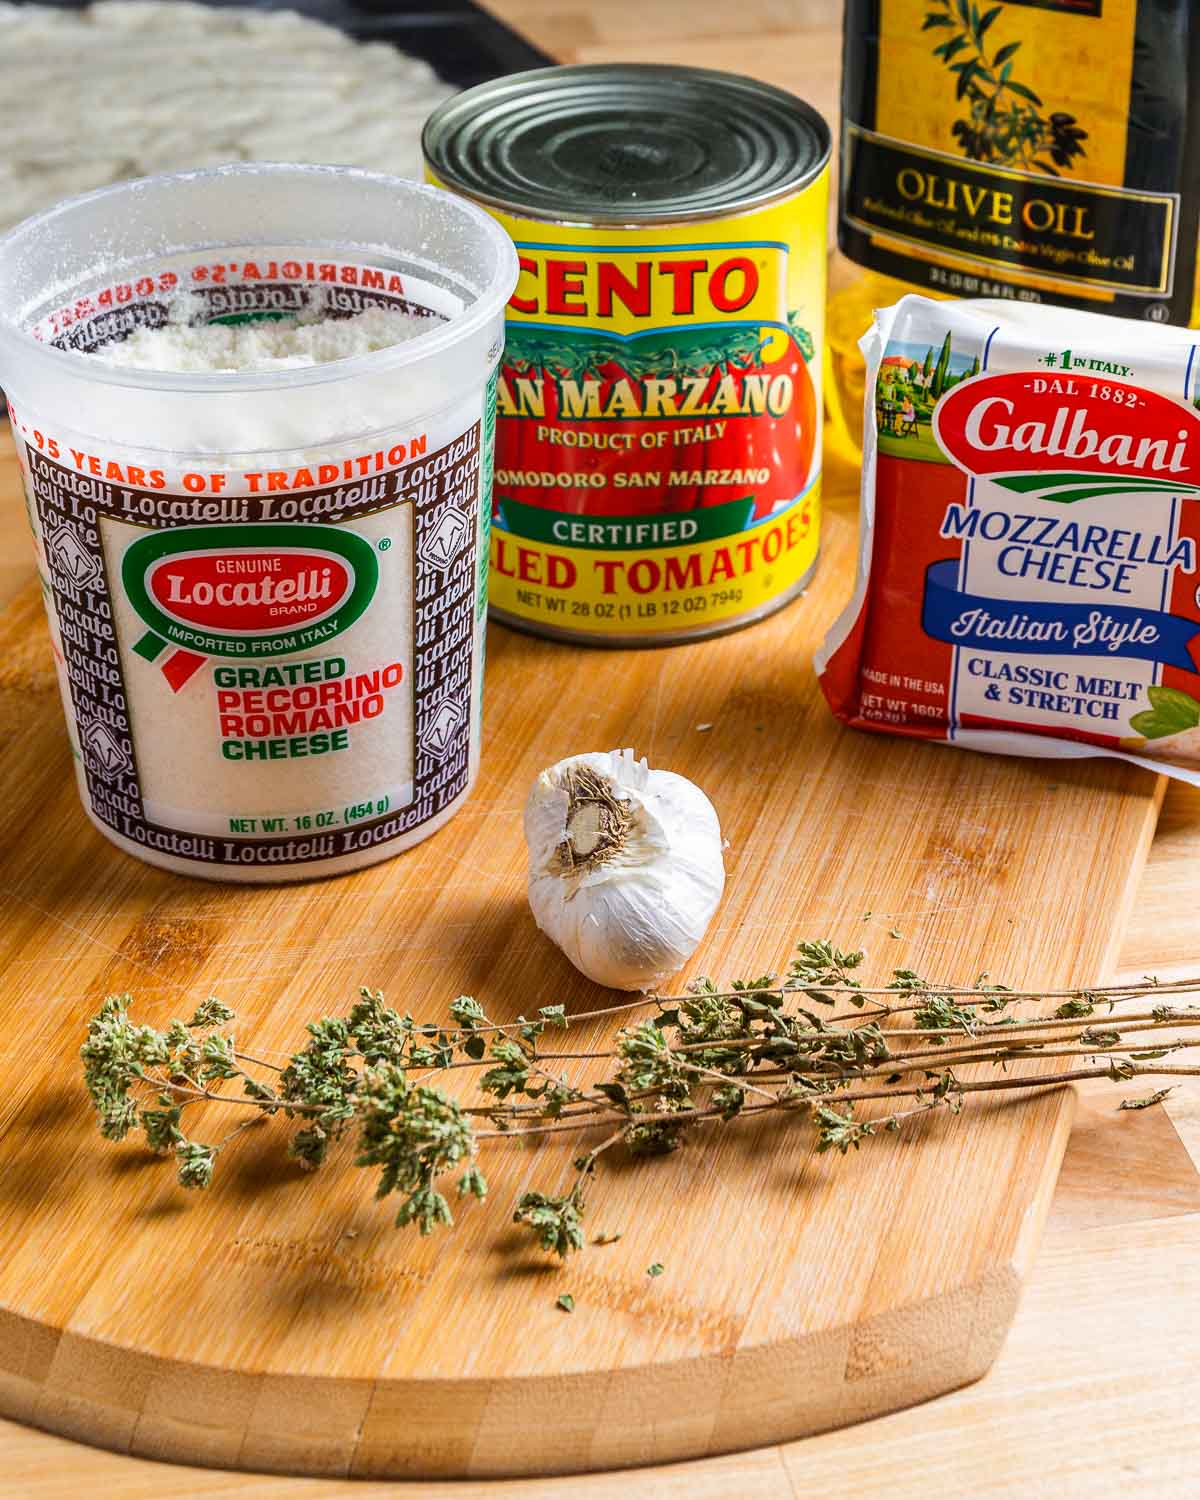
- Hand crush 1 (28 ounce) can of whole San Marzano or other good quality plum tomatoes in a large bowl.
- After hand crushing, strain the tomatoes and save the juice for another purpose. You want to be left with thick tomato pulp with minimal juice. Season the tomatoes with a 1/2 teaspoon of Kosher salt, mix well, and set aside.
- Combine 3 tablespoons of olive oil with 3 cloves of minced garlic in a small bowl to create the garlic oil.
- Preheat the oven to 450f and set the rack to the lowest level. Here I am stretching the dough again. Be sure to keep it covered with plastic after stretching.
- I highly recommend buying sliced mozzarella cheese at your local deli or supermarket. If not using already sliced mozzarella, a partially frozen block of cheese is easier to slice. You’ll need 12-16 ounces of sliced mozzarella. The exact weight isn’t as important as covering the dough.
- Now that the dough has filled the pan almost completely, we can move on to assembly and cooking.
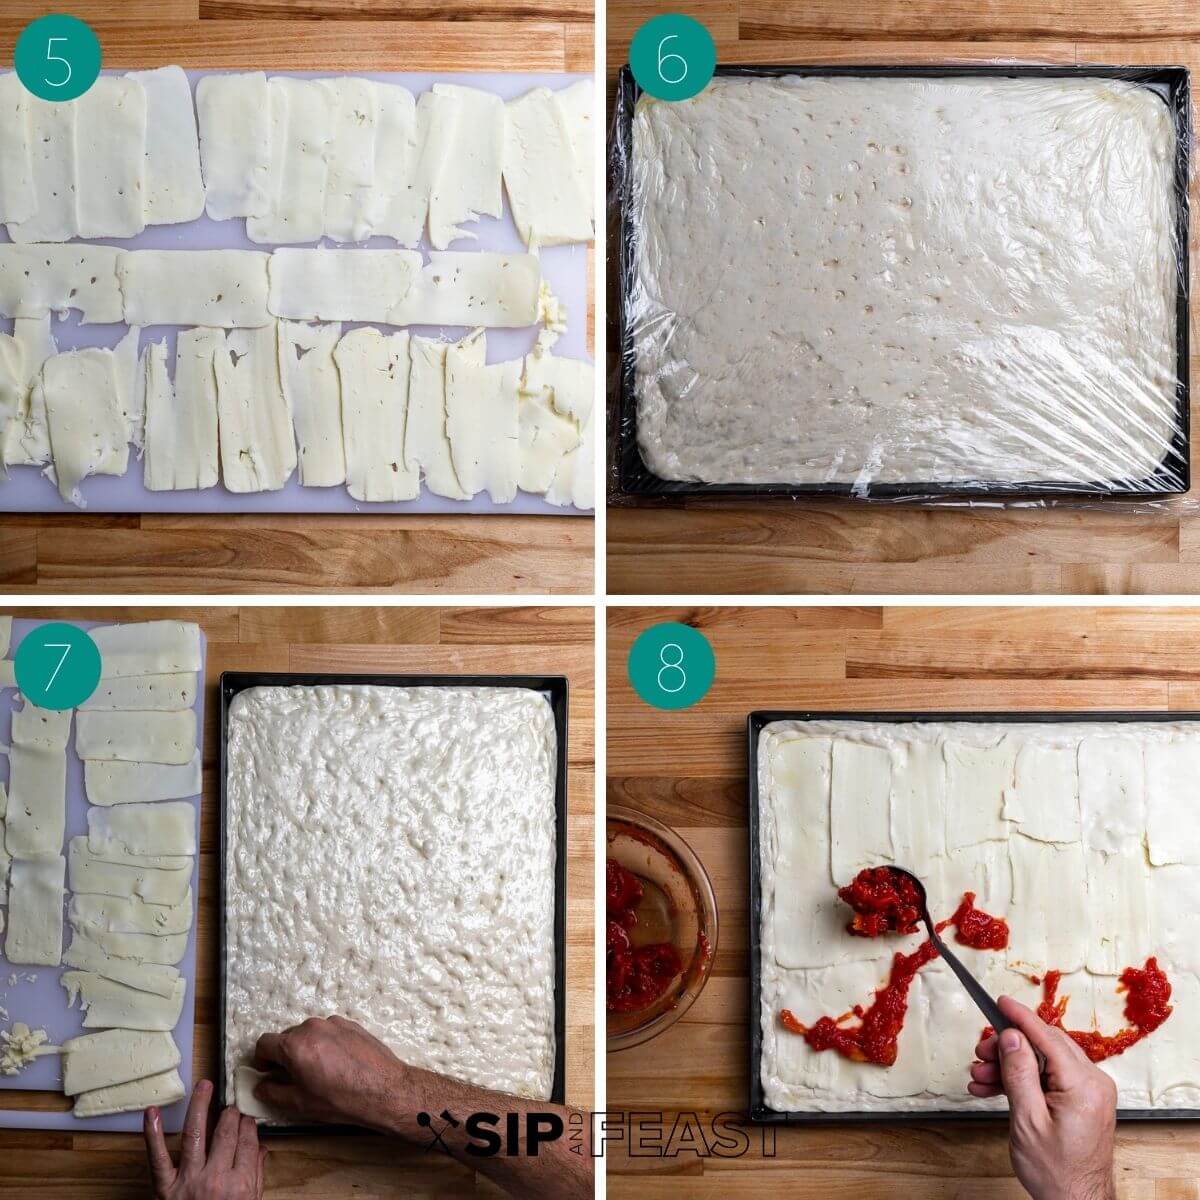
- In pic 7 above I am pinning a corner with my hands then placing the cheese down and applying light pressure. This will lock in the corners and prevent them from moving too much. Layer the remaining cheese in an overlapping shingle pattern, leaving about a 1/4″ around the edges.
- Distribute the tomatoes all over the cheese in a random pattern. Resist the urge to over sauce. The tomatoes will spread out during the cooking and will create the characteristic Grandma pizza pattern.
- Drizzle a couple of tablespoons of garlic oil all over the pizza. If you love garlic, use more. Bake the pizza in the oven on the lowest rack for 12 minutes, rotating 180 degrees after 6 minutes. After 12 minutes check the bottom of the pizza with a spatula. If the pizza is nice and brown, move it to the top oven rack and cook for 6 more minutes.
- Remove the pizza from the oven at 18 minutes. Sprinkle a few tablespoons of Pecorino Romano cheese all over the pizza.
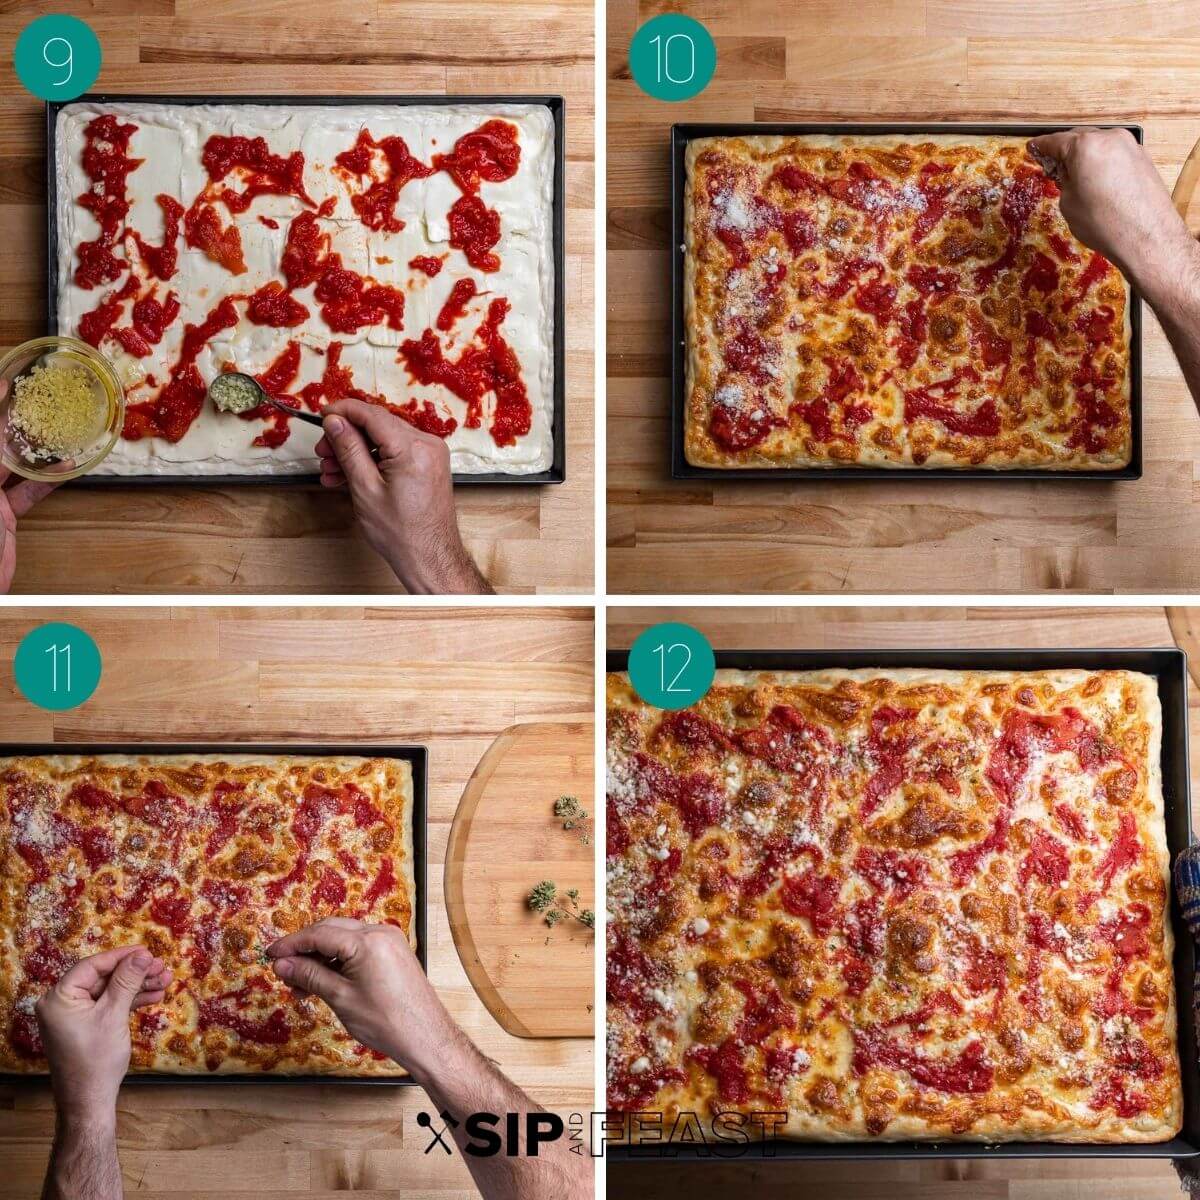
- Sprinkle 1/2 to 1 teaspoon of oregano on the pizza. In pic 11 I’m using Sicilian oregano and crumbling it in my hands. Return the pizza to the top rack and cook for 2 more minutes. Additionally, if the Grandma pizza is not crisp enough on top, broil for 30-60 seconds but watch carefully. Normally the pizza does not need to be broiled.
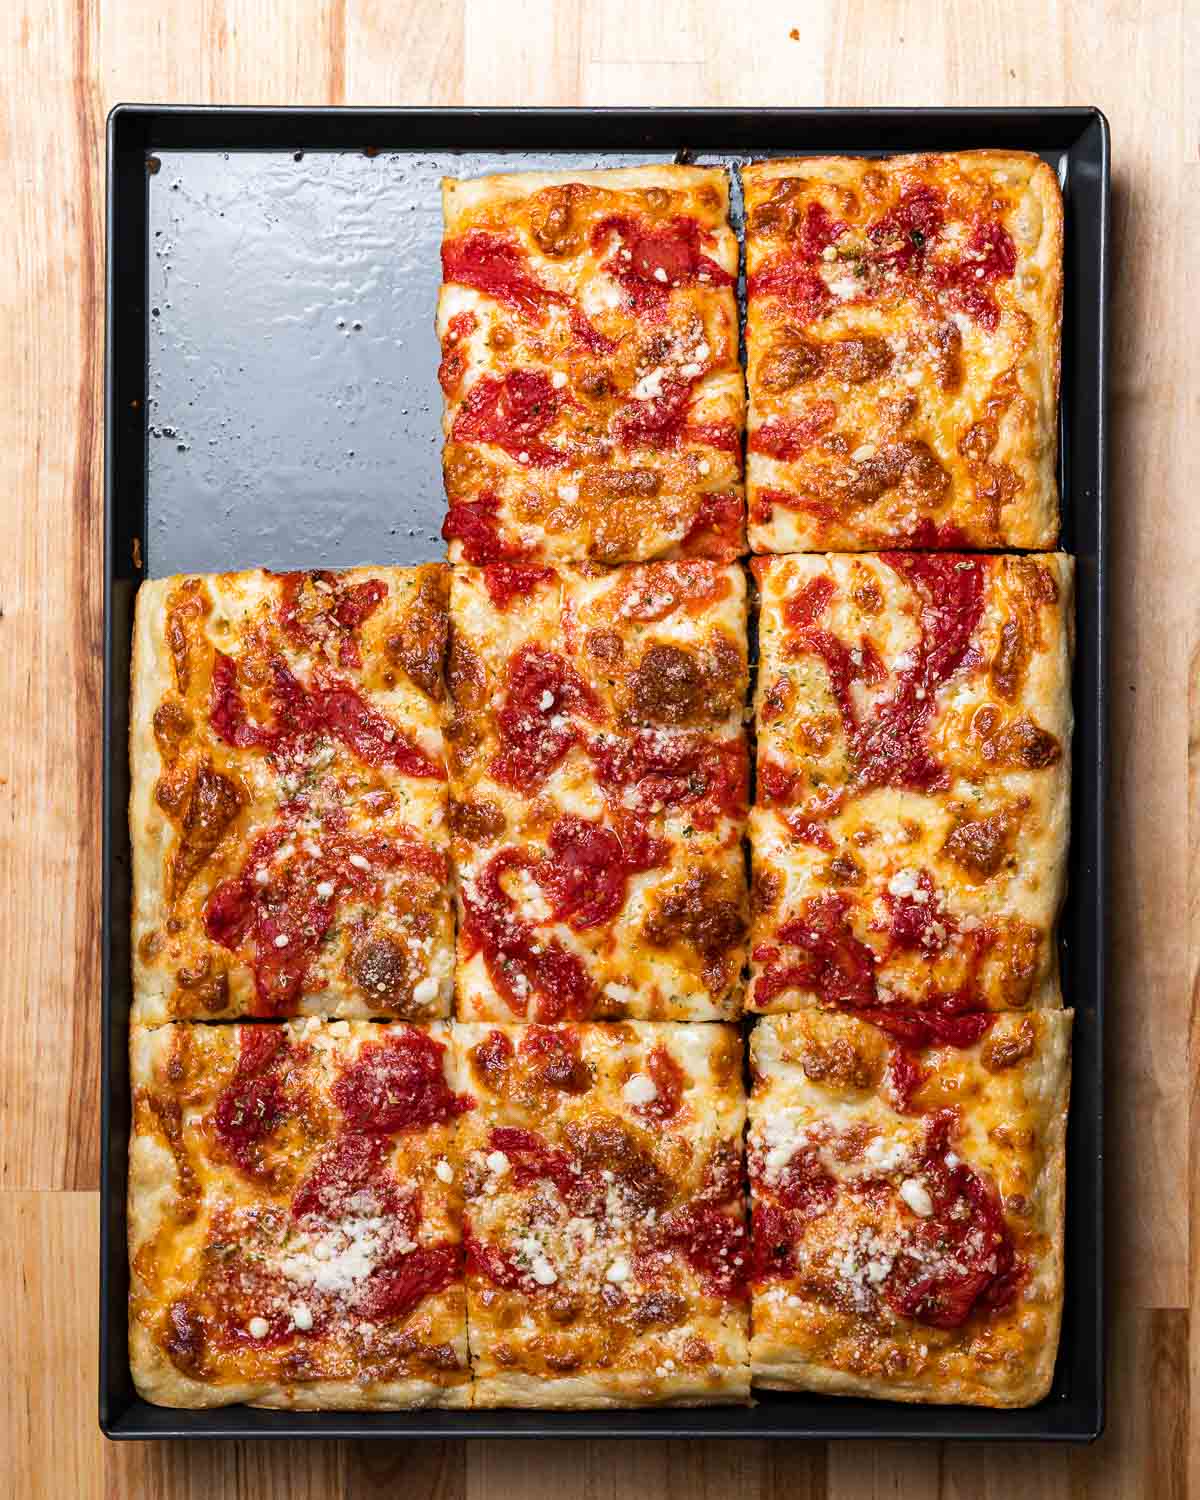
- Here is your perfect Grandma pizza.
That is how to make the real-deal, New York Grandma pizza. It is the easiest of the 3 types of New York pizza – the hardest part is waiting for the dough to cold ferment, but it is worth it!
What type of pan for Grandma Pizza?
Many pizza shops use heavy steel pans for their Sicilian and Grandma pies. They are cooking their pies in a deck oven which browns the bottom quicker. Most home cooks can’t replicate this, though if you have a baking or pizza steel as large as your pan you could try.
If you were to attempt to make this Grandma pizza in a thick steel or cast iron pan in your home oven, the bottom wouldn’t get brown enough in time.
For this reason, I recommend using an aluminum pan on the bottom of your oven. If anything, you’ll have to worry more about the bottom burning. An aluminum pan is thin and will crisp the bottom of the pizza very quickly on the lowest level of the oven.
A dark aluminum pan like the one seen throughout my pictures works amazingly well. It’s a LloydPans 16 x 12″ Grandma pan. Lloyd makes other pans as well for other types of pizzas, such as Detroit pizza and bar pizza.
You can also use a standard 18 x 13 half-sheet pan with great results.
Want To Save This Recipe?
Oven temperature and placement
Now you know the type of pan, but what about the oven?
I cook all of my pizzas in a standard 20-year-old GE oven. I have not tested this pizza using a convection oven, so you may need to adjust the cooking time, oven temperature levels, and of course pan placement.
Note: Many experts state that convection adds 20-25F degrees to recipes that call for a conventional oven.
As mentioned above in the detailed steps you should check the bottom of the pizza after 12 minutes of cooking. If the bottom is very blond, finish cooking it on the bottom rack for the remaining 8 minutes.
If you’re having problems with browning, you could pour 3 more tablespoons of olive oil under the pizza. Grandma pizza uses a lot of olive oil!
Inevitably, the temperature of all ovens fluctuates. Your oven is not my oven, and so on. You may need to play around with the placement and temperatures a bit, but I’m confident that with these instructions you’ll be able to make a Grandma pizza that looks just like mine.
Making Grandma pizza dough in a Kitchen Aid mixer
I’ve shown the process here and on YouTube, (for more pizza check out the 20 pizza videos on my channel) using hand mixing.
Why? Because I like to show without special equipment. But if you want to use your mixer all you have to do is:
- Mix dry ingredients in a large bowl and place half of them and all the water into the Kitchen Aid mixer bowl.
- With the dough hook attached, mix for 1 minute on low (speed level 1) and begin adding in the remaining dry ingredients.
- Drizzle the olive oil into the mixing bowl and continue at speed level 1 for 4 more minutes or until the dough is sticking well to the bread hook.
- Remove the dough, hand knead for 1 minute and cover for 40 minutes. After 40 minutes, ball the dough, place it in an oiled proofing container and get it in the fridge for at least 12 hours. Simple!
More pizza recipes
If you’ve enjoyed this Grandma Pizza Recipe or any recipe on this site, give it a 5-star rating and tell us about it in the comments below.
We strive to satisfy a number of learning styles. If you are someone who prefers to learn by watching, you can find most of our recipes on YouTube and our Facebook Page.
Grandma Pizza
Ingredients
For the dough
- 406 grams bread flour or 3 1/4 cups
- 2 grams instant yeast or half teaspoon
- 8 grams fine sea salt or 1 1/2 teaspoons
- 4 grams sugar or 1 teaspoon
- 260 grams cold water 9 ounces
- 14 grams olive oil or 1 tablespoon
For the Grandma pizza
- 1 ~24 ounce dough ball from above
- 1 28-ounce can plum tomatoes hand crushed and completely drained of liquid
- 12-16 ounces sliced mozzarella cheese weight will vary, but use enough to cover the pizza completely
- 3 tablespoons Pecorino Romano grated
- 3/4 cup olive oil divided
- 3 cloves garlic minced
- 1/2 teaspoon kosher salt
- 1 teaspoon Sicilian oregano or Italian
Want To Save This Recipe?
Instructions
For the dough
- Place water in a bowl large enough to hold both the water and all the dry ingredients and still have room to spare. Mix together dry ingredients in another bowl.
- Add dry ingredients to water a bit at a time and mix thoroughly to form a dry rough mass.
- Pour the oil over the dough, mix again to scrape off any dough residue stuck to side of the bowl, and place the rough shaggy dough onto a work surface.
- Knead the dough for 5-7 minutes. If the dough is too sticky, place a clean bowl inverted over the dough and wait 30 minutes before resuming. Return to kneading (just make sure to knead for at least a total of 5 minutes).
- Place the bowl over the dough once more and let sit for 30-40 minutes to warm up before forming the dough ball.
- After 40 minutes pull the dough towards its end repeatedly to form a smooth ball. Pinch the seam side and place the dough ball seam side down into an oiled bowl and cover tightly with plastic wrap. Refrigerate for at least 12 hours before using.
For the Grandma pizza
- Take the dough out of the fridge 2 hours prior to using. Do not uncover the bowl. Oil the bottom of a Grandma pizza pan (or standard half sheet pan) with 3/8's cup of olive oil. You need to use a lot of oil!
- Remove the dough from the bowl and place it into the pan. With your fingertips begin pressing the dough into the corners of the pan. You will not be able to do this in one attempt. Place plastic over the pan and let the dough warm up.
- After 45 minutes remove the plastic and try to stretch it again to the size of the pan. Cover with plastic wrap and repeat process one more time until the dough has completely filled the pan. Cover the dough one more time and set aside. Preheat oven to 450f and set one rack to the lowest level of the oven and one to the highest.
- Hand crush the plum tomatoes and drain the juice. Save the juice for another use. Add a ½ teaspoon of kosher salt to the tomatoes and set aside.
- Mince the garlic and add to a bowl with a ¼ cup of olive oil.
- Remove the plastic from the pan and if required press the dough into the edges. Right away layer the mozzarella cheese in an overlapping shingle pattern, leaving the outside 1/4 to 1/2 inch uncovered. Start with a corner. By pressing the dough down slightly you can lock the dough into the corner. Make sure the dough is layered completely with the mozzarella slices.
- Next, add the drained plum tomatoes to the pizza. You can use 45 degree lines or spoon the sauce all over. Leave some open areas. Don’t coat it all. Take the garlic oil and drizzle 3 tablespoons of the oil and garlic pieces all over the pizza.
- Place the pizza onto the lowest rack and cook for 12 minutes rotating the pan 180 degrees after 6 minutes.
- After 12 minutes remove the pizza from oven and check the bottom for browning. If the pizza is well-browned, bake on top rack for 6 more minutes. Otherwise, leave the pizza on the bottom rack for 6 more minutes.
- After 18 minutes of baking remove the pizza and sprinkle with the oregano and Pecorino Romano cheese. Bake for 2 minutes more on top oven rack.
- If the Grandma pizza is not crisp enough on top, you can broil for 30-60 seconds. Watch very carefully though!
- The total cooking time will be approximately 20-22 minutes. Let the pizza sit for 5 minutes before cutting and serving. Enjoy!
Notes
- The dough can be cold fermented for as little as 12 hours in the fridge, to as long as 72 hours.
- If refrigerating the dough ball in a metal bowl use a bit more oil to coat. The metal bowls tend to stick more than plastic.
- Cooking time will vary depending on the exact oven temp. After 12 minutes of cooking on the lowest rack the pizza should be very brown and crisp. If it’s completely blond the pizza should be cooked for the remaining 8-10 minutes on the lowest rack.
- The Grandma pizza needs a lot of oil. More than you think! The oil helps develop the amazing crispy bottom, so please use enough of it.
- Leftovers can be saved for up to 3 days and the pizza can be reheated at 350f on a parchment paper-lined baking sheet until hot. About 10 minutes.
Nutrition
Nutrition information is automatically calculated, so should only be used as an approximation.
Follow Me
The Sip and Feast Cookbook
- 100+ recipes
- Essential tools and ingredients
- Entertaining ides
- Stunning photography


Easy and delicious recipe. Thank you for sharing. Due to poor planning I did not let it ferment overnight. I look forward to doing so next time to taste the difference.
So glad you enjoyed, John!
My family went nuts over this pizza! Thanks so much for this awesome recipe and tutorial! Can this dough be used for regular pizza or Cantonese? I love the dough so much and want to try some other things. Thanks again to you and your family!!!
So glad you enjoyed!
I’m a retired chef from Texas. I ran across your videos on YouTube and just love your style! You know what you’re doing and you really share the things that people need to know. I’m learning a lot about your Italian dishes and am making the grandma pizza today for my family. I just want to thank you for sharing your knowledge! I will get your book someday! Thanks to your wife and son too! Happy cooking!!
So glad you enjoyed!
Dear James,
Umberto’s may think that they invented the Grandma’s pizza but my Grandma arrived in Toronto, Canada from Casacalenda, Molise in 1920. Three generations grew up on her flat pan plum tomato pizza that was made just as you described it and as I make it now. It sounds as if our crust is perhaps a little thicker.
My Spartan mom requests this, and she hates my cooking. I exaggerate. She detests my cooking. I showed her one of your videos. She said, nice faces. Good people. So there you go.
Curious if you can use a stand mixer to knead dough or is by hand preferred?
Thanks much,
Rose
Hi Rose, Jim prefers to knead by hand but he does sometimes use the stand mixer. Both are perfectly fine and instructions for both are included here in the article. Hope you enjoy.
Thank You James!
Very easy to follow.
Much appreciation.
-Lou