
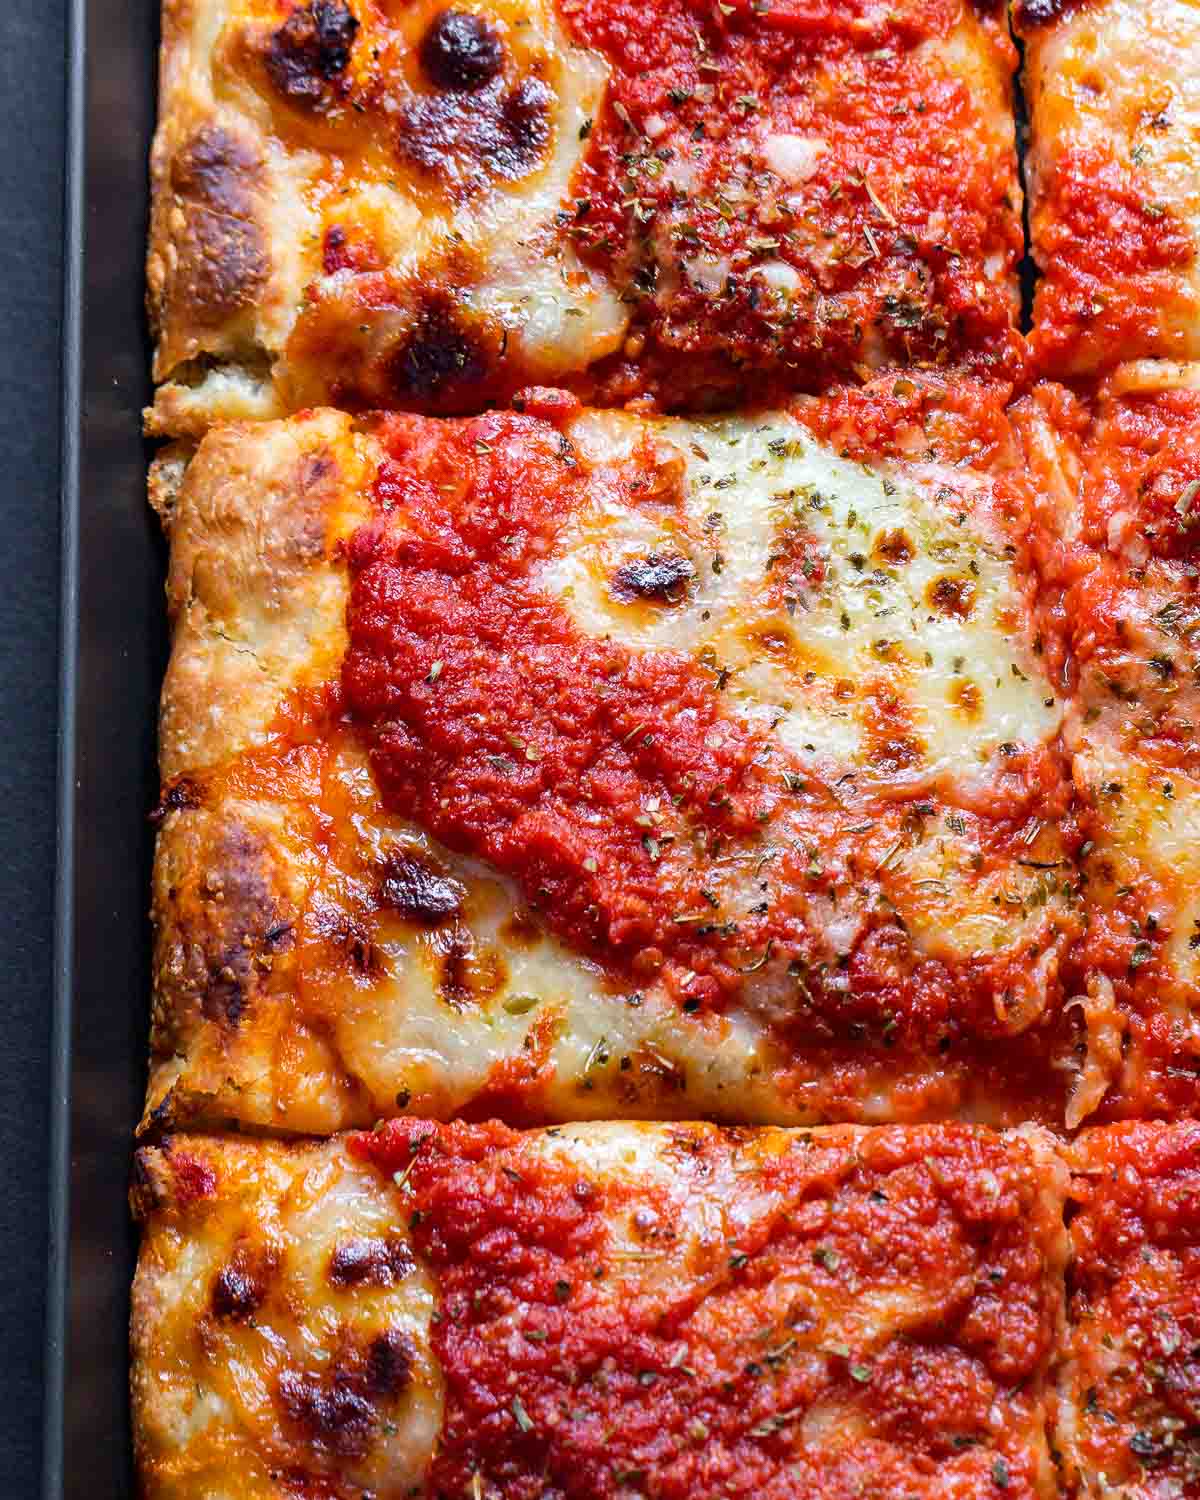
The New York Sicilian pizza with its thick, springy crust covered in tomatoes, mozzarella, and oregano, is iconic in every sense of the word. Found in nearly every pizzeria in the New York metro area, this pizza packs a flavorful punch and is adored by millions. Our step-by-step instructions show you exactly how to achieve a pizzeria quality Sicilian pie in your home oven.
What makes a New York Sicilian?
Perhaps the best way to answer this question is to start with what a New York Sicilian is not.
Often confused with a true Sicilian pie, known as Sfincione, the New York-style Sicilian is different.
Sfincione is made with a few key ingredients that are not found on a NY Sicilian: breadcrumbs, anchovies, caciocavallo cheese, and an onion-based sauce.
Sfincione was likely the muse for the NY Sicilian, but they are in fact two different styles of pizza.
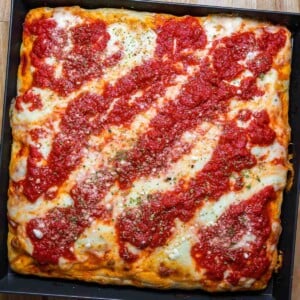
A New York Sicilian is known for its thick airy texture and crisp bottom. It is often parbaked in a rectangular pan, then topped with a simple sauce of uncooked tomatoes and salt, block mozzarella cheese, Sicilian oregano, and Pecorino Romano.
This is the type of pizza you’d get if you walked into any New York area pizzeria and ordered “a slice of Sicilian”.
Sicilian pizza, New York style is heavier and more filling than the classic New York round pizza.
Step by step New York Sicilian pizza instructions
Each number corresponds to the numbered written steps below.
Note: Mass measurements will always be more accurate than volume measurements. For doughs and bread, this is a good thing because it provides absolute consistency. I only use mass measurements for baking/dough recipes and always stick to standard cups, tablespoons, etc. when “cooking”. But, I also provide the volume (standard U.S. customary) measurements here and in the recipe card below.
Note 2: Baker’s percentages will allow you to scale the dough amount up or down depending on how much you need. To use baker’s percentages you simply divide the amount of flour in a recipe by 100 and then multiply that number by the percentages listed right below.
Bakers Percentages: 64% hydration, .4% yeast, 2% salt, 3.4% oil, 1.2% sugar
- In a mixing bowl, combine 497 grams (~4 cups) bread flour, 2 grams (1/2 teaspoon) instant dry yeast, 6 grams ( ~1 1/2 teaspoons) sugar, and 10 grams (~1 3/4 teaspoons) fine sea salt.
- Place 318 grams (~1 1/2 cups) of cold water into a very large mixing bowl. Add the dry ingredients into the water and mix together with a wooden spoon to form a rough shaggy dough. Drizzle 17 grams (1 1/2 tablespoons) of olive oil onto the dough and mix once more, scraping the sides of the bowl to remove all of the dried bits.
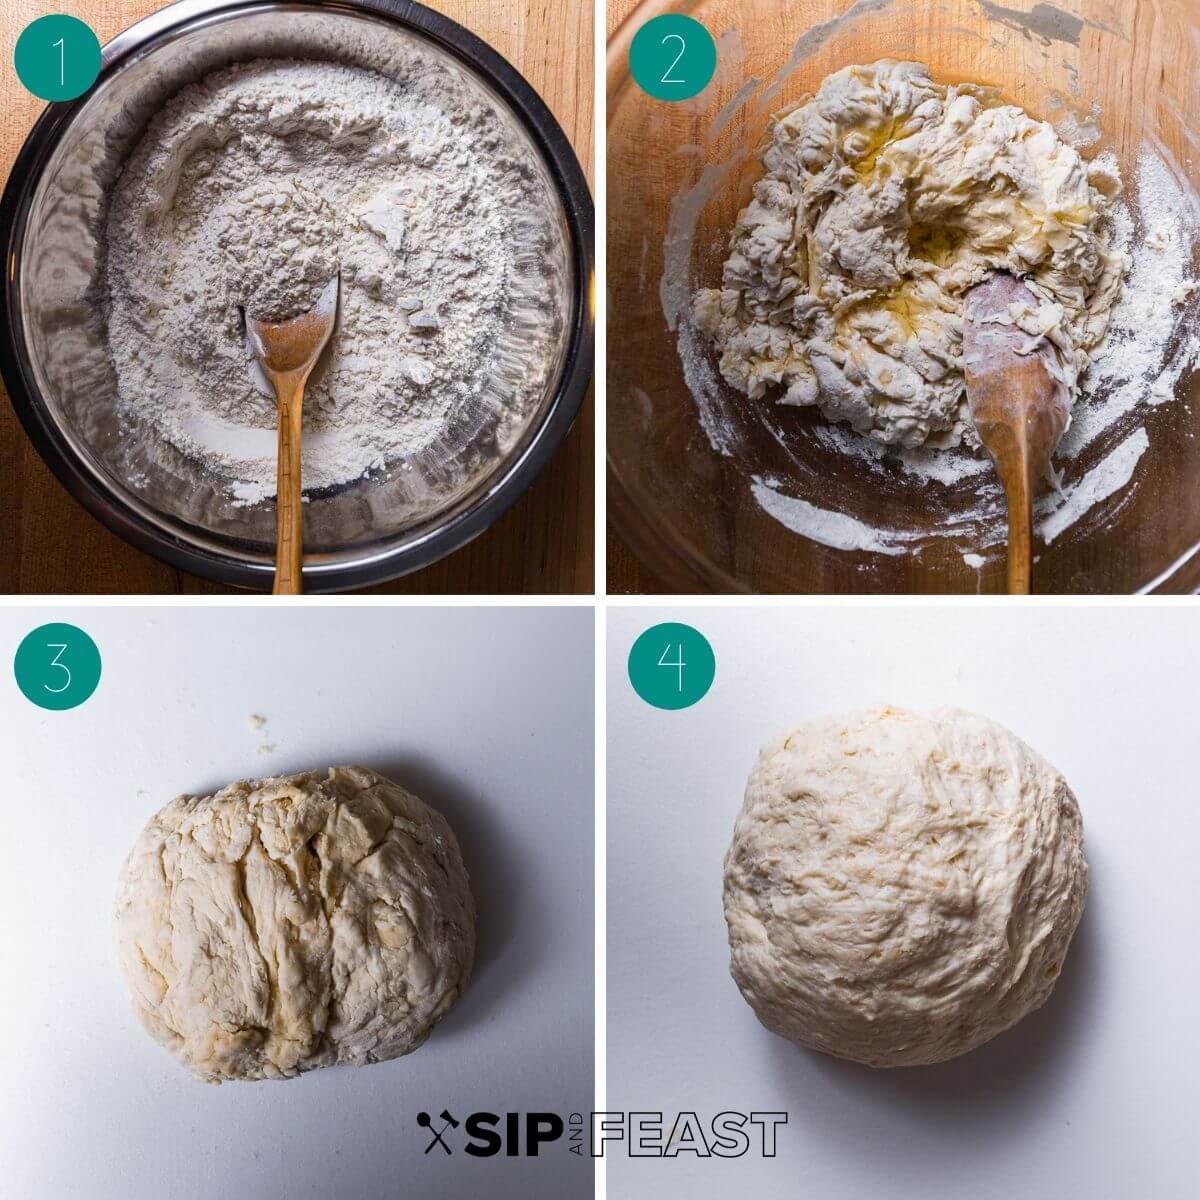
- Place the rough shaggy dough onto a work surface and begin kneading. Knead the dough for 5-7 minutes. If the dough is too sticky, place a clean bowl inverted over the dough and wait for 30-45 minutes before resuming.
- Return to kneading (just make sure to knead for at least a total of 5-7 minutes). Once adequately kneaded, cover for 40 minutes longer, then create a ball. To create a dough ball, pull the dough towards its end repeatedly to form a smooth ball. Pinch the seam side and place the dough ball seam side down into an oiled bowl (a plastic bowl with 1-2 teaspoons of olive oil is best) and cover tightly with plastic wrap. Refrigerate for at least 12 hours but preferably 24 -72 hours before using.
- On the day you make your pizza, remove the dough from the fridge for 1 hour, leaving it still covered. Pour a 1/4 to 3/8 cup of olive oil into a 14-inch square Sicilian pizza pan. You can also use any pan that is roughly the same size. Place the dough ball into the oiled pan and begin pressing it out with your fingers. The dough will not be able to be stretched on the first try. Cover the pan with plastic wrap and let the dough warm up for 30-45 minutes and try to stretch again.
- On the next attempt, the dough will be much easier to stretch with your fingers.

- Cover one more time and the dough will continue to fill the pan. If it doesn’t, just press it out with your fingers and cover for another 45 minutes.
- In pic 8 above the dough has now filled the pan after 3 intervals of pressing and covering.
- In a bowl, mix a 1/2 teaspoon of kosher salt with 1 28-ounce can of crushed plum tomatoes. Spread 4-6 ounces (just a very thin layer) of the tomato sauce onto the dough, leaving the last 1/2-inch without tomato, then cover with plastic wrap. Place the pan on top of the oven or near a sunny window to warm and rise for 3 hours. Note: If the tomatoes seem a little watery, drain them in a fine-mesh strainer for a few minutes.
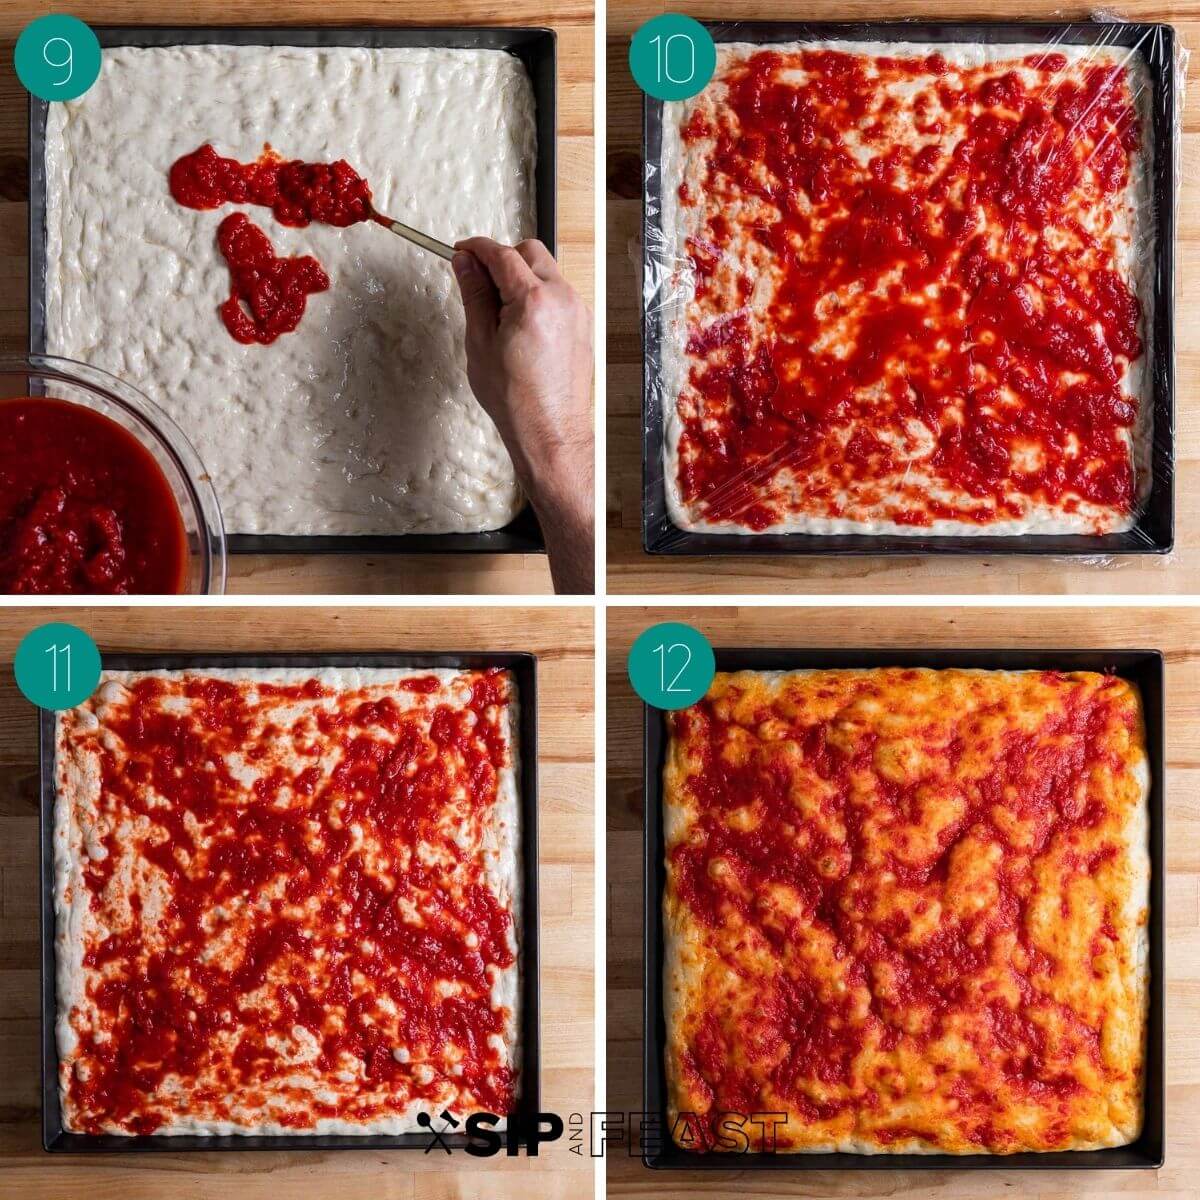
- Preheat the oven to 430f and set one rack to the lowest level and another in the top 1/3 of the oven. In pic 11 you can see that the dough will have risen substantially over the 3 hours.
- Bake the pizza on the lowest level for 12 minutes. After 12 minutes the pizza should be golden brown on the bottom. Check it out to see! If the bottom of the pizza is still blond you will need to cook it for the remaining time on the bottom level. Otherwise, the remaining cooking time will be on the higher set rack.
- Spread out 12 ounces of shredded low moisture whole milk mozzarella, leaving the last 1/2-inch or so without the cheese.
- Place diagonals of the remaining sauce on top of the cheese. Bake the pizza for 12 more minutes on the higher set rack.
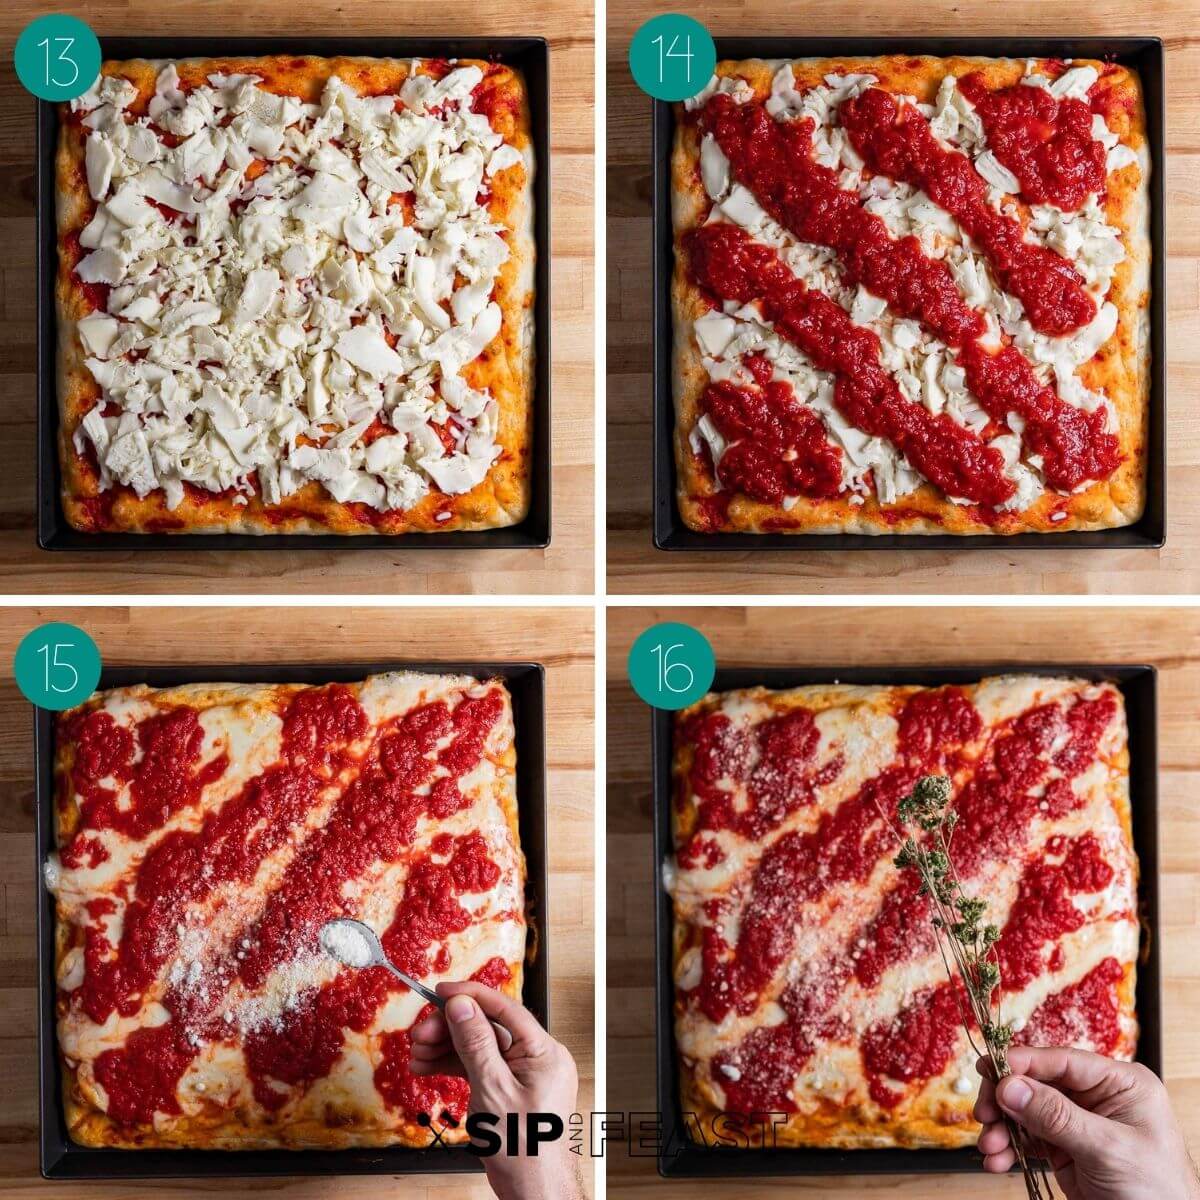
- Remove the pizza from the oven and sprinkle with 3 tablespoons of grated Pecorino Romano.
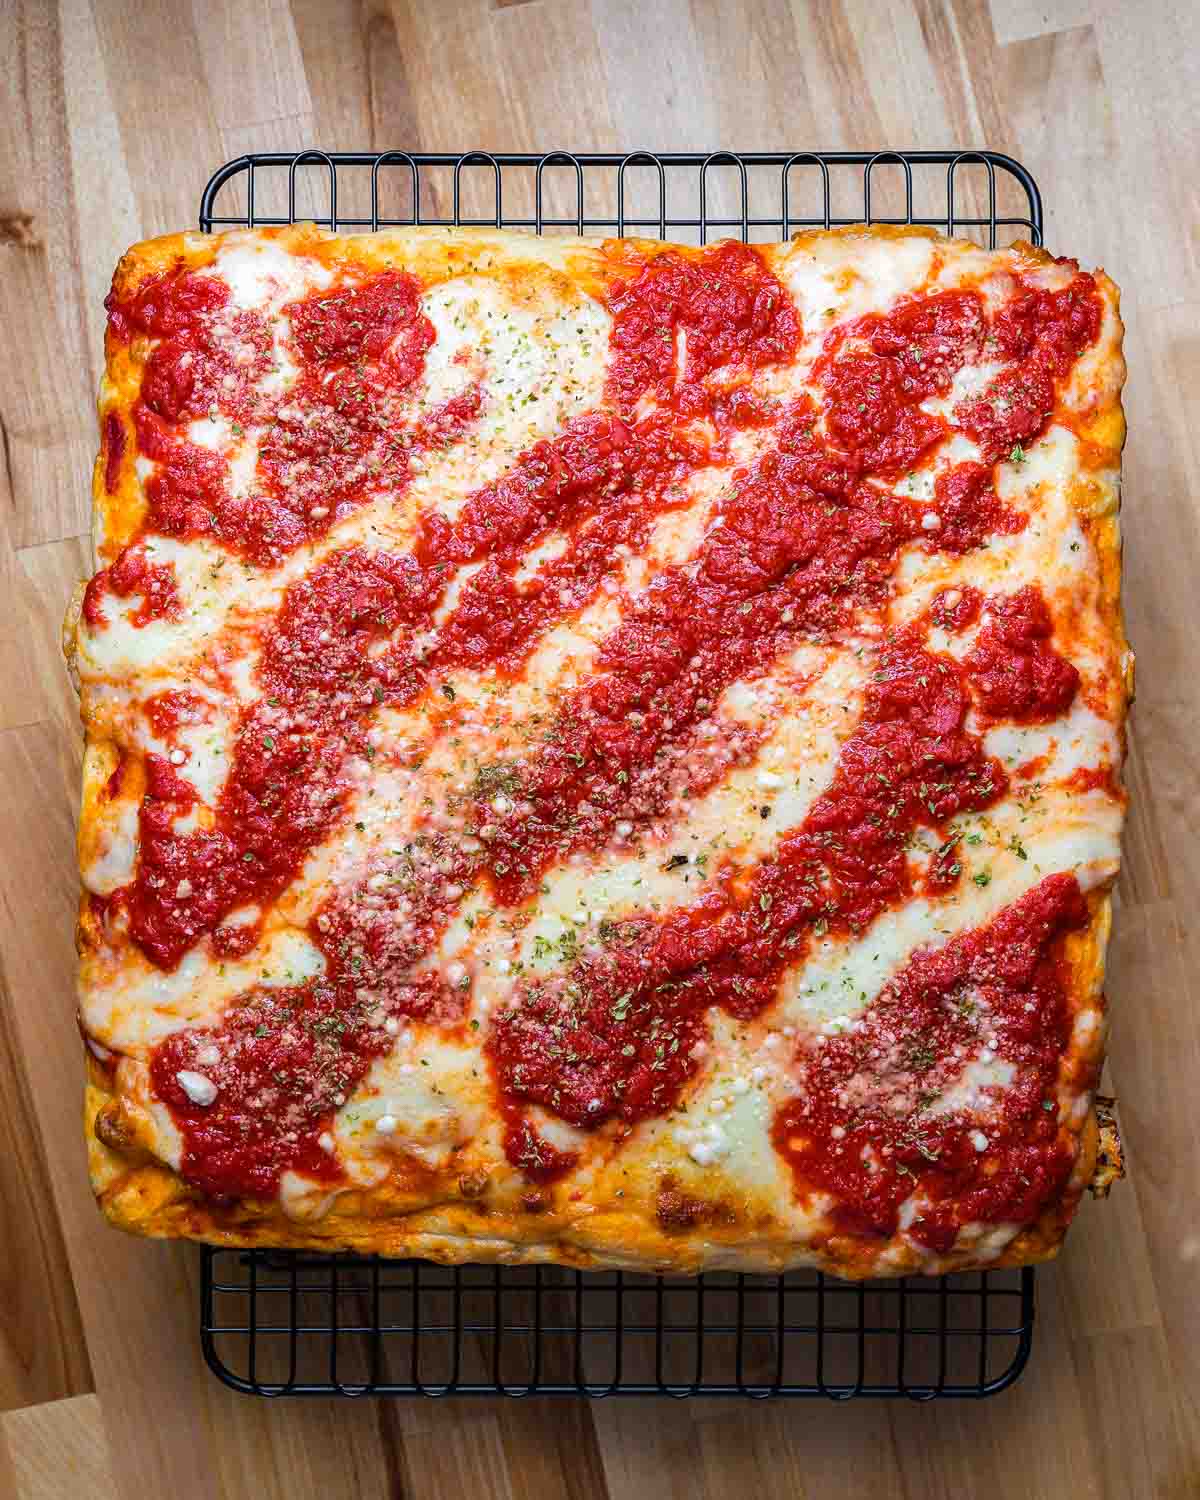
- Also, sprinkle 1 teaspoon of Sicilian oregano all over the top. Return the pizza to the oven for 1 more minute. If you want a bit more color, broil for 30-60 seconds but watch carefully. Once the pizza is finished cooking, remove it with 2 spatulas and place it onto a wire rack for a couple of minutes. This will keep the bottom crispier and will then allow you to transfer it to a cutting board to cut with a pizza cutter. After cutting into squares the pieces can be placed back in your pizza pan. Enjoy!
The pan for a NY Sicilian
Many pizza shops use heavy black steel pans for their Sicilian pies. Pizzerias utilize a deck oven which browns the bottom of the pizza quicker.
Most homes aren’t equipped to replicate this, however, a pizza steel that’s as large as your pan might be able to simulate the process.
But without a large pizza steel, I would not recommend using a heavy black steel or cast iron pan as it will not allow the bottom of the pizza to brown enough.
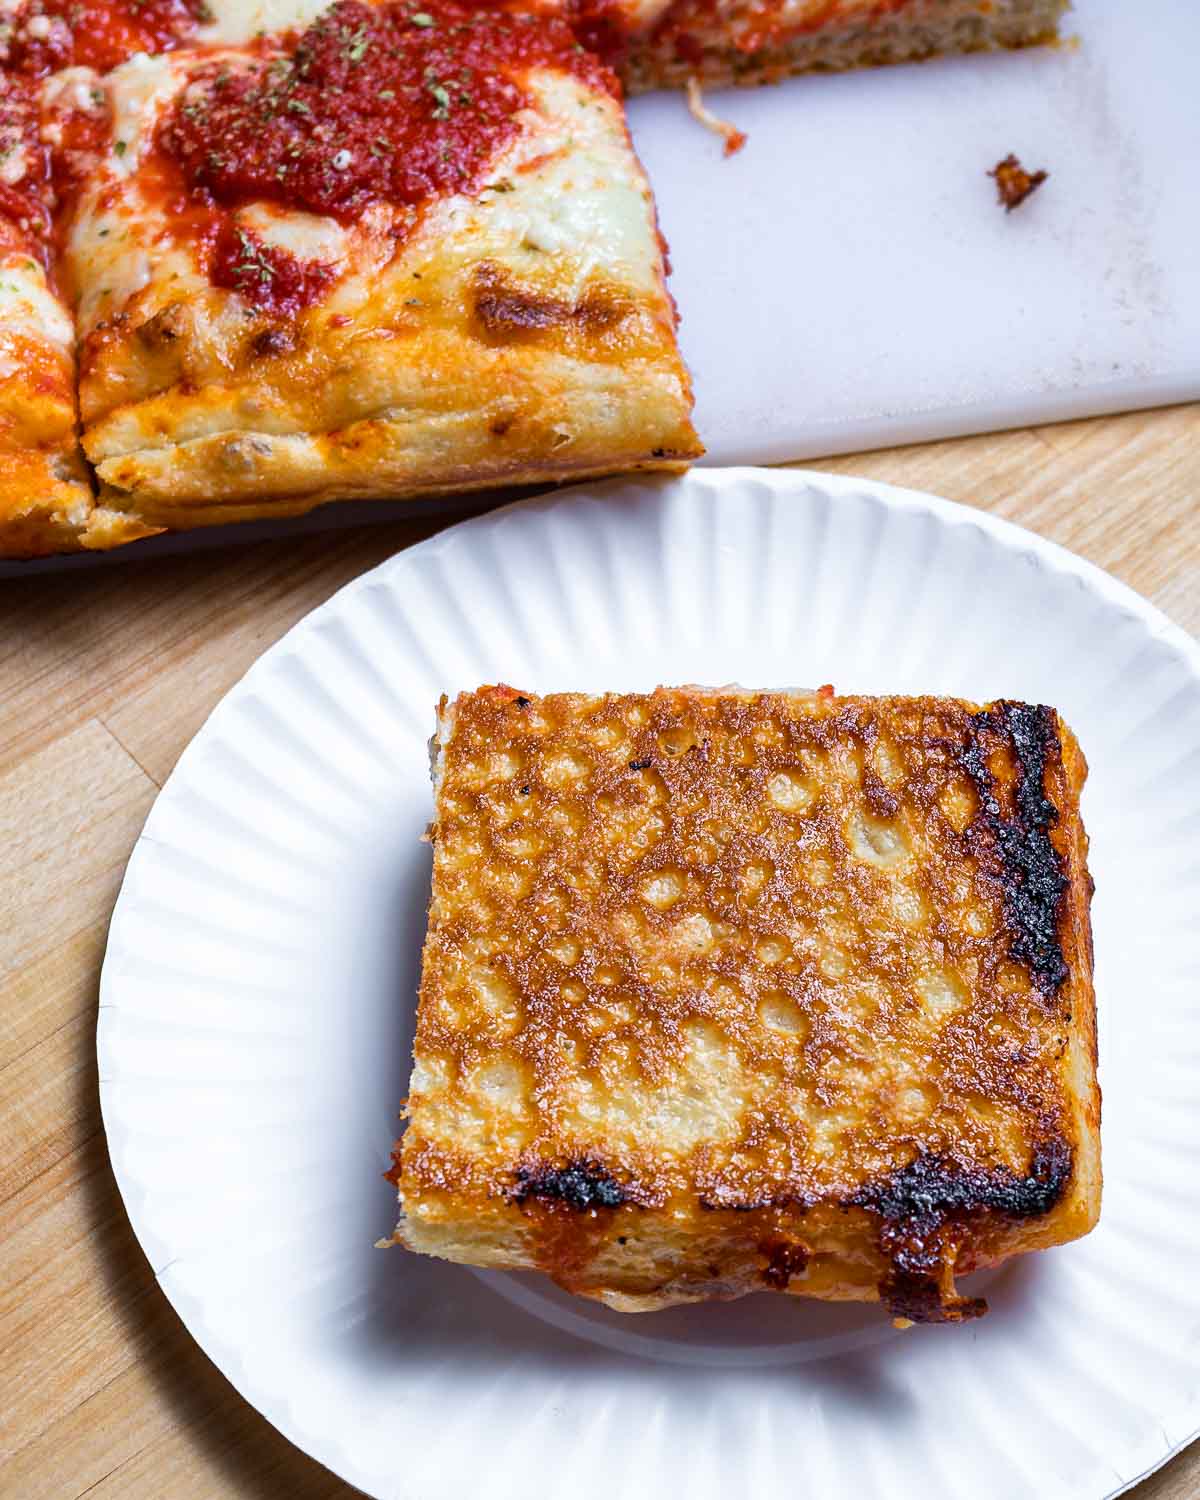
I recommend using an aluminum pan since it’s thinner and allows the bottom of the pizza to crisp when placed on the lowest level of the oven. Be sure you watch to prevent the bottom from burning.
Want To Save This Recipe?
A dark aluminum pan like the one pictured above works incredibly well. It’s a LloydPans 14 x 14″ Sicilian pizza pan. It is deep enough for this type of pizza and also works well for focaccia.
You can also use a standard aluminum sheet pan with great results but you might want to increase the dough ball to about 40 ounces versus the 30-ounce used in this recipe. A 30-ounce dough ball will yield a thinner pie that will cook in less time – approximately 5 minutes.
Note: Don’t ever slice your pizza while it’s in the aluminum pan as it can be easily damaged. Instead, move the pizza to the wire rack first, then to a cutting board. Once sliced, you can transfer it back to the pan.
Oven placement and temperature
As you may know, I’ve cooked all of my pizzas in a standard 20-year-old GE oven.
This New York Sicilian pizza recipe has not been tested in a convection oven, so if that is the type of oven you have, you’ll likely need to adjust the cooking time, oven temperature levels, and pan placement.
Note: Many experts state that convection adds 20-25F degrees to recipes that call for a conventional oven.
As mentioned above in the steps, it’s important to check the bottom of the pizza after 12 minutes of cooking. If the bottom is very blond, finish cooking it on the bottom rack for the remaining 12-13 minutes of cooking time.
If you’re having problems with browning, you will have to cook at a higher temperature on your next attempt. Probably towards 450f.
Inevitably, the temperature of all ovens fluctuates. Your oven is not my oven, or your nonna’s oven. You will most likely need to play around with the placement and temperatures a bit.
Just keep in mind that making a New York Sicilian pie is an interactive process and requires some love, attention, and finesse! But I’m confident that with these instructions you’ll be able to make a pizza that looks just like mine (maybe even better!).
Using a stand mixer
While stand mixers can certainly be handy, I prefer to show the process here and on YouTube without any special equipment so it’s accessible to the masses. For that reason, these instructions are for hand mixing.
However, if you’d like to use your mixer, simply follow these instructions:
- Mix dry ingredients in a large bowl and place half of them and all the water into the Kitchen Aid mixer bowl.
- Using the dough hook attachment, mix for 1 minute on low (speed level 1) and begin adding in the remaining dry ingredients.
- Drizzle the olive oil into the mixing bowl and continue at speed level 1 for 3-4 more minutes or until the dough is sticking well to the dough hook.
- Remove the dough and hand knead for 1 minute. Ball it up and place it in an oiled container and cover tightly. Cold ferment the dough for a minimum of 12 hours but if possible, shoot for at least 24 hours and up to 72 hours in the fridge for a better tasting dough.
Why par-bake a New York Sicilian pizza?
This type of pizza differs from other New York-style pizzas in that it requires par-baking. That is baking the dough with very little sauce prior to adding the cheese and remaining sauce. This same process is used in Detroit-style pizza. A few benefits to par-baking include:
- Increased oven spring. Basically, you’re locking in the size of the pizza, getting more airiness in the crust, and preventing all the sauce and cheese from penetrating the dough and making it too soggy.
- Pre-saucing. The sauce helps keep the moisture level intact and prevents very large bubbles from forming. I also think it helps the next layer of cheese and sauce grab a bit better and not fall off when eating.
- Make ahead. You can save the par-baked pizza crust plastic wrapped in the fridge for up to 3 days. Once you want to make a pie, the process will be so much easier. This is what many pizzerias do to speed up their workflow.
More great pizza recipes
- New York pizza – The classic round pizza cut into triangular slices – the kind you’d find at every legit NY pizzeria.
- Grandma pizza – The Long Island classic. Thinner than a NY Sicilian with lots of garlic.
- Vodka sauce pizza – Sheet pan style with the most delicious vodka sauce and basil.
- Pizza fritta – also known as fried pizza dough topped with a variety of savory or sweet toppings.
- New York white pizza – A round pie topped with mozzarella, ricotta, garlic, and a touch of Pecorino Romano.
If you’ve enjoyed this New York Sicilian pizza recipe or any recipe on this site, give it a 5-star rating and leave a review.
Some people learn by watching. If you’re that type of person, you can find most of our recipes on YouTube and our Facebook Page.
New York Sicilian Pizza
Ingredients
For the dough
- 497 grams bread flour or 4 cups
- 2 grams instant dry yeast or 1/2 teaspoon, SAF brand recommended
- 10 grams fine sea salt or 1 3/4 teaspoons
- 6 grams granulated sugar or 1 1/2 teaspoons
- 318 grams cold water or 1 1/2 cups
- 17 grams olive oil or 1 1/2 tablespoons, plus more for proofing container
For the NY Sicilian pizza
- 1 30 ounce dough ball from above recipe
- 1/4 cup olive oil
- 1 28-ounce can crushed plum tomatoes drained
- 1/2 teaspoon kosher salt
- 1 teaspoon Sicilian dried oregano or Italian oregano
- 3 tablespoons Pecorino Romano grated
- 12 ounces low moisture whole milk mozzarella shredded
Want To Save This Recipe?
Instructions
For the dough
- Place water into a bowl large enough to hold both the water and all the dry ingredients and still have room to spare. Mix together dry ingredients in another bowl.
- Add dry ingredients to water a bit at a time and mix thoroughly to form a dry rough mass. Pour the oil over the dough, mix again, and place the rough shaggy dough onto a work surface.
- Knead the dough for 5-7 minutes. If the dough is too sticky, place a clean bowl inverted over the dough and wait for 30-45 minutes before resuming. Return to kneading (just make sure to knead for at least a total of 5-7 minutes).
- Place the bowl over the dough once more and let sit for 30-40 minutes to warm up before forming the dough ball.
- After 40 minutes pull the dough toward its end repeatedly to form a smooth ball. Pinch the seam side and place the dough ball seam side down into an oiled bowl (about 2 teaspoons olive oil) and cover tightly with plastic wrap. Refrigerate for at least 12 hours but preferably 24 -72 hours before using.
For the NY Sicilian Pizza
- Take the dough out of the fridge for 60 minutes prior to use. Do not uncover the bowl.
- Pour and spread the olive oil into a 14-inch square pan and drop the dough ball into it. Try to stretch with your fingers to fill the pan for a couple of minutes. The dough will not be able to be stretched on the first try. Cover the pan with plastic wrap and let the dough warm up for 30-45 minutes and try to stretch again. If unsuccessful, cover one more time and wait another 30-45 minutes. Press the dough into the corners to form a crust.
- Mix the salt into the tomatoes. Spread 4-6 ounces of the tomato sauce onto the dough (just a very thin layer) then cover with plastic wrap. Place the pan on top of the oven or a sunny windowsill to warm and rise for 3 hours.
- Preheat the oven to 430f and set one rack to the lowest level and the other to the top 1/3 of the oven. Once the oven is to temp and the dough has risen enough par-bake the pizza on the lowest rack for 12 minutes or until the bottom of the pizza is lightly golden and the dough has firmed up.
- Remove the pizza and top with the mozzarella cheese, leaving 1/2-inch of the perimeter without any cheese. Spoon the sauce on top of the pizza in diagonal lines (you might not need all of the sauce) and cook on the higher set rack for 12 minutes more.
- Remove from the oven and sprinkle with grated Pecorino Romano and Sicilian oregano. Cook for 1 minute more. You can broil the top for 30 seconds or so for more color but watch very carefully! Enjoy!
Notes
- The dough can be cold fermented for as little as 12 hours in the fridge but is much better after a longer period. 24 to 72 hours is recommended.
- If refrigerating the dough ball in a metal bowl use a bit more oil to coat. The metal bowls tend to stick more than plastic.
- Cooking time will vary depending on the exact oven temp. After 12 minutes of cooking on the lowest rack, the pizza should be quite golden. If it's completely blond, the pizza might need further cooking on the lowest rack after adding the sauce and cheese. All ovens are different so you will need to check the bottom to make sure!
- The Sicilian pizza needs a lot of oil. More than you think! The oil helps develop the amazing crispy bottom, so please use enough of it.
- Leftovers can be saved for up to 3 days and the pizza can be reheated at 350f on a baking sheet until hot. About 10 minutes.
Nutrition
Nutrition information is automatically calculated, so should only be used as an approximation.
Follow Me

The Sip and Feast Cookbook
- 100+ recipes
- Essential tools and ingredients
- Entertaining ides
- Stunning photography


The flavor of this dough is INCREDIBLE! Would the dough measurements change if I wanted to bake this in an 8X8 metal pan?
We’re glad you enjoyed, Isabel. Yes, the pan we use is 14x14x1.5 inches so you’d need to scale the recipe down to fit into a pan that’s much smaller.
Can I mix in a stand mixer instead? Would it I do it any differently?
You can. Please refer to the section of the article titled “Using a stand mixer” for the instructions.
Like most native New Yorkers, pizza has been one of my basic food groups from the day I was weaned off formula. Having left the NY area almost 30 years ago, eating pizza from Florida & Georgia pizza joints has always involved lowered expectations- My goal is to give it an 8 out of 10 or better, and while living in FL I got lucky finding Estella’s, a neiborhood restaurant in Port St. Lucie that’s run by former New Yorkers, putting out 9+ pizza every time.
Now I live in Georgia and for the past several months I discovered none of the area pizza shops offer Sicilian pies. I really needed to get a NY square slice on my plate and decided to take on the whole task if I could find the right guide to get me through it, starting from a countertop assembly of ingredients to a satisfying smile as I take my 1st bite…
THANK YOU James! At 70, I’ve never made pizza from scratch before. Until now. I paid careful attention to all of your details, never losing my patience or trying to rush the process. My reward was a genuine NY Sicilian pie with a perfect, tasty crust and balanced with proper toppings. Not to sound conceited, but even my wife gave it a 9+ out of 10. Thanks again!
A quick note- when ordering the ingredients, I considered buying Self Rising Flour to save a step, but I actually was curious enough to find out how it “self rises”. I discovered the leavening agent is baking soda- NOT yeast. I’m not a baker but I know my way around a kitchen and I know that the yeast in pizza dough contributes significantly to the dough’s character. Knowing that fact made the decision to get regular flour & a packet of yeast the only correct choice- I want pizza dough, not cupcake batter…
We’re thrilled you and your wife enjoyed the pizza, Gene! Thanks so much for trusting in the recipe!
Hi James,
I used bread flour and used a Lloyd pan. I have a convection oven and set it to 430 degrees. I par-cooked for 20 minutes and then cooked another 20 minutes after adding sauce and mix. The crust stayed blonde and didn’t sag. Any ideas why it didn’t brown up and get real crispy? I used about 3/8 cup of VOO. Thanks
Hi Stephen. I have two ovens and they bake very differently based off the heating elements. The oven where I now film videos, needs 500°F to get the same browning effect of my main kitchen’s oven at 450°F. I would increase temp by 40-50°F and check every few minutes so that it doesn’t burn. Once you have the oven dialed in you should be set for future bakes.
Perfect! Have made this 3 times and it’s excellent every time!
So glad you enjoyed!