
New York pizza is often imitated but rarely duplicated. Some believe the secret is in the water, or the cheese. I’m here to demystify the process by sharing my homemade pizza dough recipe, and all my tips, tricks, and secrets with you. By the time you’re done reading, you’ll understand why the cold-fermentation process is the true key to unlocking that unmistakable New York flavor and will have the confidence to go forth and make the BEST damn pizza you’ve ever tasted.
Over the course of time, and in my quest for the perfect homemade New York slice, I’ve tested many formulas.
This has been a labor of love, and my obsession to get it right is starting to pay dividends. I’ve finally created the perfect dough and ordering pizza has become a thing of the past. My family actually prefers my pizza to many of the local pizzerias.
So rest assured, this recipe has been pressure tested, tweaked, refined, again and again until it was perfected and ready to share with you, along with some sciency tidbits you can use to impress your friends and family.
And the best part about this homemade pizza dough recipe is that while it works for New York pizza, it can be used for many other recipes as well!
Being born and raised in New York I like to think I know what good pizza is. I also know what isn’t.
Pizza dough should have a wonderfully complex cold fermented flavor that comes from using only a little bit of yeast, balling your dough, and letting it slowly ferment in the refrigerator. The pizza will also have a good chew from the high gluten flours often used.
Lots of pizzerias cold ferment dough. Many don’t. There are no doubt some great places that don’t go through the process and get good results. Perhaps they have a secret technique?
But, for you, the home-cook, I know incorporating the cold fermentation process will be a game-changer. If you think there’s too much work involved, I challenge you to test a batch of cold fermented dough versus a same-day mixed dough. I know you’ll be pleasantly surprised!
What type of pizza can you make with this dough?
New York round pizza
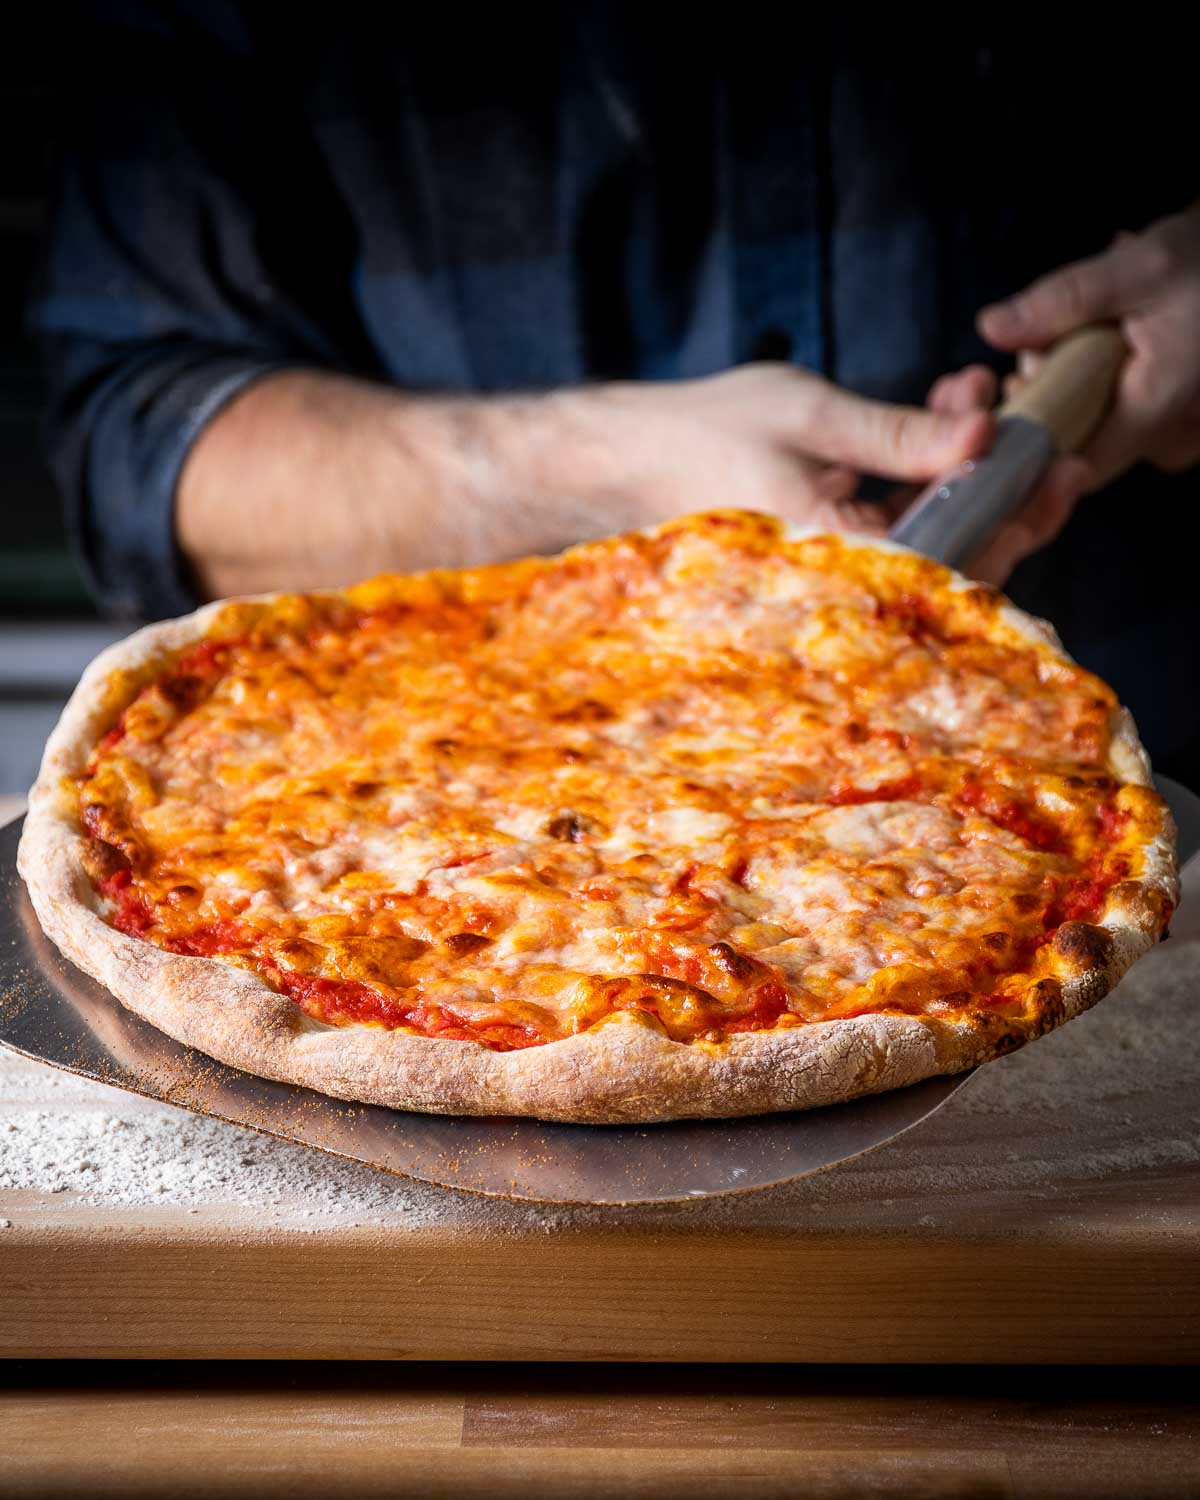
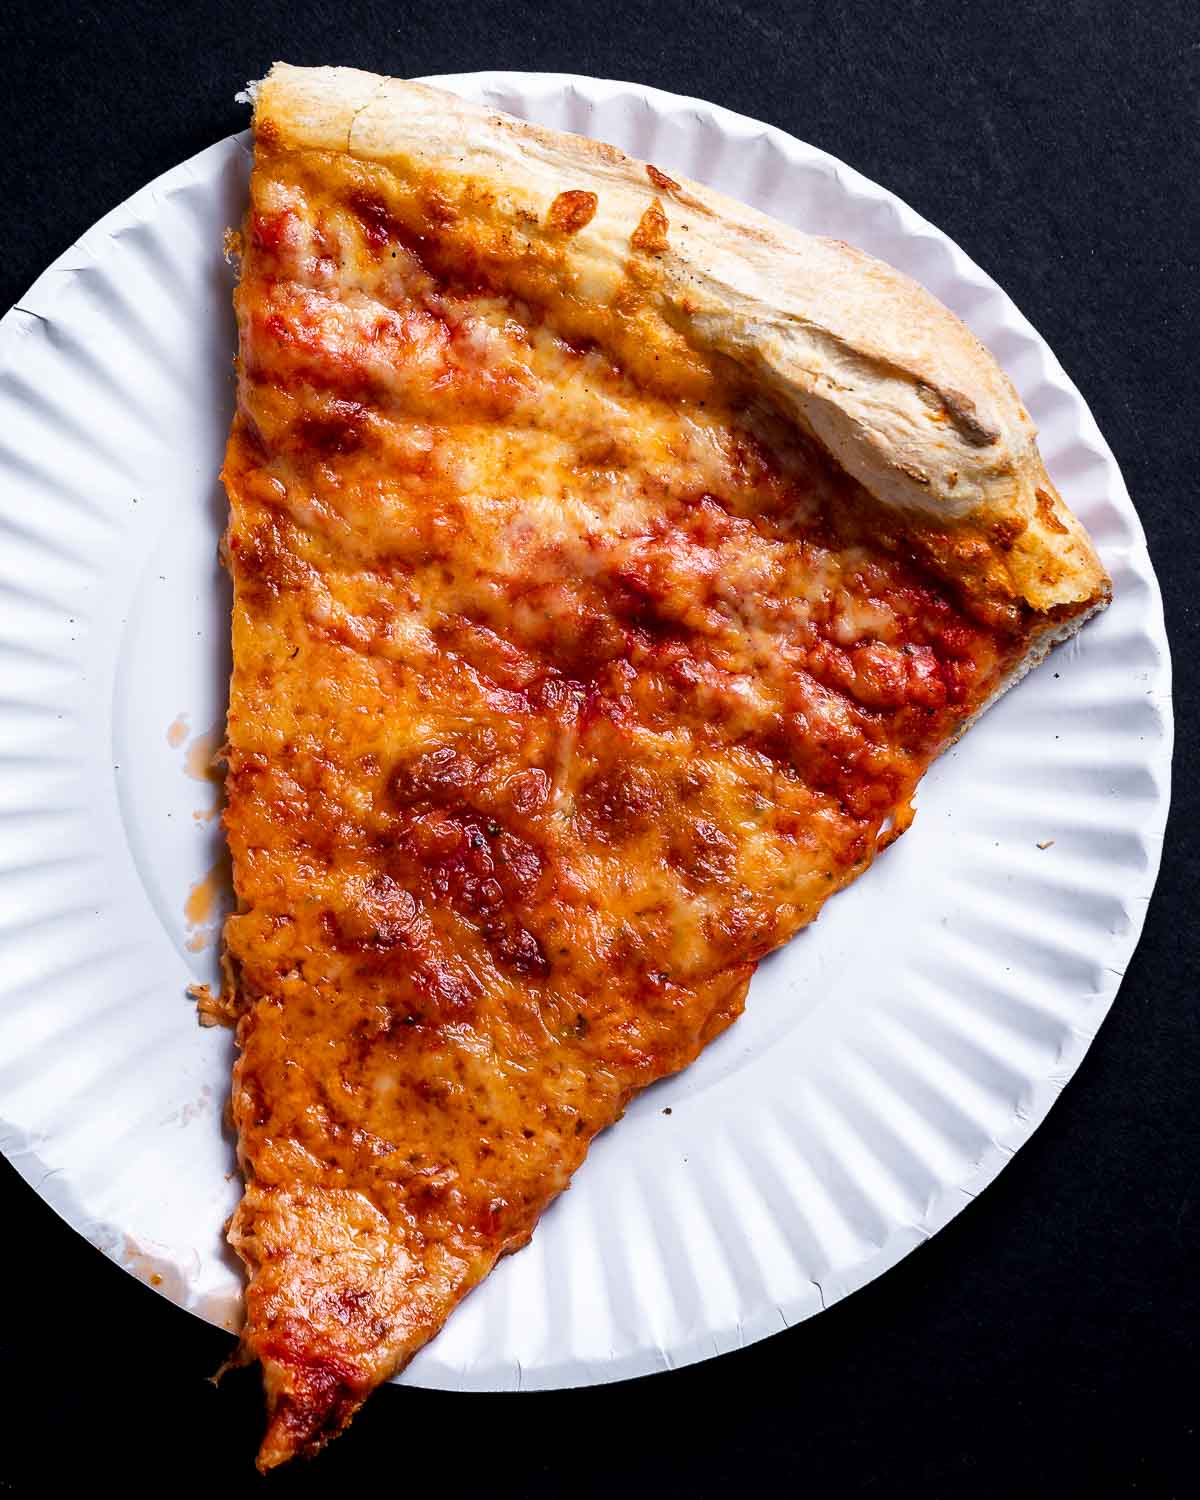
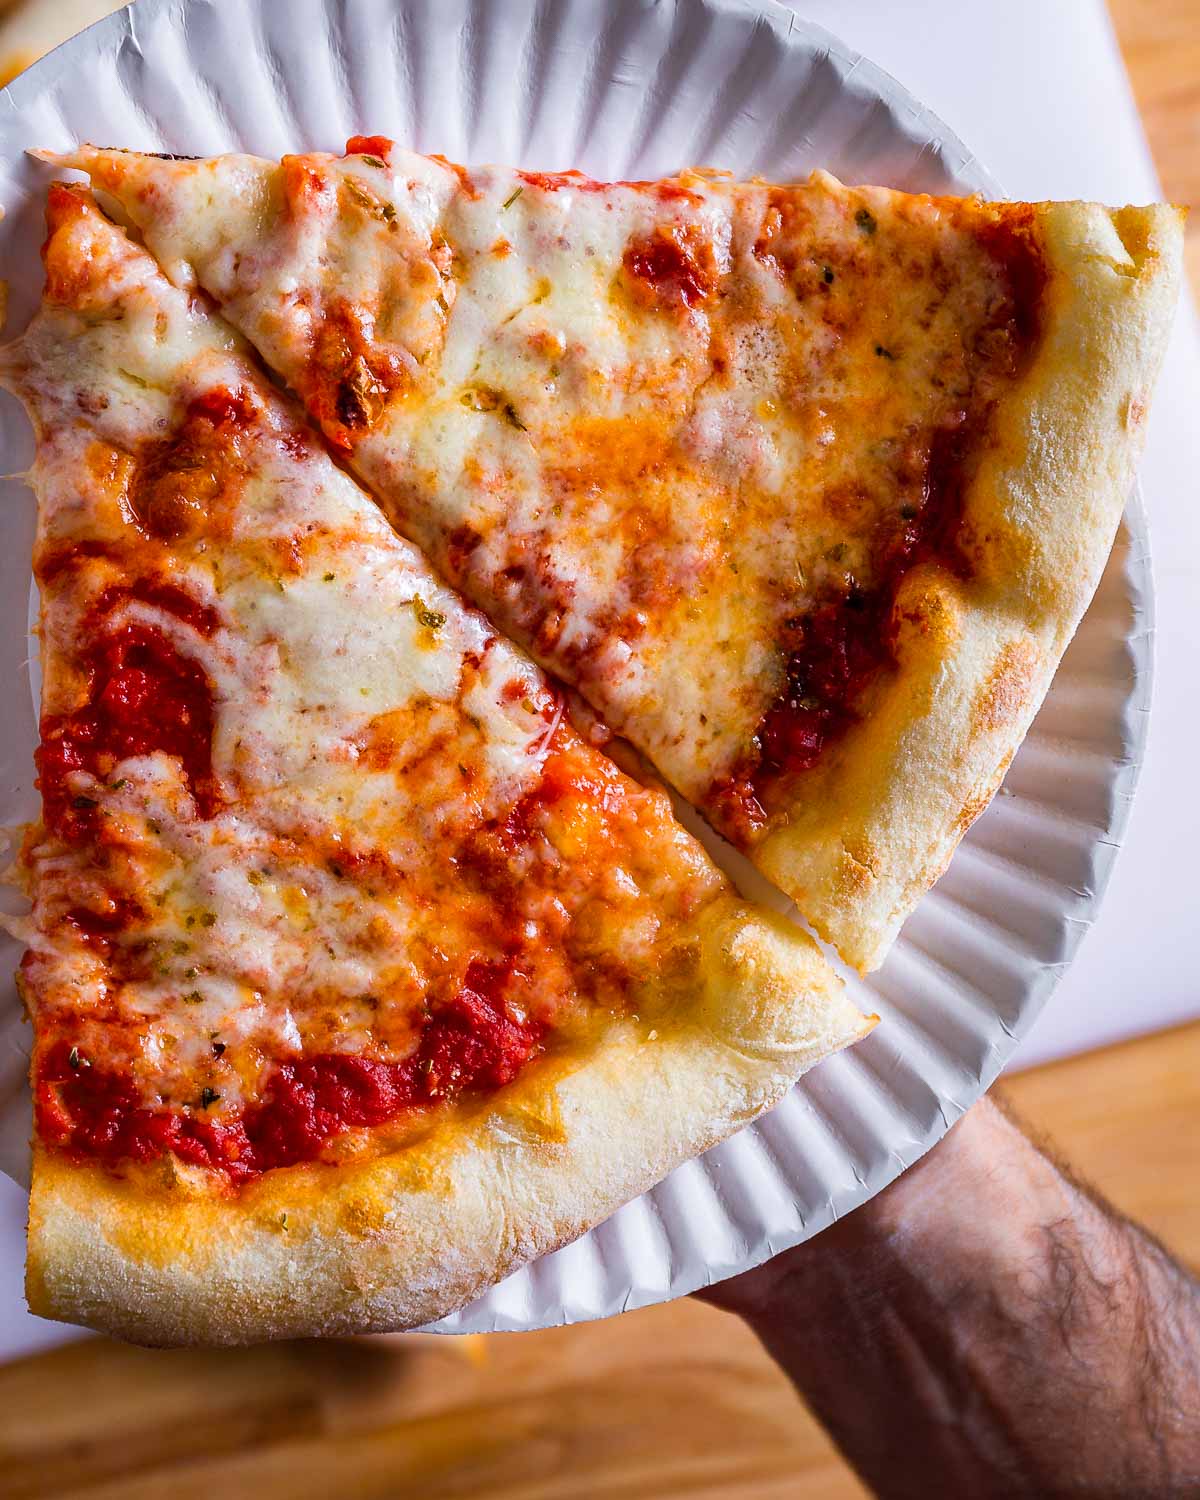
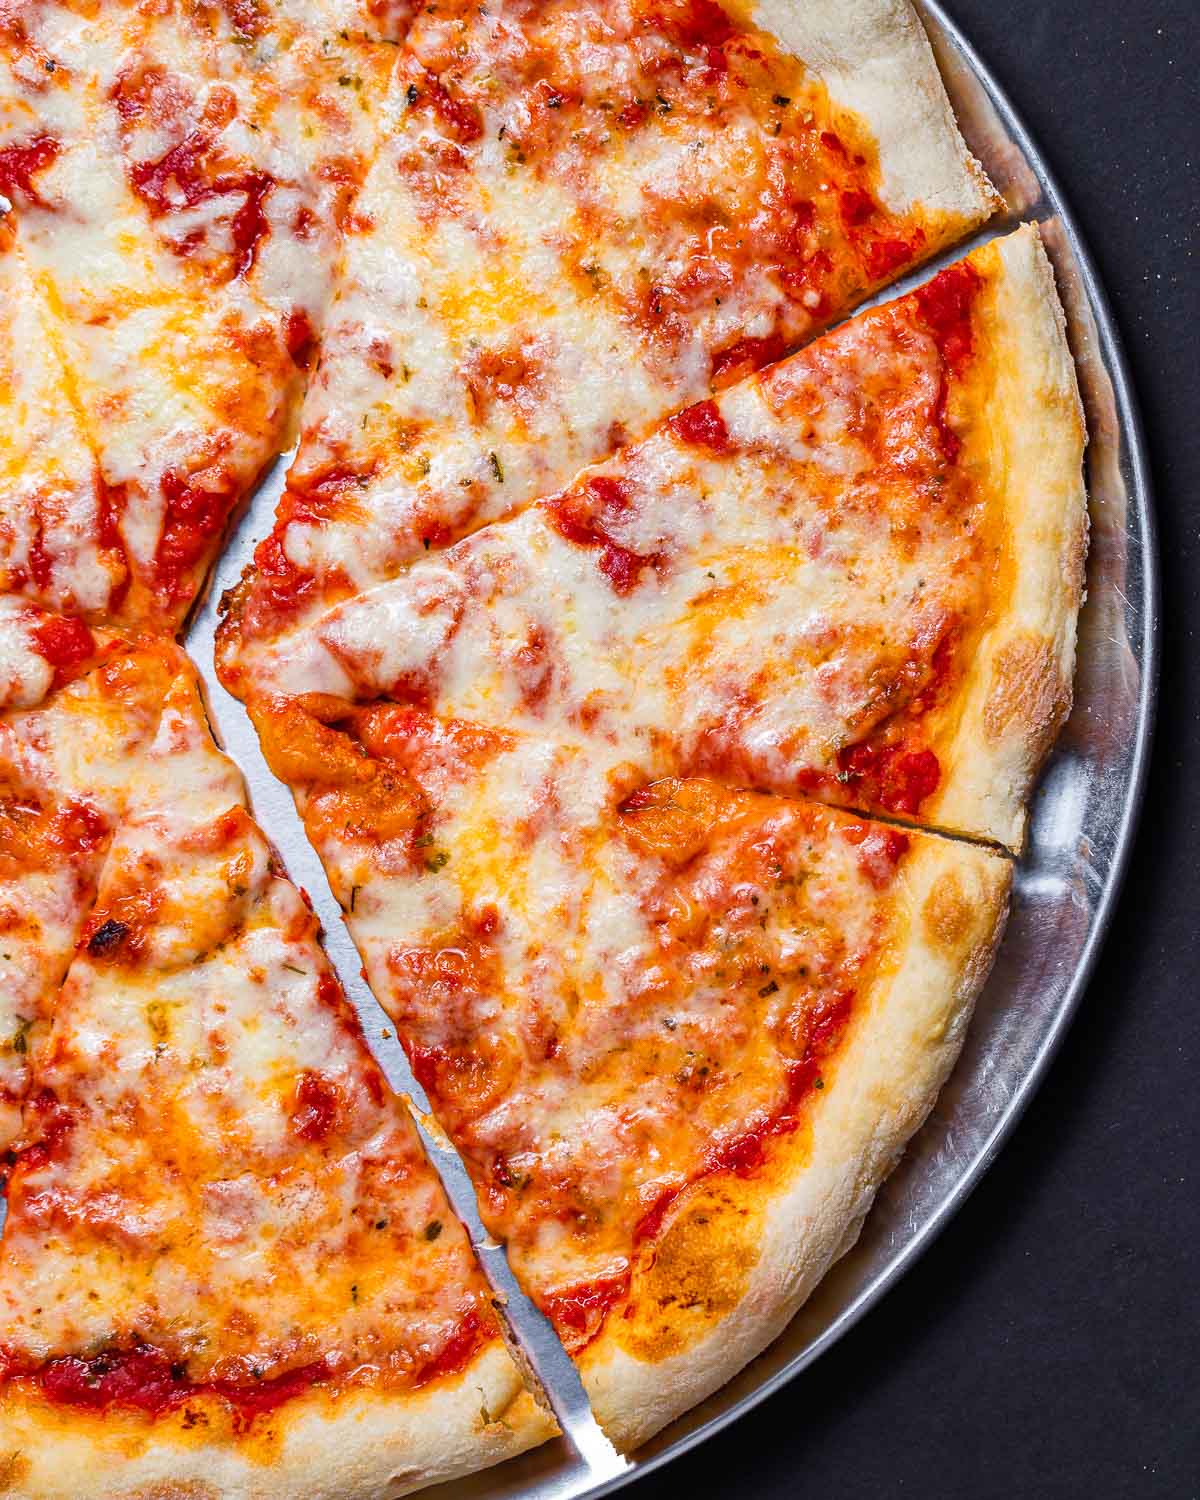
Traditional round New York Pizza is the thinnest of the three types of pies.
It’s the type of pizza whose tip flops slightly when you hold it and folds well for easy, on-the-go eating.
The sauce consists only of uncooked canned tomatoes. Most New York pizzerias use 7/11 by Stanislaus or one of their other brand lines.
The cheese will be block mozzarella, shredded. Most shops use the Grande brand.
The pizza might have a touch of Pecorino Romano or parmesan cheese and a bit of oregano.
That’s it!
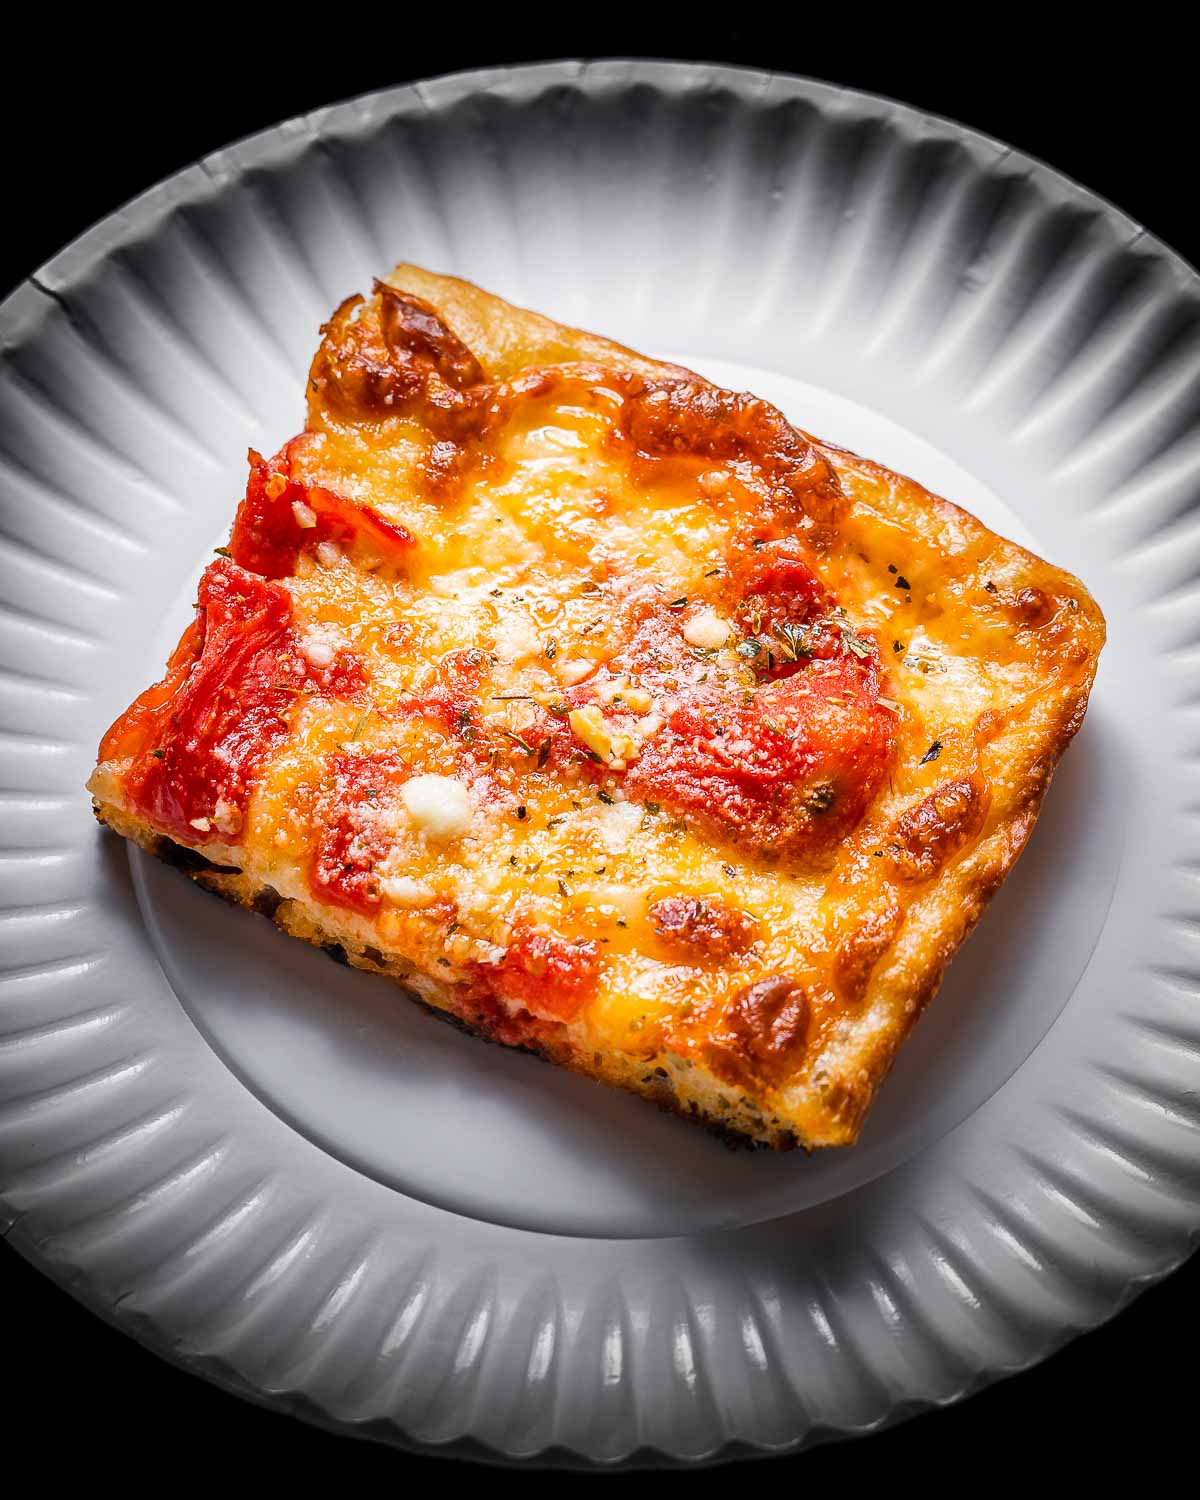
New York Sicilian pizza
Don’t confuse this pizza with sfincione, which is a traditional pizza from Sicily that contains breadcrumbs, anchovy, and caciocavallo cheese.
The pizza I’m referring to is the pizza you’d get if you walked into a New York area pizzeria and ordered a “slice of Sicilian”.
Pictured right below, this popular type of pizza is the thickest of the 3 most common pizza styles found in New York.
It has a thick airy texture with a crisp bottom and is made in a rectangular pan using block mozzarella cheese, lots of sauce, oregano, and Pecorino Romano cheese.
Most of the time uncooked sauce is used, but some places like L&B Spumoni Gardens do cook it.
The thing that sets this pizza apart is that it needs to be parbaked. To make this pie check out my full New York Sicilian recipe.

The Grandma pizza
The Grandma pizza is a square pizza that’s much thinner than a Sicilian.
Created on Long Island, the Grandma pizza or a version of it can be found all over the NY metro area.
This pizza has some unique characteristics, but IMO it’s the easiest of the big 3 to prepare.
For all the details check out our Grandma pizza recipe.
The ingredients
Flour
Many New York pizza shops elect to use General Mills’ All Trumps flour which is made from hard red spring wheat that has a 14.2% protein content. They make both a bromated and unbromated version.
King Arthur’s brand is more widely available to retail consumers, and all their flours are unbromated.
[Sciencey tidbit: Potassium bromate, typically referred to as “bromate” is a compound used to strengthen dough, thus allowing for increased “oven spring”, and higher rising in the oven. (source: King Arthur Flour)]
In my experience, I have found little to no difference between bromated and unbromated flour.
For my recipe, I use King Arthur’s “Special Patent flour”, purchased in bulk (50 pounds) through Webstaurantstore.
I use a lot of flour in my home and I’ve found that they have some great prices on flour and pizza supplies. You will pay for shipping, but the prices are less than other well-known websites.
If buying flour in bulk isn’t an option for you, you can buy the exact same flour in a 5-pound bag at your grocery store under the name King Arthur “Bread flour”.
The Special Patent, aka Bread flour, has a protein content of 12.7% which gives the pizza a nice chew and is nearly identical to that of an All Trumps-made slice.
Pro tip: If you truly want to learn to make pizza, opt for the 50-pound bag of flour.
>A 5-pound bag won’t last long, is not enough to learn with, and in the long run, will cost you way more money.
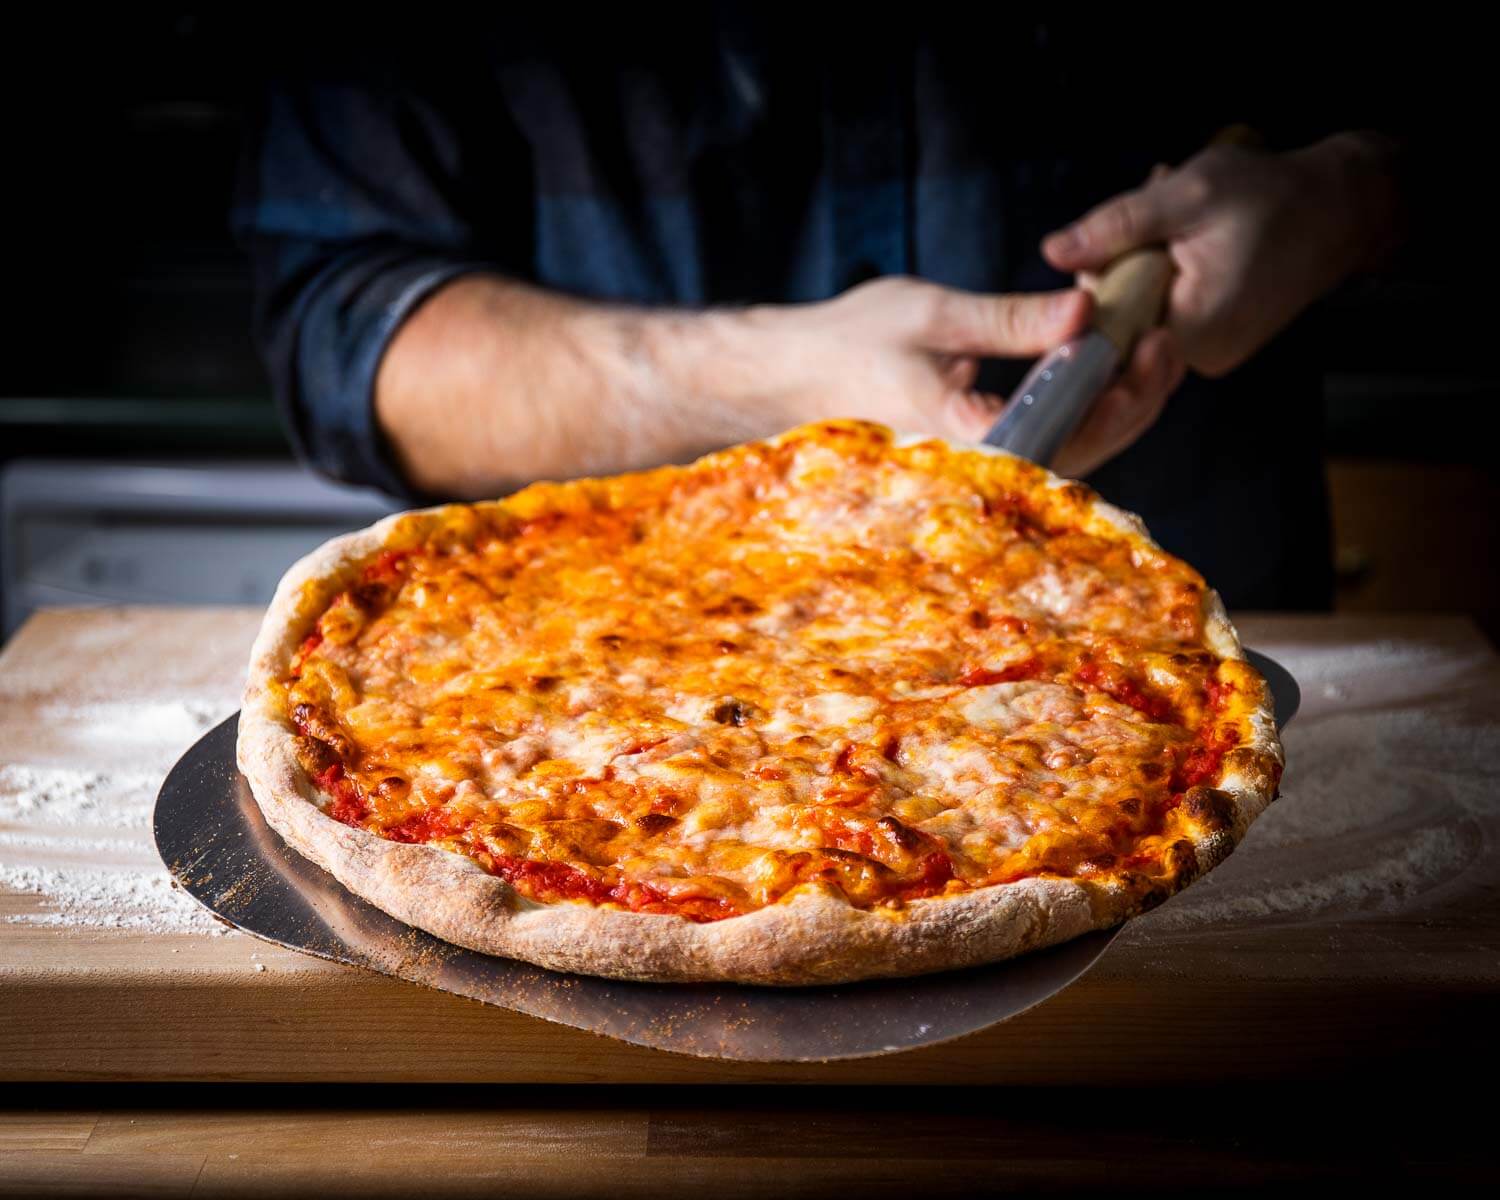
Note: Diastatic malt powder is a blend of malt barley flour and enzymes that help yeast to fully grow, enabling dough to achieve a better rise, and to aid in browning. Many pizzerias, bagel shops, and bakeries employ its use.
I rarely use it as I don’t find that it impacts the taste of the dough. However, for illustrative purposes, I did use it for the second picture at the beginning of this post. As you can see, the pizza crust is a bit browner compared to the other pics.
If you want to try using it, I suggest starting off with a very low amount, less than .4%. Using more than that can make the dough very sticky and difficult to work with.
If you choose to use the King Arthur’s bread flour I have recommended, it already contains a small amount of malt barley. Organic flour typically doesn’t contain malt barley, so if you are choosing an organic flour, you may find that the diastatic malt powder provides some help.
Water
If I had a dollar for every time I’ve heard someone credit the New York water as the reason our pizza is so good, I’d be rich.
Repeat after me, “I DO NOT NEED NEW YORK WATER TO MAKE GOOD PIZZA”!
This my friends, is a myth, an urban legend, culinary folklore if you will, at its finest.
I plan to make a few videos dispelling this myth, but for now, take my word for it.
Frankly, I think it’s an insult to the excellent pizza makers today and the prior generations of pizzamakers who taught them.
New York has more of a pizza culture and tradition than anywhere on the planet, including Italy.
There are literally tens of thousands of pizzerias in the NY metro area and the competition is strong. They know what they’re doing. Please don’t discredit their talent by perpetuating the water myth.
Oh, and ditto for bagel shops.
Yeast
You can use any type of yeast you want for the dough, but the easiest to work with is instant yeast. I prefer to use instant because you don’t need warm water and can mix the dough right away.
My favorite brand is SAF instant yeast. If you buy a bag of it and store it in the freezer, it will stay fresh and last for 6 months or more.
Mozzarella cheese
Block mozzarella is the cheese of choice for the New York pizza.
This is not the time for fresh mozzarella which is too wet and can be problematic when making a New York pie. Save the fresh for another time, such as in a salad with fresh tomato and basil.
Pizzerias often use brands that are only available from restaurant distributors, such as Grande brand.
Polly-O, which is widely available in the New York area to retail consumers, used to be the number one brand used by pizzerias, however, its popularity has declined.
I remember being a kid and seeing “We proudly use 100% Polly-O” on so many pizza shop windows.
Some well-known places, such as Di Fara in Brooklyn, still use Polly-O.
When using Polly-O, I like to use a blend of 50% part-skim and 50% whole milk. Using 100% whole milk mozzarella results in too much liquid for my liking.
Note: It has been asserted on pizza forums that Polly-O commercial is different than retail. I have not been able to confirm this, but from my testing, they taste and function the same.
Galbani brand mozzarella is a bit dryer and I’ve had success with using their whole milk version for pizza. Galbani is becoming easier to find here in New York over the last 5 years or so. Whole Foods and Trader Joe’s will have some different brands, such as Calabro. Depending on where you live, you will have to experiment with what’s available.
Hard cheese
Many places use parmesan or Pecorino Romano. While parmesan is good, (and if you want to get real fancy use an expensive block of 24 or 36 month Parmigiano Reggiano), I’m partial to Pecorino Romano and really recommend you use it.
Pecorino Romano is the cheese used in pasta dishes like Carbonara, Cacio e Pepe, Alla Gricia, and Amatriciana.
Pecorino Romano cheese is as New York as apple pie and most supermarkets will sell a lot of it. Locatelli is the brand often sold. It makes a pizza a true NY pizza!
Tomatoes
The tomatoes used most often in New York pizzerias are from the company Stanislaus, which includes a variety of California-grown tomatoes.
Isn’t it funny that most New York pizzerias are not using Italian imported tomatoes? No doubt some do use San Marzano, but with that, the price of the pizza will be higher.
To purchase Stanislaus tomatoes, you’ll need to buy from a restaurant supplier or order them online. The only supermarket I’ve ever seen them in is Uncle Giuseppe’s marketplace, an Italian supermarket with multiple locations here on Long Island, NY.
If you’re not able to get your hands on Stanislaus tomatoes, there are plenty of other great choices. Brands like Cento and Sclafani are good and easy to find in the New York metro area and often other parts of the US.
I lived in Minnesota for 3 years and was able to find Cento brand there.
If using whole San Marzano plum tomatoes just give them a quick pulse in the blender when making sauce for New York round pies.
Pro tip: when pulsing tomatoes in a blender, pulse for 1-2 seconds at a time to minimize the amount of oxygen added to the tomatoes. Too much oxygen will rob the tomatoes of their red color and turn them orange.
Oregano
Nothing screams Italian-American more than dried oregano with the exception of maybe Pecorino Romano. If you can find Sicilian oregano use it, but any high-quality brand of dried oregano will be fine.
Whatever you do though, do not use any dried “Italian seasoning”. The only place that belongs is in the trash.
How to make homemade pizza dough
Each number corresponds to the numbered written steps below.
- Start by filling a large bowl (large enough to comfortably accommodate the dry ingredients and the water with a lot of space leftover) with the water. In another bowl (the one pictured in step 1), add all the dry ingredients.
- Mix the dry ingredients with a wooden or rubber spoon.
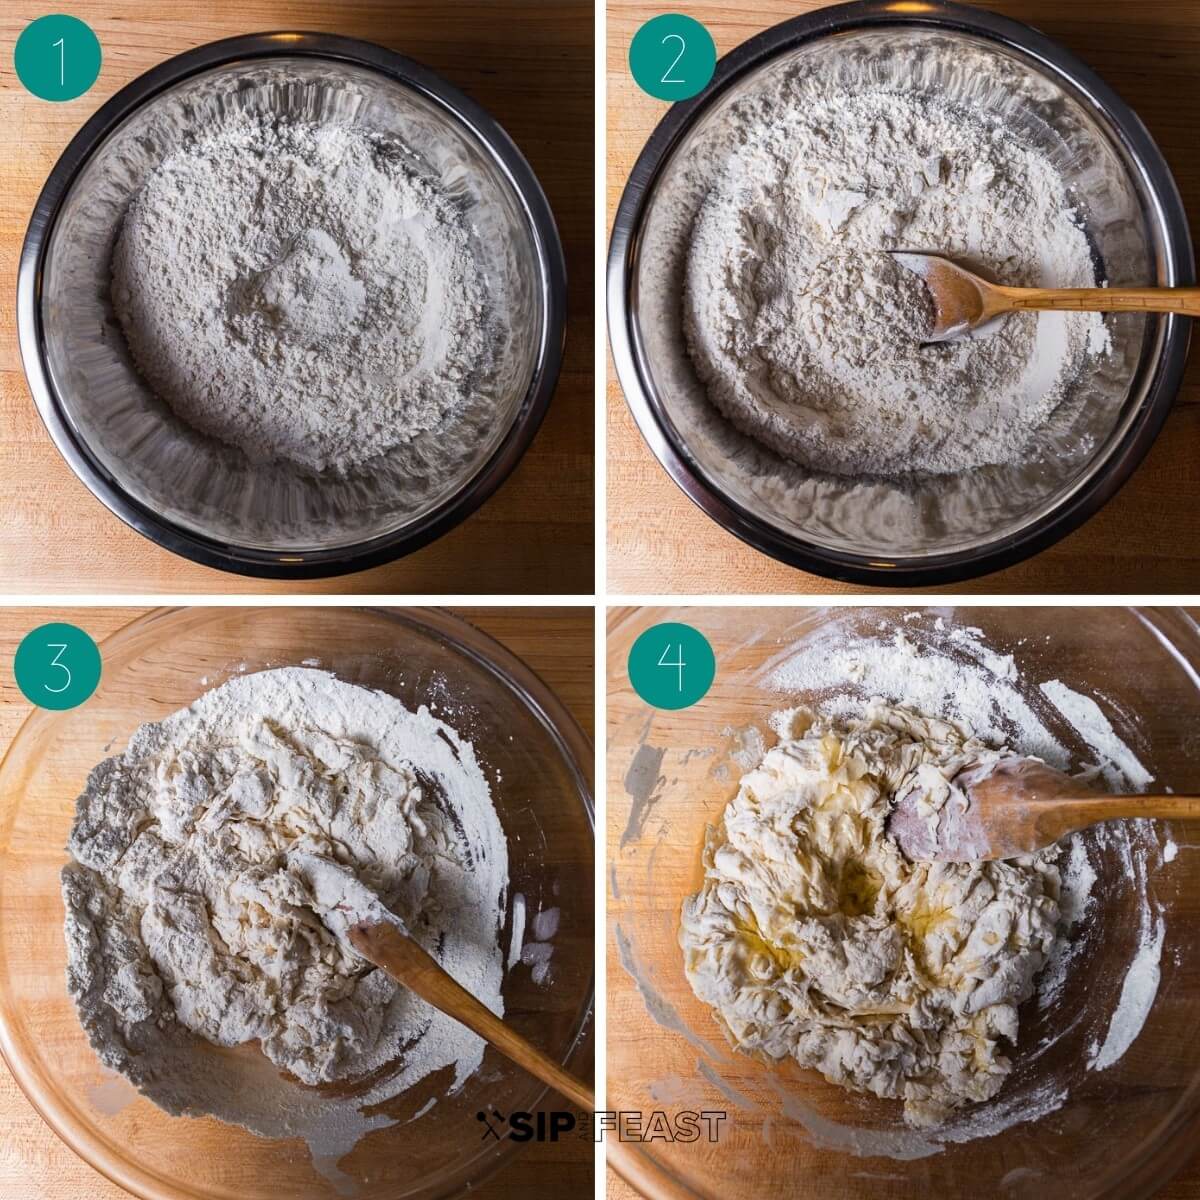
- Slowly add the dry ingredients to the water and begin mixing as best you can.
- Add the olive oil to the rough dough. I like to drizzle some of it around the sides of the bowl to more easily pick up all the flour remnants. Mix again as best you can to form a rough shaggy dough ball.
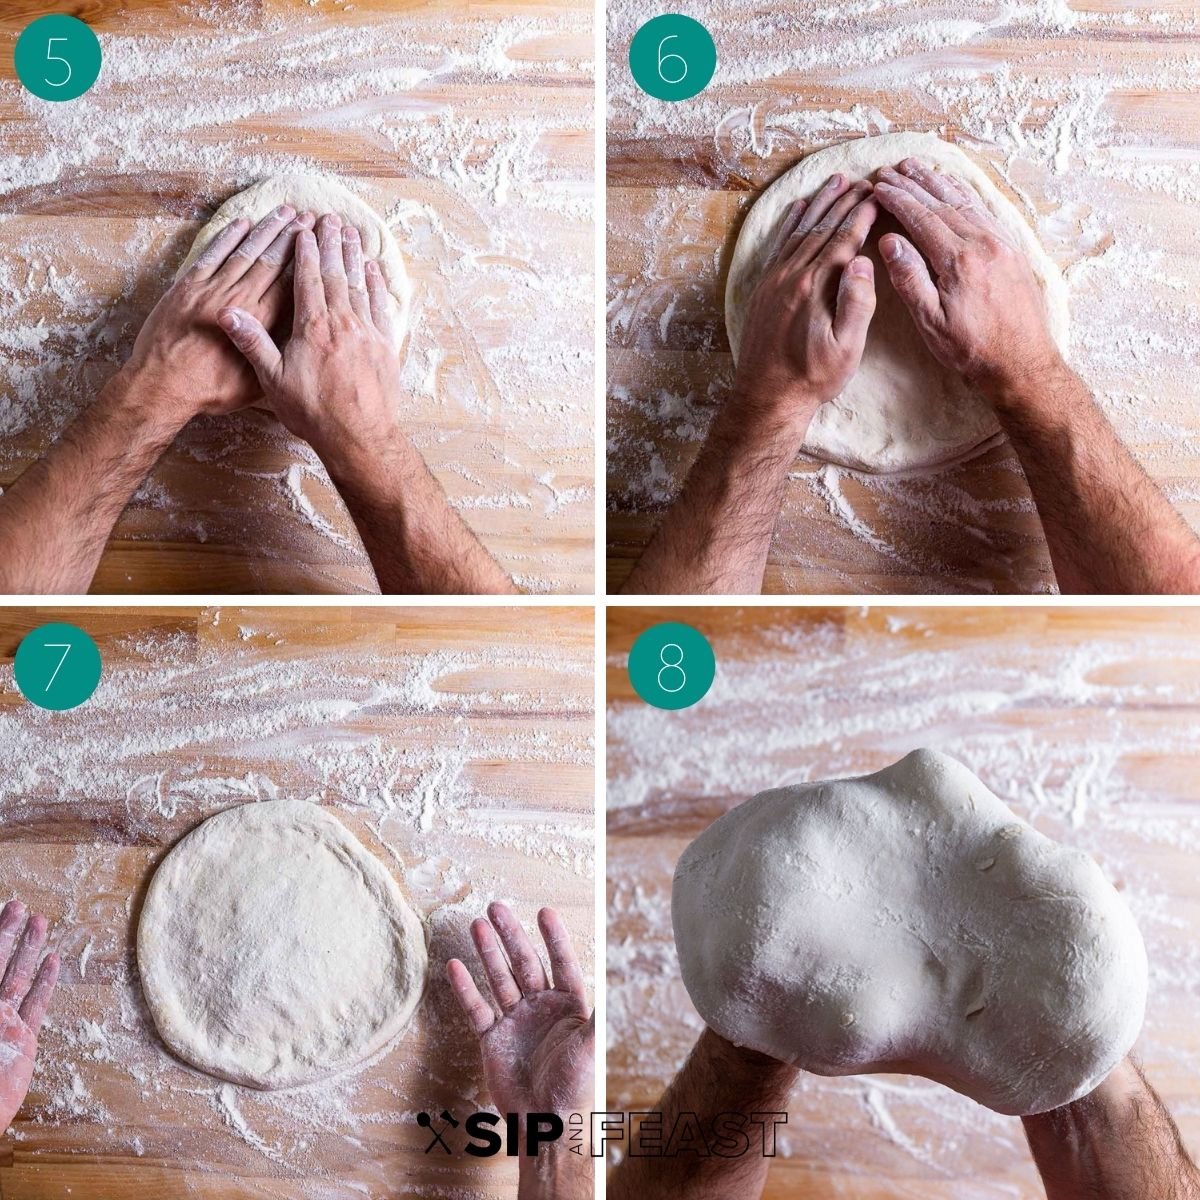
- Place that shaggy dough ball onto a large work surface. A large plastic cutting board or granite/marble countertop works well. Begin kneading the dough by pressing down and forward on the dough ball then rotating it 90 degrees and repeating. Do this until the dough gets too sticky to handle.
- When the dough is too sticky and can no longer be kneaded, cover the dough with a clean bowl inverted or with plastic wrap. Make sure to completely cover the dough.
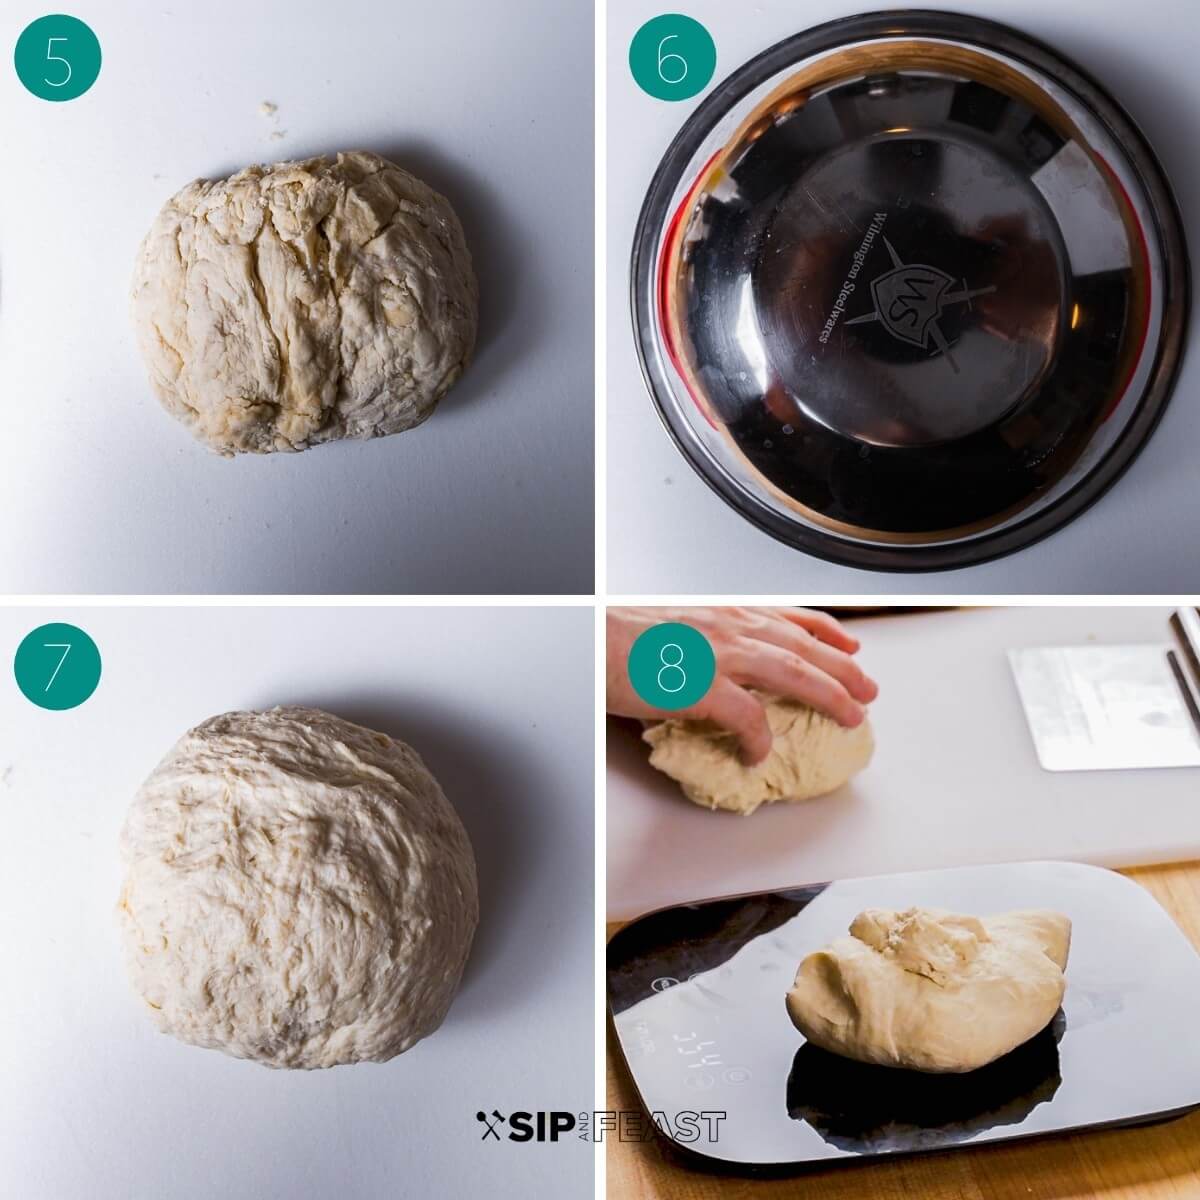
- After 30 minutes remove the lid. The dough will be less sticky. Continue kneading. You want to make sure that you knead the dough for at least 5-7 minutes. This will give you a good workout! After you finish kneading the dough, cover it again and wait 30 minutes before balling the dough.
- Now it’s time to weigh the dough. Portion the dough to your desired size. You have ~1380 grams (48 ounces) of dough to work with. You can make exactly 4 (~345) gram dough balls for NY round pizza.
- When measuring out the dough balls keep the remaining dough covered so it doesn’t dry out. Ball the dough by repeatedly pulling the sides of the dough underneath. Do it about 20 times until a smooth ball is formed.
- Pinch the underside of the dough ball to lock in the gasses.
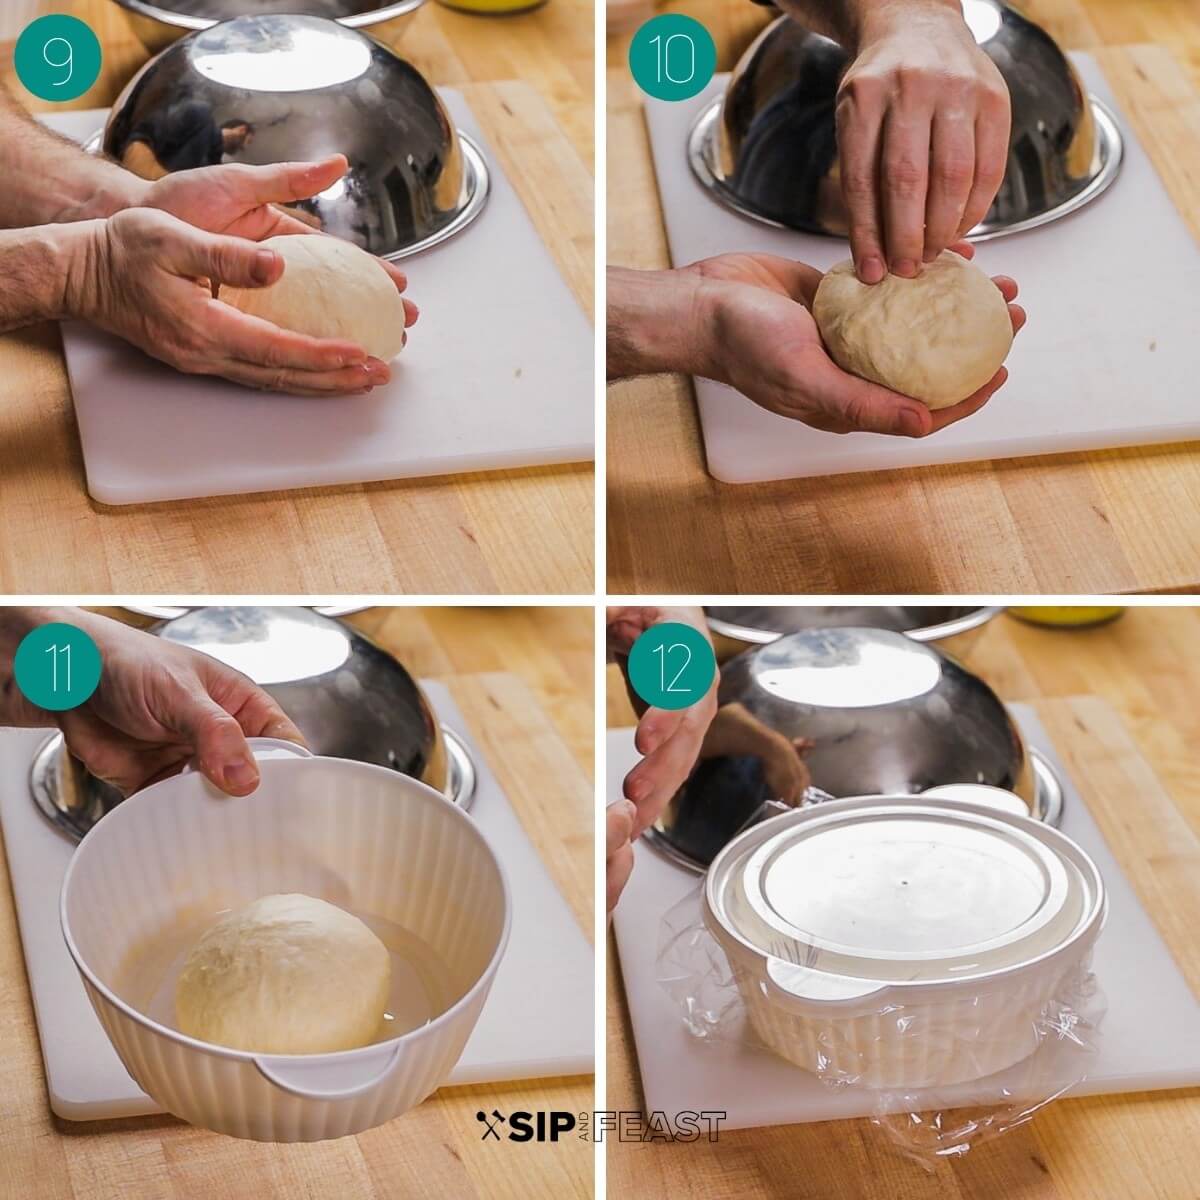
- These dollar store large plastic containers are the best individual proofing containers I own. If you have something similar, use it. I strongly recommend a plastic container for NY round dough balls.
- For extra insurance, I like to cover it with plastic before putting on the lid.
How to make real New York pizza
Each number corresponds to the numbered written steps below.
Before starting this process, make sure to remove the pizza dough from the fridge 2 hours prior during warmer months and 3 hours prior in colder months.
It is highly recommended to use a pizza steel instead of a stone. To learn how to make your own, read this homemade pizza steel tutorial that walks you through the entire process.
- Place your pizza steel 7 inches from the top of the oven (most likely the second highest rack from the top) and preheat the oven to as high as it will go (most likely 525f, but if it can go to 550f, do it!). Let the oven preheat for 45 minutes before starting to shape the dough. Use any high-quality crushed tomatoes like Sclafani, Cento, or Stanislaus. In the pic below I’m holding a large 105 ounce can of 7/11 tomatoes by Stanislaus. Taste your tomatoes and if they need it, add a bit of salt. I normally add a 1/2 teaspoon of kosher salt to 28 ounces of 7/11. All brands will have different sodium levels so be sure to taste-test. Pro Tip: Open a can and portion out in quart containers, then freeze. When you plan to make a pizza, defrost the tomatoes that morning. Place the tomatoes into a bowl and season with salt to taste.
- Grate the mozzarella cheese on the 1/4″ whole section of the grater. Cover the cheese and set it aside. For a 15-16″ pie you will need about 10-12 ounces of cheese.
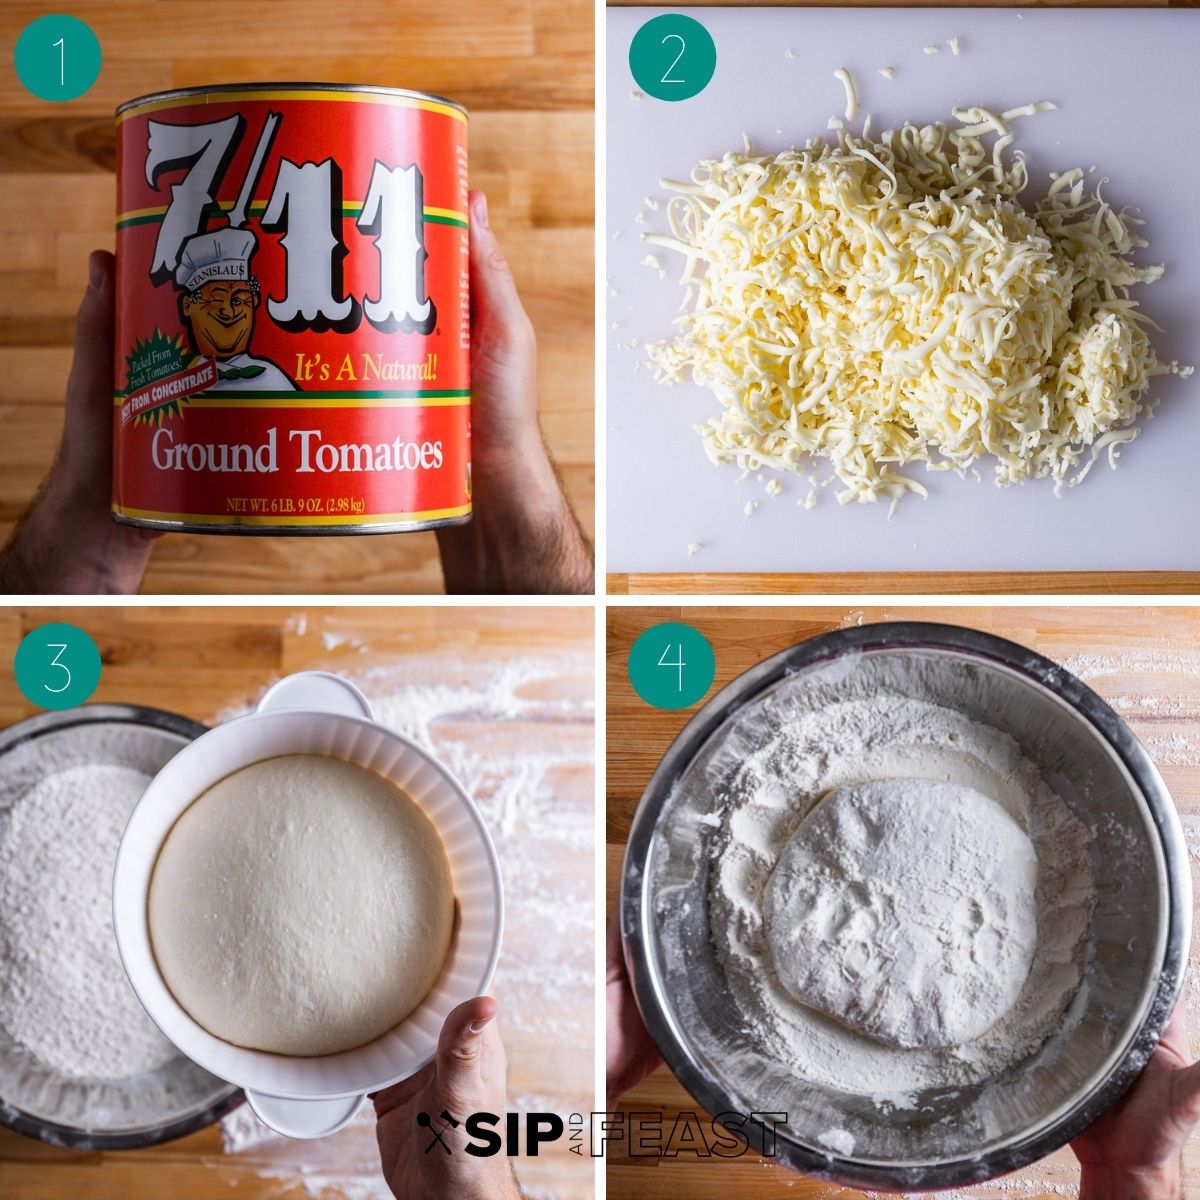
- Grab your dough ball. A bowl scraper works well to remove the ball from the proofing container. You could also turn the container upside down and let gravity take the ball out.
- Drop the dough ball into a large bowl filled with all-purpose flour. Gently turn the dough ball to flour both sides. At this time you can prepare your wooden pizza peel with a dusting of semolina flour or if you don’t have semolina you can use regular all-purpose flour. Keep the wooden peel near your floured work surface.
- Place the dough ball onto a floured work surface (wooden cutting board, plastic cutting board, or granite/marble countertop work well), keeping the proofing container side of the dough ball facing upwards (that is the stickier side of the dough).
- Using your fingers, press down on the dough to begin stretching and increasing the size of the circle. Form a rim trying to keep the dough in a circle. Avoid touching the rim so that it doesn’t degas. Also, avoid flattening the center too much so that when stretching, it doesn’t become too thin in the center. Note: Degassing means that the crust won’t have that airy puffiness. To avoid degassing in general, New York pizza dough should always be hand-stretched and never rolled.
- After you form your rim the dough should be about an 8-9″ circle and will next need to be stretched with your knuckles. Bring the dough with the sticky side facing away from you into your knuckles. Gently stretch the dough to form the pizza.
- Keep rotating the pizza dough as you stretch, maintaining your knuckle placement on the perimeter while trying not to ruin the rim, and gently pull with your knuckles to increase the size of the dough. If you need to drop the dough, place it sticky side up on your wooden peel and not on the floured work surface. Do this so that too much flour doesn’t get on the dough.
- Once you form roughly the 15″ circle place it on the wooden peel.
- You can grab the dough and gently pull it the last little bit into the desired size. Just try your best to not touch the rim. When satisfied with the pizza dough’s shape make sure it moves. NOTE: This is very important. If the pizza doesn’t move easily on the peel, lift up the side that’s sticking and shake more semolina flour onto the wooden peel. Test again and make sure the pizza slides well before moving onto the next step.
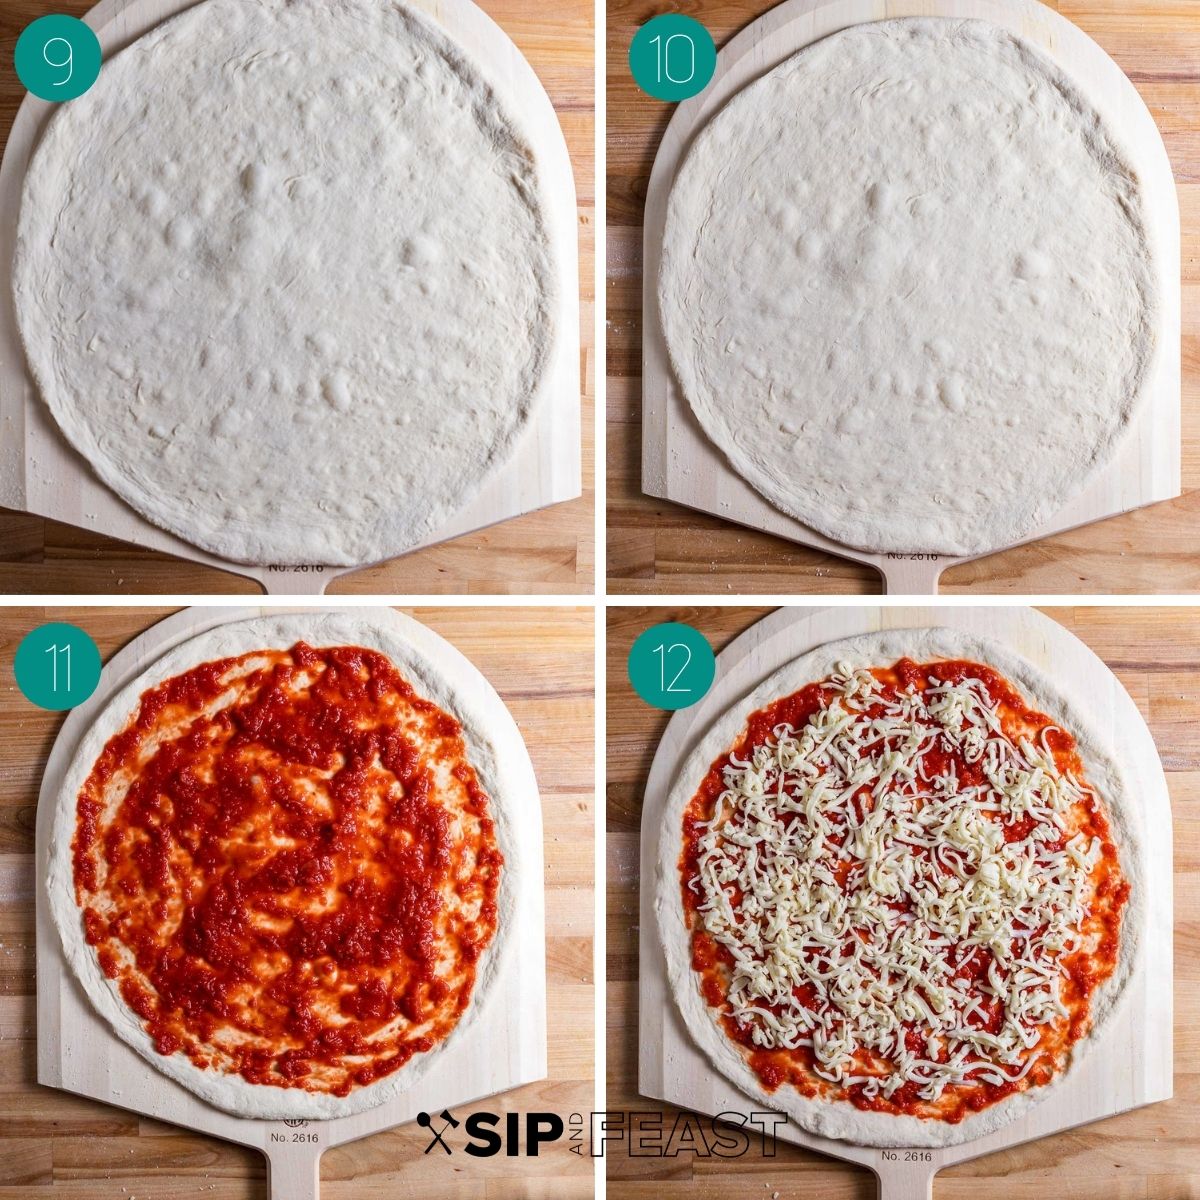
- Now it’s time to add the tomatoes. With a ladle, spread the tomatoes evenly. If you’re having a hard time getting the tomatoes distributed evenly, use a brush. A thin layer of tomatoes up to the rim is desired (about 8-10 ounces of tomato for a 15-16″ pie)
- Next, add the mozzarella cheese evenly. You’ll need about 10-12 ounces of cheese. At this time, add a couple of tablespoons of Pecorino Romano cheese and a half teaspoon of dried oregano evenly to the pizza.
- Make sure the pizza moves freely by gently lifting the peel and moving it back and forth.
- Now it’s time to launch the pizza! Using a digital infrared thermometer, check that the steel is about 600f. NOTE: A 550f oven will be able to get the steel to about 615f while a 525f oven might only reach 585f or so. You will be fine either way.
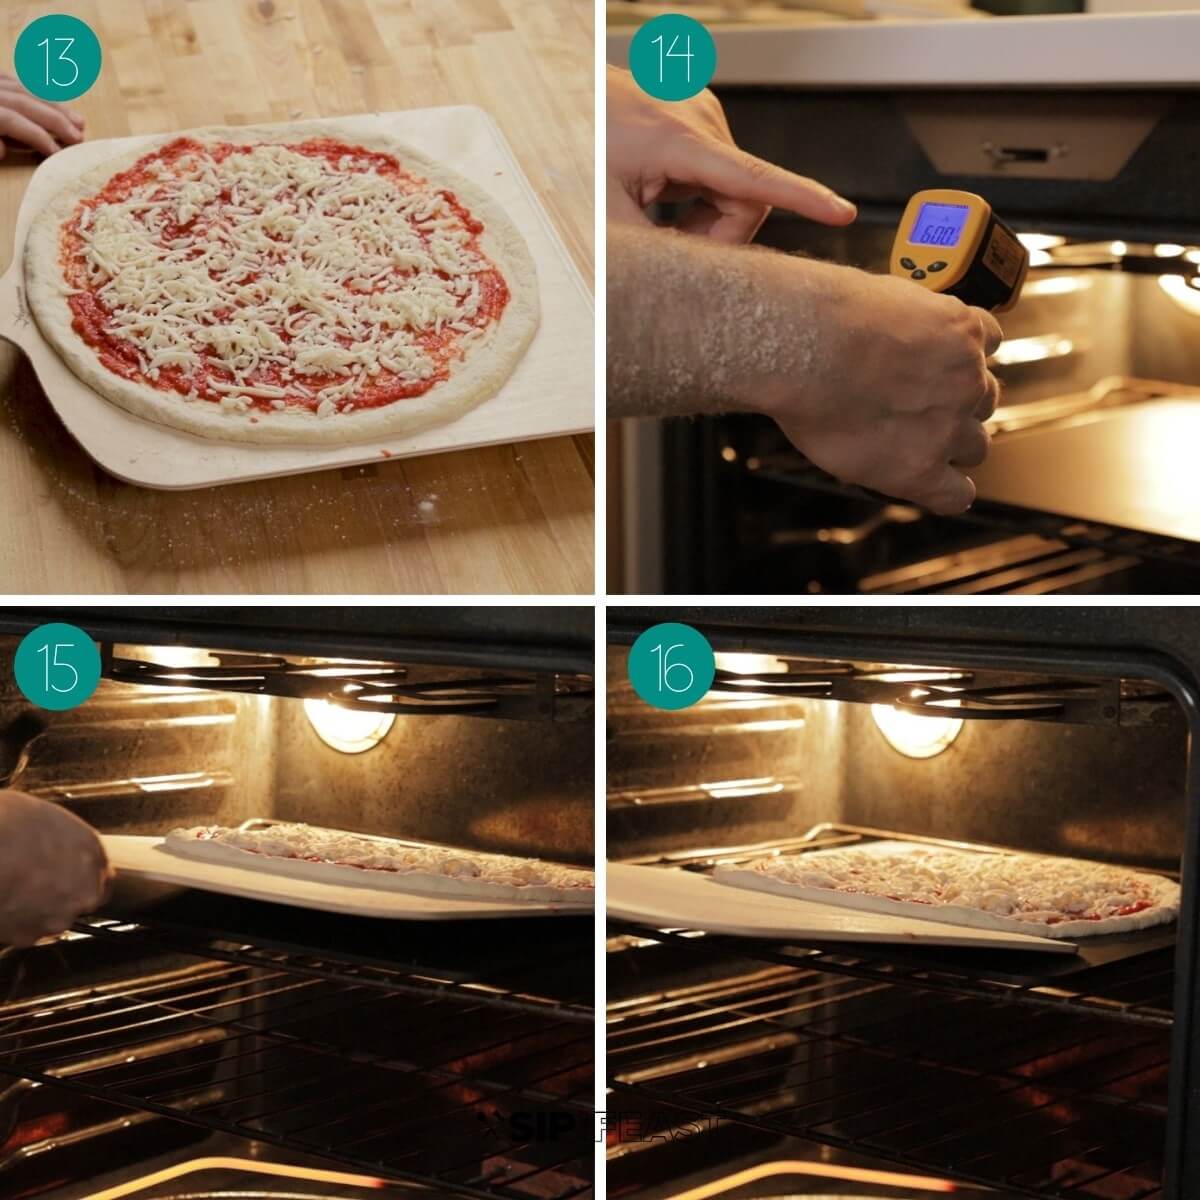
- Open the oven and launch the pizza by tipping the wooden peel towards the back of the steel.
- Give the peel just a little shake and pull motion, to slide the peel out from under the pizza and successfully land the pizza onto the steel. If the pizza deforms a bit don’t try to correct it. Just close the door and chalk it up to practice.
- Set a timer because the pizza will cook fast.
- After 3 minutes open the oven and slide your metal peel (not the wooden peel) under the pizza and rotate it 180 degrees. Close the oven again and cook for another 3 minutes.
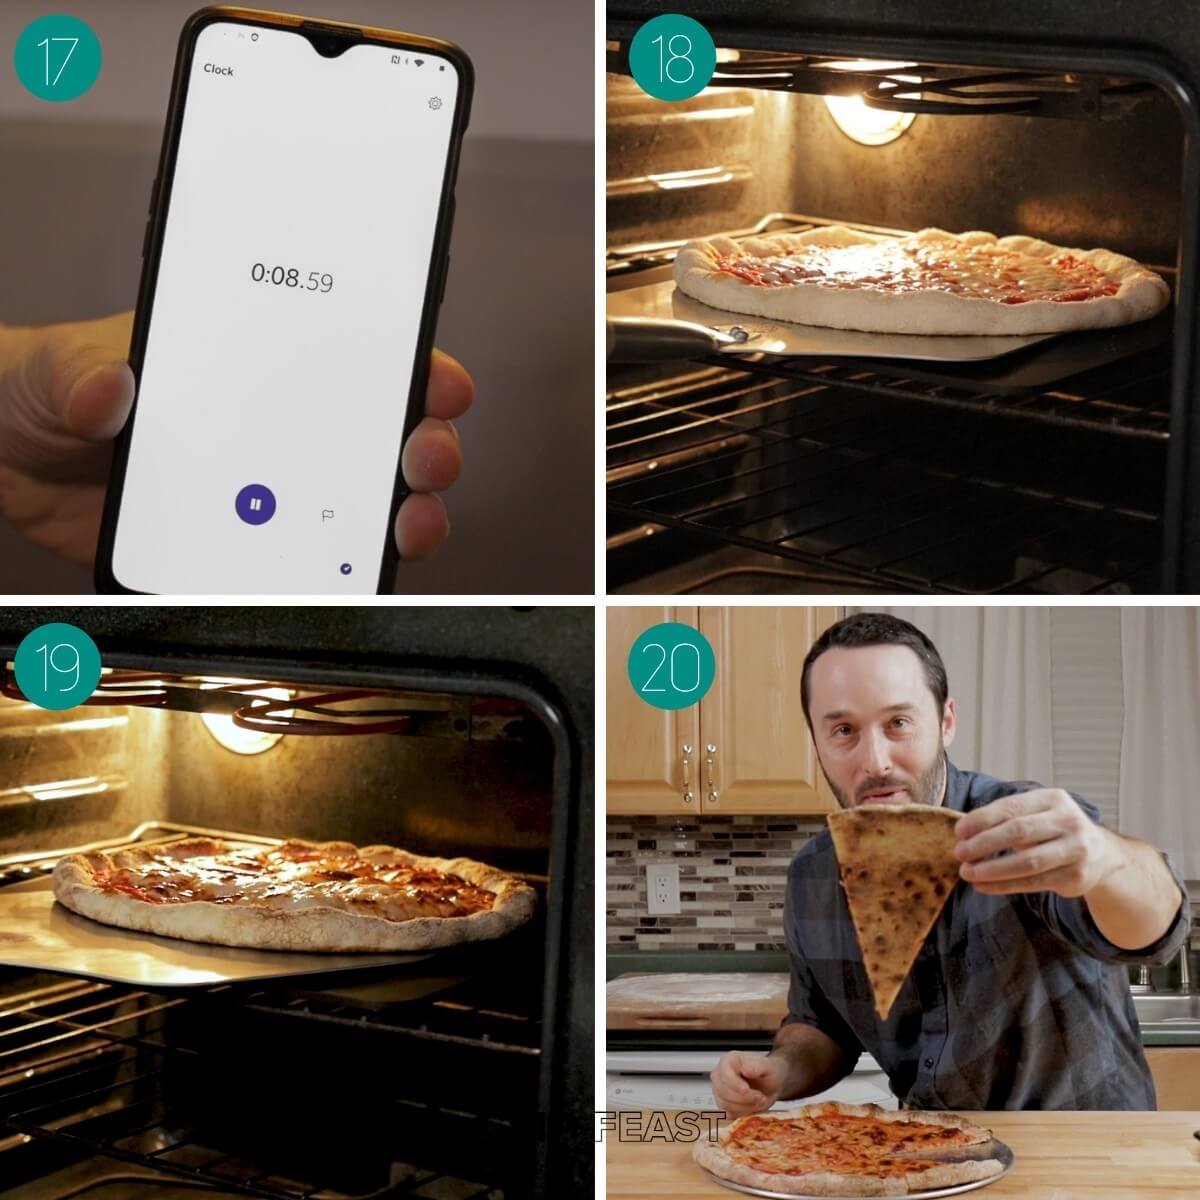
- The pizza will cook in 6 -7 minutes. Watch it carefully during the last minute. If you’re not happy with the top you can broil for like 15 seconds, but be very careful.
- That is the perfect bottom from homemade New York pizza dough cooked on a pizza steel.
I’ve made about 20 YouTube pizza videos. If you are at all intimidated by this process, I really encourage you to watch those videos.
Though I made this post extremely comprehensive, I’m sure I missed things that are just so much easier to convey through video. Shaping the dough is no doubt one example.
Plus I believe the videos show real proof, that this can actually be done at home.
Putting a few pretty pictures on a website and saying it works is a little different than actually showing it works.
I think both methods have value, but the intricate details of making a New York pizza IMO are best shown through video.
What dough hydration level for New York pizza dough?
Dough hydration refers to how much water is contained in the dough. So 1000 grams of flour and 640 grams of water will equal a 64% hydration dough.
Or 813 grams of flour and 521 grams of water will be 64% hydration. The previous numbers are the amounts that this recipe uses for 4 dough balls.
The hydration amount will greatly affect your ability to handle the dough and shape it.
Towards 60% will be easier to shape and stretch a New York round pie, while near 70% would be better for pan pizzas.
Most NY dough will be anywhere from 59% to 65% hydration. Other styles, such as Roman Taglio or Detroit style, will have much higher hydration levels.
Want To Save This Recipe?
The recipe I provide here is for 64% hydration, which is a good compromise. This dough has been tested on hundreds of pies in my home oven, and I have the belly to prove it.
I think 64% hydration is good to use for all New York pizza for most home cooks, however, I do encourage you to experiment with the numbers if necessary.
Baker’s percentages
Bakers percentages will allow you to scale the dough amount up or down depending on how much you need.
To use baker’s percentages you simply divide the amount of flour in a recipe by 100 and then multiply that number by the percentages below for New York pizza dough.
NY pizza dough baker’s percentages:
- 64% hydration
- .4% yeast (SAF instant yeast)
- 2% salt (sea salt)
- 1.2% sugar
- 3.4% olive oil
For example, say you want to make dough with 3000 grams of flour. Divide 3000 by 100, which equals 30. Now take 30 and multiply that by 64 which is our water, or hydration, percentage. The result: you will need 1,920 grams (68.5 ounces) of water.
For yeast multiply 30 by .4. You’ll need 12 grams.
For salt multiply 30 by 2. You’ll need 60 grams of sea salt.
For sugar multiply 30 by 1.2. You’ll need 36 grams.
And finally, multiply 30 by 3.4. You’ll need 102 grams of olive oil.
NOTE: It doesn’t matter what unit of measurement you start with. You could use grams as I did in the above example, or pounds, ounces, etc. It doesn’t matter.
I recommend you use a baker’s percentage calculator to easily calculate the exact amount of dough you’ll need.
To weigh the amounts precisely you’ll need to use a digital scale. It’s an invaluable tool for making pizza dough!
The recipe below in the recipe card will be for four (15-16”) round pies. Each dough ball will weigh ~345 grams or about 12 ounces, but please remember that with baker’s percentages you can make as much pizza dough as you need.
This is the dough calculator I use all the time.
All you have to do is type in the ingredients percentages and the size of your dough ball. The calculator will then give you the gram amounts you need.
It can also give you the amounts in U.S. Customary, but for accuracy, I recommend using grams.

Thickness Factor
Thickness factor, or TF, is the weight of the dough required per square inch of pizza. So for my standard 345 gram dough ball, the thickness factor will be .061 for a 16″ pie.
Use the dough calculator and input the TF and pizza size in inches along with the baker’s percentages to give you the required ingredient amounts.
With the TF number known you can size the pie to fit any pan you’d like. In the calculator, you change the pan size to rectangular or round. All the TF info is down below in the recipe card.
Using thickness factor will allow you to produce generally the same relative thickness pies over and over again.
It’s not a post-bake measurement. If you change the way you proof or handle the dough, the pies can turn out very different, so keep that in mind.
But if you develop a good consistent technique for making pies and opening your doughballs you can use TF to size up or down your pies and achieve consistent results.
If you make the same size pies and are happy with them, you don’t have to worry about TF. In fact, if you just use the same size dough balls from the recipe card below, you don’t even have to use the calculator.
Do you need a Kitchen Aid mixer for NY pizza dough?
You absolutely do not need an electric mixer. I often mix pizza dough by hand.
Every video I’ve made at the time of this publication has been mixed by hand.
I like to demonstrate techniques with the least amount of specialty tools.
Also, If I’m mixing more than can fit in my Kitchen Aid it’s easier to just do one large batch by hand.
There is no downside to mixing by hand! There’s actually an upside: hand mixing burns calories, which means you can eat more pizza!
Mixing it by hand is as simple as mixing together the dry ingredients in one bowl and pouring the water (plain cold tap water, since we are using instant yeast) into another larger bowl.
Slowly add the dry ingredients into the water-containing bowl and mix to form a rough shaggy dough. All you have to do is place the roughly formed mass of dough onto a large cutting board and start kneading.
If you want to use a Kitchen Aid, fit it with the dough hook and keep the total amount of flour at no more than 1200 grams.
I like to place all the water and half the dry ingredients into the mixer and mix on low or the 1 setting for 1 minute or until incorporated.
Next, slowly add the remaining flour and the olive oil and continue to mix for about 4 minutes longer still on setting 1. Remove from the mixer and hand-knead for at least 1 minute.
The kneading process
Kneading is the process that creates strength in the dough’s gluten network.
For the New York-style homemade pizza dough, and especially a regular New York slice, hand kneading is essential. Knead the dough for at least 5 minutes, but do 7 minutes if you can.
Kneading is as simple as pushing the dough away from you, in a folding motion, with downward force on the cutting board using the palm of your hand.
Rotate the dough 90 degrees and repeat. Just do it over and over again.
After a bit of kneading the dough might get too sticky.
If that happens, just completely cover the dough with plastic wrap or a clean inverted mixing bowl. Wait 30 minutes then return to kneading for the remaining amount of time.
For example, if you were able to knead for 3 minutes, but then had to cover due to stickiness, knead for at least 2 minutes more after the 30 minute covering.
Once the dough has been kneaded and is smooth, cover again for 30 minutes and wait.
After 30 minutes the dough can be divided and balled. To divide, cut off and weigh out a 345 gram (~12 ounce) chunk (for 15-16″ NY rounds) and cover the rest of the dough temporarily with plastic or the inverted bowl again.
Balling the dough
To ball the dough, fold the dough onto itself repeatedly. The dough will get tighter and tighter and the dough ball will become round.
Pinch the bottom of the ball where the seam is to close it up and place the dough ball into an oiled plastic container seam side down (about 1 tablespoon of olive oil spread all around).
I strongly recommend using a plastic container for NY rounds, since being able to remove the dough ball without degassing it is a critical step.
For pan pizzas, such as Sicilian or Grandma, where pulling the dough ball out of the proofing container without degassing is not critical, the dough balls can be placed in round aluminum oiled proofing containers.
For both containers, I like to add a piece of plastic wrap first, then the cover before refrigerating.
Cold fermenting the dough
By now you’ve heard me mention “cold-fermenting” numerous times.
Cold fermenting is the process of letting the dough slowly proof and gain flavor in the refrigerator.
The cold fermentation process slows down the yeast activity, which gives the pizza that quintessential NY flavor. I told you it wasn’t the water.
I have never made a really good homemade pizza until I started cold fermenting my dough.
I used to think I did, but that all changed after I started cold-fermenting. The contrast is so stark.
We ordered a pizza from a local pizzeria recently and it was not good.
Friday nights tend to be popular for pizza orders, so perhaps they ran out of dough and mixed up a quick batch with a lot of yeast to compensate for the number of orders.
I was able to tell by the taste that the pizza had not gone through the cold ferment process. I can’t blame them, when was the last time you ever went to a pizzeria and they were closed because they ran out of good dough?
I live near some of the best pizza places in the country and have tried some of the most famous ones in the city, Brooklyn, Queens, and even New Haven, Connecticut.
I’ve done many taste tests of my dough versus some of the best places in the world and the taste is just as good. Many times it’s better.
I need to stress this point and I stress it hard in all my Pizza Videos.
Please. Cold. Ferment. Your. Pizza. Dough.
And use that dough for all your pizza, rolls, calzone, and garlic knot recipes. You won’t be disappointed.
How long to cold ferment pizza dough?
You can cold ferment the dough for days, but even just 12 hours in the fridge will yield an amazing-tasting pie.
The sweet spot is around the 48-hour mark. I’ve made pizza with 5-day dough and it’s been excellent.
Launching the NY pizza pie
Launching is the process whereby the pizza is moved from a wooden peel to the oven deck.
We use a pizza steel to simulate a deck oven.
In a perfect world, the pizza slides off the peel effortlessly and maintains its perfectly round shape.
Almost all pizzerias in the NY metro area train their employees to launch pizza.
An employee at a shop is launching dozens of pizzas a day and gets extremely proficient at it very quickly.
Don’t get discouraged if your pizzas deform when learning how to properly launch.
Launching takes practice, and the pizza will still taste good.
Why launch?
Pizza that is cooked directly on a steel forms a far better charred bottom than if the pizza were to be baked in a pan or on a pizza screen.
Screens aren’t really used in the New York area, though I’m sure some places do. They are more popular in other parts of America and at chain pizza shops where training employees to launch is not a priority.
Removing and turning the pizza
When the pizza is launched, you use a wooden peel, but when it’s time to remove or turn the pizza at the halfway point, you’ll want to use a metal peel.
The metal peel is ideal for sliding between the pizza and the steel.
Once removed, place the pizza on top of an elevated wire cooling rack. This helps prevent moisture accumulation which tends to happen if you take a super hot pie and place it directly on a solid pizza pan.
When you’re ready to eat, cut the pie on a large cutting board and serve it on a metal pizza pan. If the pizza gets a bit too cool, just place it on the pizza pan in the oven at 350f for a few minutes to warm it back up.
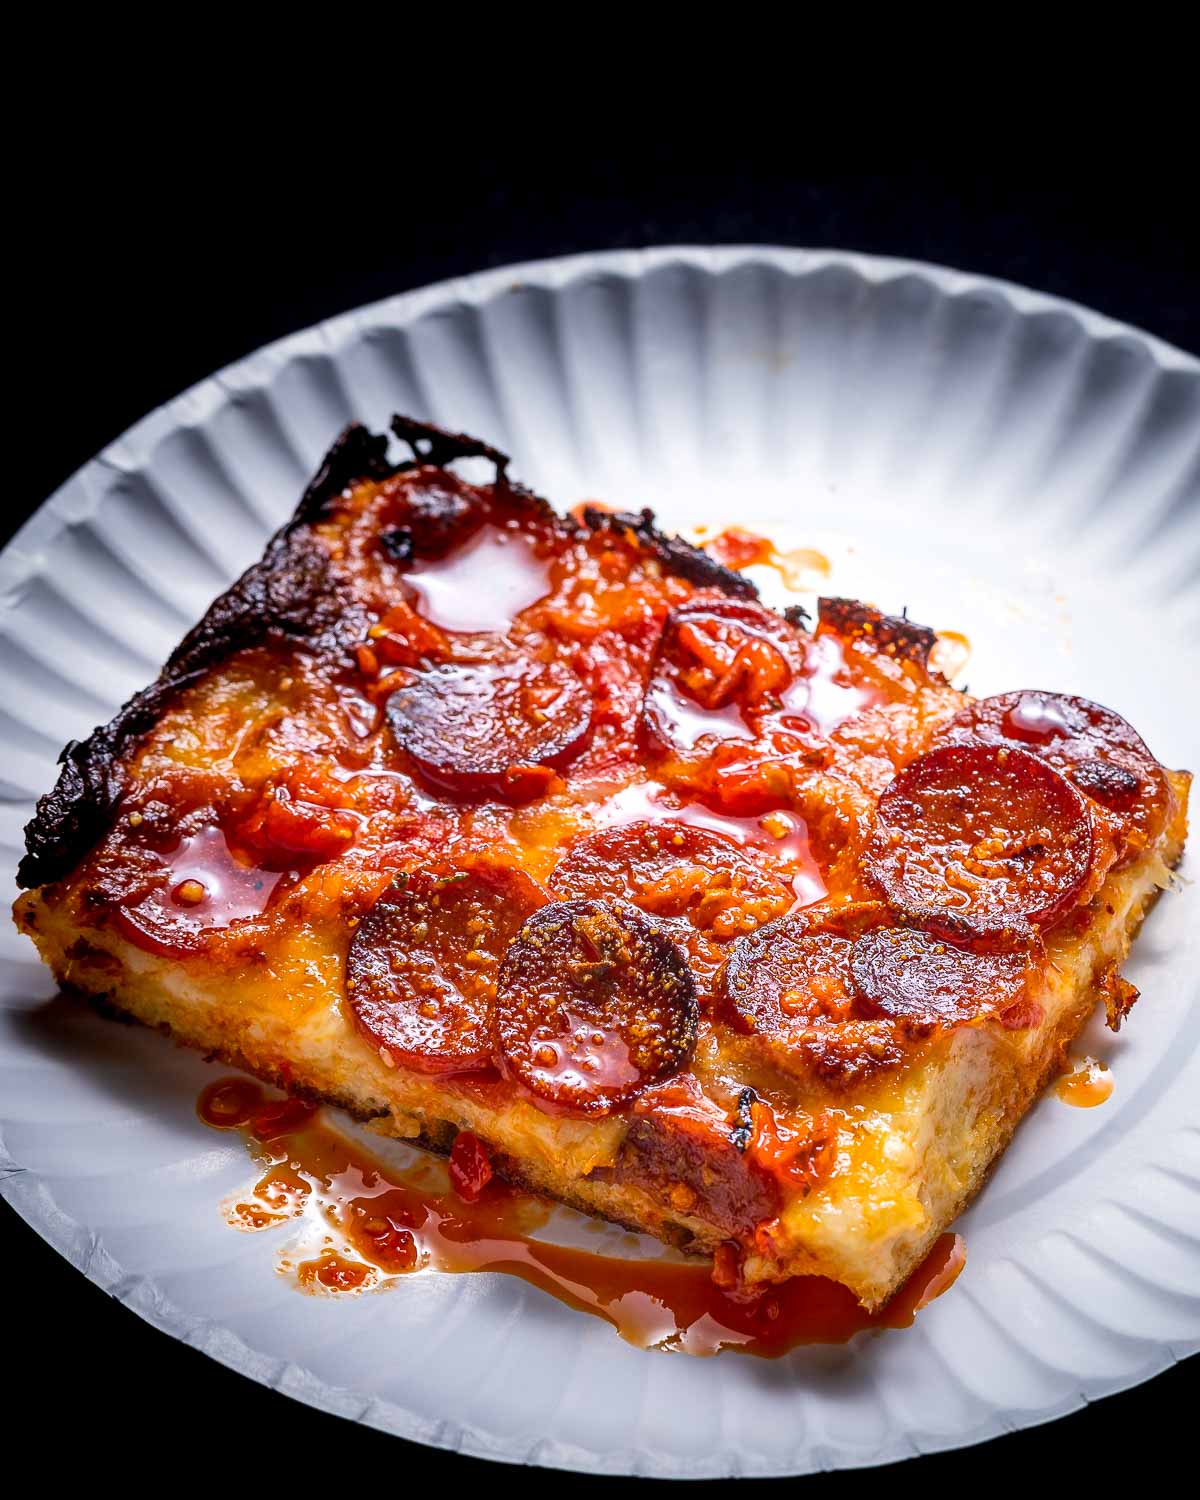
The sheet pan pepperoni pizza directly above is my favorite pizza. And it is also made with this dough recipe!
Putting it all together
Now that you’ve learned the tricks to making an authentic New York-style pizza, I hope you walk away with the confidence to make this on your own.
And remember to use a steel for the best results! Either buy a preseasoned one or follow our DIY pizza steel tutorial.
I’ve been cooking for most of my life and nothing has given me more satisfaction than making pizza, and being able to share my knowledge with you.
As I mentioned, my pizza-making journey has been a labor of love, but this post is meant to be the gateway to making a good New York pizza dough that will yield a great New York Pizza!
This homemade pizza dough recipe can be used for all of the pizza recipes on this site.
Three recipes I suggest you try right away are our New York white pizza, garlic knots, and these delicious pepperoni pinwheels.
Remember, just size the dough according to your needs and the size of your pan. At the time of this writing, there are 20 pizza recipes on my YouTube channel and I will publish many of them here as fast as I can.
If you’ve enjoyed this New York pizza and homemade pizza dough recipe, or any recipe on this site, we want to know so tell us in the comments below. We would love to hear how you did and it’s nice to show others as well. Thanks!
Watch the video below where Jim will show you how to make this recipe with easy-to-follow instructions. Some people learn by watching. If you’re that type of person, you can find most of our recipes on YouTube and our Facebook Page.
Homemade Pizza Dough - New York Pizza

Ingredients
For the dough - makes 4 (345) gram dough balls
- 813 grams bread flour or roughly 6 1/2 cups
- 521 grams cold tap water or 2 1/4 cups
- 3 grams instant yeast or 1 teaspoon
- 16 grams fine sea salt or 2 3/4 teaspoons
- 9.5 grams sugar or 2 1/4 teaspoons
- 27 grams olive oil or 2 tablespoons
For the pizza
- 1 345 gram dough ball
- 10-12 ounces whole milk low moisture mozzarella cheese shredded
- 9-10 ounces crushed tomatoes
- 1 tablespoon semolina flour only for dusting wood pizza peel
- 1/2 teaspoon dried oregano
- 2 tablespoons Pecorino Romano cheese
- 1/2 teaspoon Kosher salt
Want To Save This Recipe?
Instructions
For the dough
- Place the water in a large bowl. Mix together the dry ingredients in a separate bowl.
- Add dry ingredients to water a bit at a time and mix thoroughly with a wooden spoon to form a dry rough mass.
- Pour the oil over the dough, mix it in, and place all the rough dough onto a work surface. A large plastic cutting board works well to avoid any sticking.
- Knead the dough for 5 minutes. If the dough is too sticky, place a clean bowl inverted over the dough and wait 30 minutes before resuming. Return to kneading after 30 minutes and make sure to knead the dough for at least 5 minutes total.
- Place the bowl over the dough once more and let sit for 30-40 minutes to warm up.
- Divide the dough into 4 equal-sized balls, weighing them to ensure they are roughly 345 grams (or 12 ounces) each.
- Pull the dough towards its end repeatedly to form a smooth ball. Pinch the seam side and leave it on the bottom. Place the dough balls into an oiled bowl (use 1 tablespoon of olive oil and wipe it all over the bowl) and cover with plastic wrap. Refrigerate for at least 24 hours before using.
Making the pizza
- Remove the dough from the refrigerator at least 2 hours prior to shaping.
- Add the salt to the crushed tomatoes and mix. Place pizza steel on the second highest rack of the oven. Preheat the oven to the highest temperature for 45 minutes prior to shaping dough. Sprinkle semolina flour onto your wooden pizza peel and sprinkle regular flour onto a large work surface.
- Carefully remove the dough ball from the container, without degassing, and drop it into a large container with flour. Flip the doughball over, then place the dough ball onto your floured work surface with the sticky side up (the side that faced down in the proofing container is the sticky side).
- Begin opening the doughball by pressing down on the dough with fingertips to gently stretch it out. Form an outside crust or rim but don't touch the rim. Leave more thickness in the center of the dough. Rotate the dough (2-3 times) and gently stretch it to make it get larger.
- Bring the dough onto the knuckles of your hands and with the sticky dough side facing up, stretch the dough to form a 15-16" circle. Once the circle is formed place it onto the wooden peel.
- Make any gentle adjustments to stretch the pizza round, being careful to not deflate the rim. Hold the wooden peel and make sure the pizza moves back and forth. If it sticks at all add more semolina flour under the pizza and test again.
- Spread the crushed tomato and salt mixture onto the pizza and then the mozzarella cheese taking care to not touch the rim. Sprinkle the oregano and Pecorino Romano onto the pizza.
- Using an infrared digital thermometer, test that the pizza steel is at least 590f. Once the steel is hot enough carefully launch the pizza onto the steel and close the oven door. Rotate the pizza with a metal peel after 3 minutes and remove with the metal peel when done (approximately 6-7 minutes total cooking time).
- Use a pizza cutting wheel to cut the pizza into 8 slices and enjoy your homemade New York pizza!
Notes
- For Kitchen Aid mixer - combine water and half the dry ingredients and mix on speed setting 1 with a dough hook. Slowly add the remaining dry ingredients then the olive oil and mix for 4 more minutes on speed 1. Remove dough and hand knead for 1-2 minutes then ball.
- Calorie info is for 1 New York pizza.
- It is recommended to use a pizza steel. If using a pizza stone, the cooking time will be longer by about 3-4 minutes.
- This dough recipe makes 4 (345) dough balls for 15-16" round New York pizzas.
- Balling the dough tightly is most important for New York rounds.
- Mixing "Instant dry yeast" with salt does not retard yeast growth.
- The thickness factor (TF) for 14-16" New York round pies are .08 to .061
- Freezing - The dough balls can be frozen for up 3 months. First cold ferment your dough for at least 24 hours, then wrap tightly in plastic wrap, and freeze.
- Leftovers - Can be stored in the refrigerator for up to 3 days and in the freezer for up to 3 months. Reheat pizza in the oven at 350f until warm.
Nutrition
Nutrition information is automatically calculated, so should only be used as an approximation.
Follow Me
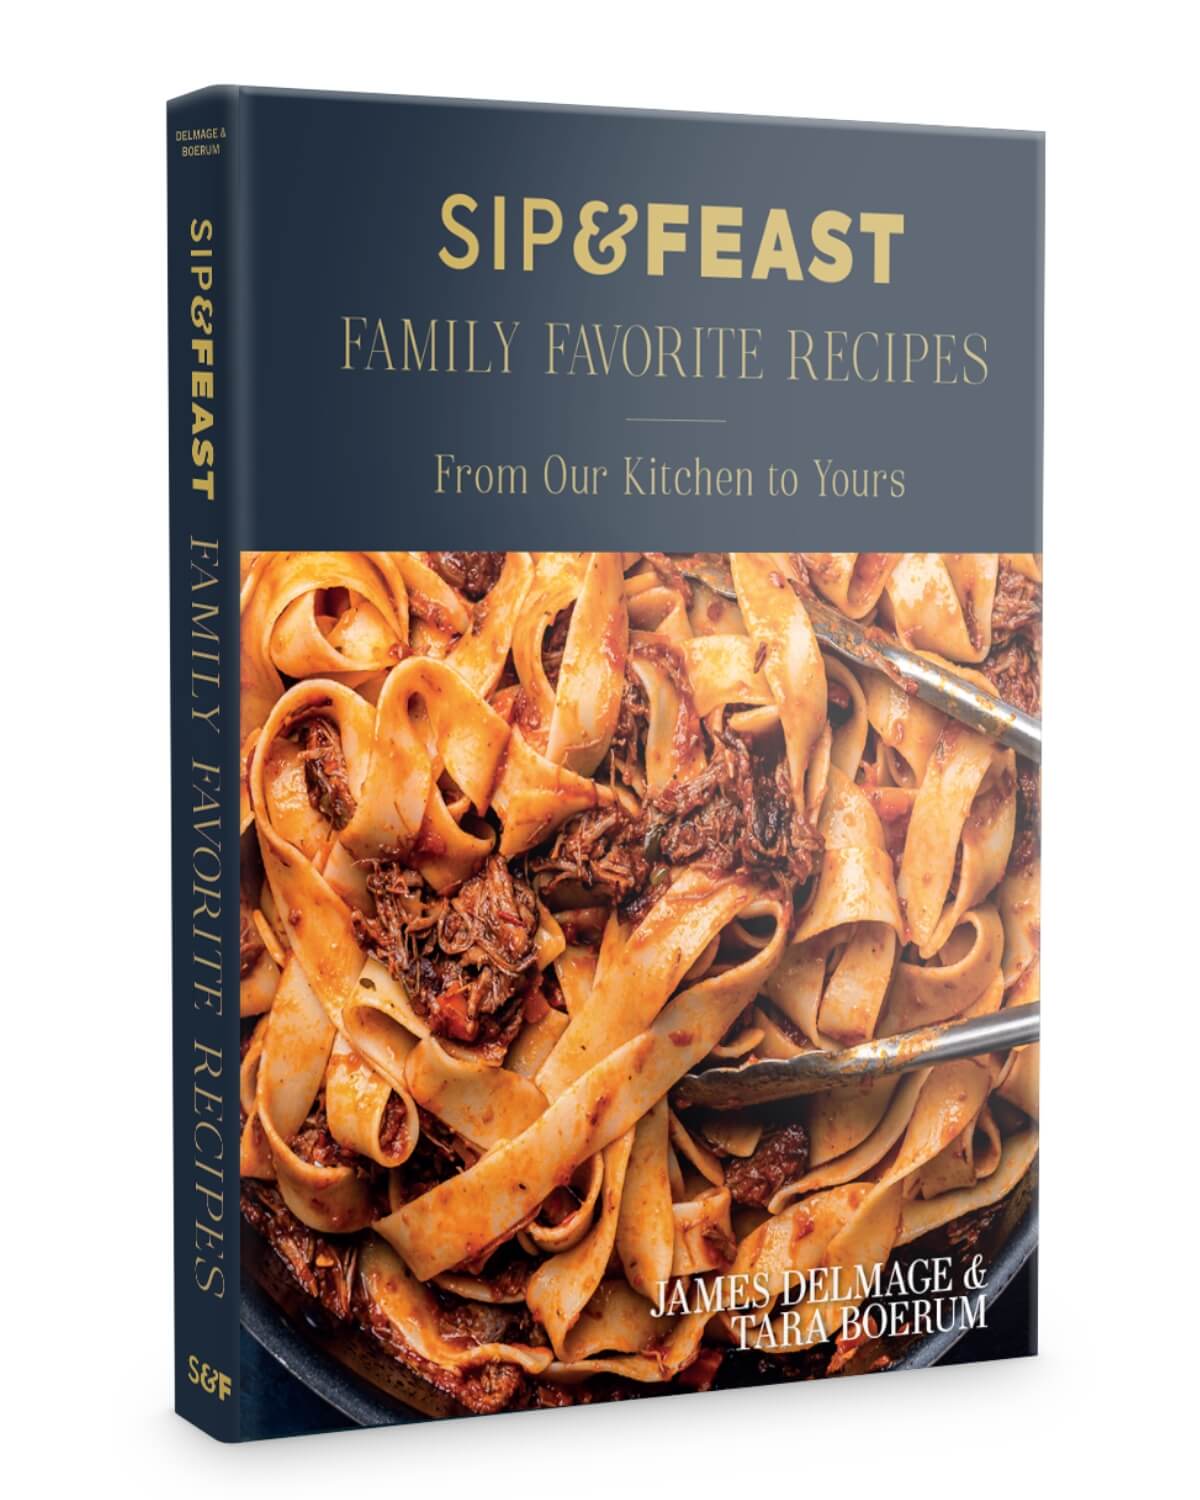
The Sip and Feast Cookbook
- 100+ recipes
- Essential tools and ingredients
- Entertaining ides
- Stunning photography


This is the best pizza recipe EVER!!
The recipe is literally so easy to follow and in the end you will not be disappointed. Even though it does take longer than a conventional pizza it is well worth the wait. After having made this at home I can never go back to regular pizza again. I’m excited to keep playing with the toppings and changing it up. Thank you so much for sharing this recipe, it truly takes me to a NYC pizza shop! Thank you for all the ingredient recommendations as it really helped make everything simple and easy to follow.
Hi Sofia, I’m so happy you enjoyed the pizza recipe. Thank you so much for the comment and I hope you continue to enjoy with the different toppings, etc.!
I’ve tried this recipe once with a baking steel and indoor oven set at 550. I want to try it in our outdoor wood fired oven. Should I use a baking steel or just the oven floor as I do for Neapolitan style pizzas. Also what is a good oven temp? I can get the outdoor oven up to 900 degree but am guessing that’s too high for a NY style.
Hi there, you can do this on the floor of your wood oven, but I’d shoot for the same temp – roughly 550 – 620 or so. If your heat goes higher you may have a problem with the flour though as a different type of flour is needed for the wood fired ovens. All this being said, I haven’t tested this recipe at all in a wood fired oven. If I was going to do this for an outdoor wood oven, I’d start with Caputo OO.
You have become my one of my best friends over night. Others have said this in the comments. I am a NJ boy, now living in Texas, going on 68 years old. Although Texas is the place for me, it is not the place for Pizza (a couple of places with NY/NJ “style” and although good, not nearly as good as any number of pizza parlors that I grew up with). I’ve resorted to making it myself. I’ve been building upon some recipes I’ve gathered, but your writeup here is by far, the best. I appreciate the detail you’ve provided, including insights into how commercial establishments make their pizza, what ingredients they use, and where a low life like me can buy the same ingredients they use in bulk. I appreciate it so much, I would have paid good money for your knowledge. I feel I should print this out and lock it away in a safe for good keeping. You go through ever step. Mixing, kneading, launching, balling. If I ever meet you someplace, let me make you a pizza. That you.
Hi Richard, wow, thank you so much for this amazing comment. I really appreciate the kind words and and thrilled you enjoyed the pizza recipe!
Jim,
Everyone I share this recipe with absolutely loves it! Question is, you need to take the dough out of the fridge 2 hours before you bake, can it be longer than that? For example, can you take it out in the morning before work and it still be good to bake that night for dinner? Thanks again for all of these great recipes!
Hi Tom, You can do it a little longer than 2 hours, but I wouldn’t do it for the full day. When the weather is colder you can go for longer, but in the warmer months it needs less time. The risk you run by having it out too long is it can collapse. Hope this helps and so happy you’re enjoying the recipes!
Hi Jim,
I know that your recipe uses bread flour. Is there any different measurements if using the Italian “00” flour? And if your using a wood fired pizza oven should the hydration level be different. Thanks!!
Hi Dino, I haven’t tested the recipe using 00 flour so can’t say for sure. This recipe was created for a home oven – wood fired pizza ovens get much hotter and would likely require changes to the recipe but I haven’t tested myself. I am hoping to have a wood fired pizza oven at my home soon but until then I can’t test a recipe for one.
Jim,
Thanks for your response. First off your recipe for dough is by far the best I’ve made so far. I made it with “00” flour and bread flour. Both were very good. The “00” stretched a bit thin but I’m not sure if it was because I had the dough out too long, about 4 or so hours. The bread flour came out perfect. The crust was amazing and my family commented on how good it was.
Can’t wait till you get a woodfired oven to test recipe. Thanks!!
Thanks, Dino. I’m so happy you used the recipe and had success with it!
Your video for NY style pizza changed my life—been trying to make pizza for years with limited success. All those little details are so important. Thank you! Thank you!
Hi Nick, thanks for the awesome comment. I’m so happy to hear you’ve had success with this recipe and really appreciate the review!
Never had anyone show step by step the way you did. Love how you teach us better and easier ways to cook Italian. I will never be able to thank you enough. If you and your lovely wife ever want to adopt another family member, my two Pomeranians and myself would gladly volunteer 😆. I will always be an honored student of yours. Have an amazing day.
Hi Diane, thank you so much for the very kind words. We are so happy to hear you find our recipes to be helpful. We hope you have a great day too!
Hello Jim,
Just made pizza last night with your dough recipe, made dough 2+ days in advance
It was by far the closest I have had to new York Pizza since I left The Bronx some 40 years ago!! I have tried so many and none were even close to this. I made them in my outside Pizza Oven with custom 3/8″ steel plates and gas attachment next time I will try wood. I have tried so many recipes and none were even close to yours nice crisp, thin brown crust the way I remember..
This Pizza Dough recipe will be what I use from now on!!
Thank You
P.S. Loving the rest of your recipes reminds me of when I was growing up Bronx style…Next I will try the Sicilian Meatballs when i was a teenager I worked in The marina Del Rey Throggs Neck the owner would make them for us every now and then, I haven’t had them since.
Hi Scott, I’m so happy to hear you enjoyed the pizza recipe and that you feel it’s pretty close to the pizza you were used to. Thanks for the great comment and review, very much appreciated! Let us know how the Sicilian meatballs turn out.
Hi Jim-
A big thanks to you and your family from me and mine. I am now obsessed with making pizza! Perfecting my pizza making with your recipe has become my new hobby. I love having people over to make them the most delicious pizza and my results are just getting better and better with practice. I’m from Levittown, Long Island so all of your recipes are resonating with me, but especially the pizza. I had all my siblings over for pizza on Christmas eve–what a fun and interactive holiday meal it was. Thank you so much for this and so many other recipes. Tonight I’m making chicken riggies. I have no doubt it will be delicious!
Hi Marybeth, what a great comment, thank you! I’m so happy you’re enjoying making the pizza with your family and hope you love the chicken riggies too!
Do you have instructions on any of the dough recipes for using a food processor?
Thanks!
Hi Natalie, no, I haven’t tested any of my dough recipes with a food processor.
I’m trying this for the first time. Wish me luck lol
Hi Cindy, hope you enjoyed it! Thanks for the comment!
I’ve got this dough fermenting to make pizza tomorrow. Very pleased with the way it has come together so far. I have never been successful at thin crust, only deep dish. I have every confidence your recipe will end my thin crust drought. Thanks for all your hard work. I’ll let you know how they turn out.
Hi Dee, I appreciate the comment and wish you success with your pizza! Let us know how it turns out!
Very confused right off on the measurements. 813 grams does not equal 6+ cups of flour. It’s more like 3.43 cups. Which is right? Should we go by the grams listed or next measurement listed? Thanks.
Hi Steve, I’m not sure what tool you’re using to convert grams to cups, but we use King Arthur’s conversions and based on 120g of bread flour equaling 1 cup of flour, that is where we get the “roughly 6 1/2 cups” that’s listed in the recipe card. For pizza making and for baking in general, we recommend using a digital kitchen scale and using grams since it will be exact every single time. Cups and other volume measurements can change based on the cups being used, if the person measuring is compacting the flour into the cup, etc.
Great dough recipe! Probably the best dough I’ve ever made. Instead of brushing the pie with water, I brushed it with a mixture of heavy cream and garlic powder which turned out great and nicely incorporated the garlic power. I also cooked it on the lowest setting of my ooni, which took about 7 minutes. Great stuff.
I really appreciate the comment, Maggie, and so happy to hear you had success with the dough. Thank you!
This pizza series and instructions are great!!! I have learned so much and have been making pizza w different dough recipes and methods for a long time… the specific directions such as how to “launch” the pizza., and the pizza steels needed were so enlightening. My husband prepared the pizza steel for us even the direction of 7 ” away from top of oven was so helpful ….this positioning is something I’ve always struggled with. With this info my grandson came over and we had a great (and successful) pizza making experience… he knows pizza ( born in east Boston) I rarely write reviews but felt like I owed you for all the valuable instructions. Thanks again! I’ll keep reading and watching!!
Hi Ann, so happy to hear you enjoyed the pizza series and that you found it helpful. Thanks for the comment and feedback!
Hi! I was wondering if you could half this recipe for me. I’m trying to but it’s difficult. Thank you
Hi Zena, the serving section of the recipe card allows you to adjust the number of servings which will help you decrease or increase the recipe by the desired amount.
I’m a pinch can I only ferment for 12 hours for garlic knots? Or should I use a different dough for shorter fermentation?
Hi Daniella, you can ferment for 12 hours for the knots.
So good, thanks for all the work you do!
Thank you, Josh! So happy you liked this one!
Jim,
Tell about that digital scale you are using in the NY pizza video. It does not resemble the OXO one in your Amazon store.
Anecdote: Between the two Italian bakeries in my neighborhood and my mother’s, I grew up thinking all pizza was square.
Hi Michel. Really any digital scale will work. I bought the OXO after making the video and it seems better quality than the one I used in the video, though they both still work great. I wouldn’t be surprised if my mother thought the same. She always talks about the square pizza she would buy in Astoria when she was a kid.
Best pizza ever! If I use all purpose flour, are measurements the same, e.g. the hydration levels? Thank.
Hi Carolyn, I haven’t tested the recipe with all-purpose flour, but the hydration rate should be the same – the pizza may just be less chewy than if you used bread flour.